Transcription
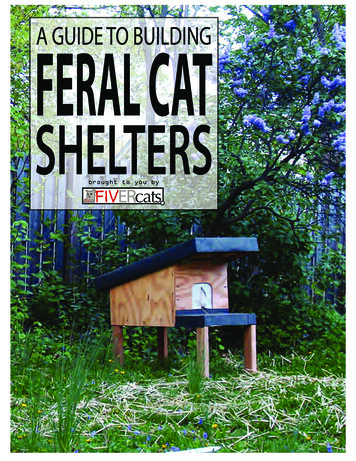
A GUIDE TO BUILDINGFERAL CATSHELTERSbrought to you by
About Community Cat SheltersSeeing community cats outdoors in the elements can beheartbreaking. Of course we would love to bring each andevery kitty safely indoors, but some cats are feral andprefer not to live with people. The neighborhood wherewe live has no shortage of community cats who werespayed or neutered, ear tipped and are cared for byneighbors. One of the main feeding stations for theneighborhood is in our backyard, where we feed anywherefrom 1 to 4 community cats daily. Providing shelter forcommunity cats is important in all seasons, but particularlyas the weather gets colder.Since we took on the responsibility for caring for the cats,it seemed only natural to provide shelter for them as well,but we needed to find the right design.Feral cats require three main principles to feel safe using a shelter. First, the shelter must be dry. Second, the interiormust be warm. Third, the cat must have two ways in and out of the shelter so they don't feel cornered.To keep things dry it is important for the cat shelter to be off the ground and above the probable snow level with awatertight roof. To keep the cat house warm it is stuffed with straw, which the cat makes into its own little nest.Straw is the perfect bedding because it has a very low moisture count and is a good insulator. In particularly coldclimates, Styrofoam sheet insulation can be added to the inside floor, walls and roof to provide extra warmth. Theescape plan is solved by including a front and back entrance built into each cat house.The other consideration that matters less to the cat and more to the cat caretaker is accessibility. For this reason theroof of our cat house design is on hinges and can be opened to change the bedding or to access a cat that is hiding.With these principles in mind, it is possible to make a successful cat shelter out of almost any material or design. Aslong as your cat house is waterproof, filled with dry straw, and has two entrances you can help your local communitycats weather even the harshest winters.The following building plans are available for free to help provide cats in need with shelter. To build these catshelters you will need power tools. If you are unable to build the shelter yourself, we recommend reaching out to alocal carpenter or handyman who likely has many of the materials around from other projects. The shelters built fromthese plans should last for many years. You should clean the shelter and change the straw every year just before theweather turns cold.If you are not able to build a shelter using these plans, there are many other options to purchase cat shelters or builda simple shelter out of Styrofoam or Rubbermaid bins. Alley Cat Allies has an extensive list of cat shelter options at allskill levels as well as pre-made: er-options-gallery/In addition to providing food, shelter and care, the most important way to help cats is to get them spayed orneutered to prevent more homeless cats. The ASPCA has a search tool for free and low-cost spay/neuter optionsnationwide: w-cost-spayneuter-programsFIVER ivercatsinfo@fivercats.com2
GETTING STARTEDMATERIALS:five 8 foot 2x4sone 8 foot 1x3one sheet of 1/2 plywood 4x8 feetone box of 2 1/2 inch coated deck screwsone box of 1 5/8 coated deck screwsone Roll of asphalt roofing materialtwo heavy duty outdoor hingesone hook and latch setESSENTIAL TOOLS:tape measurepencilchop sawcircular sawjig sawcordless drillchalk line4x8 1/2 plywoodcut pattern for cat shelter30 1/2 inch18 inch22 inchfloorpieceroofpiecesidepiece14 inch19 inchfront wallpiececut latersidepiece14 inch19 inchback wallpiececut later42 inch48 inchDraw this cut pattern on your sheet of plywood with adrywall square and a pencil. Use a circular saw to cutout the sides, floor and roof. Leave the front and backwalls uncut. This extra piece will be used at a laterstage of construction.3
Cut four 2x4sat 18 1/2inches foruse as leggsmeasurefrontDrive 1 5/8screwsthroughplywoodinto legsfloorpieceMeasure the spacesbetween the legs.Cut 2x4 pieces tofit openings.measuresidemeasuremeasure4
Drill pilot holes through legs as shown. Secure framing with2 1/2 inch screws through pilot holes. Screw plywood downinto framing with 1 5/8 screws. This should give you a nicesolid base.backviewAttach side pieces as shown.Secure with 1 5/8 screwsMeasure down 1 1/2 inches on the side pieces. Strikea chalk line on the inside of the cat house as shownby the dotted line. This space will accomadate forthe roof lid.5
backviewfrontviewFrame back exit. Measure between side pieces and cut cross brace out of1x3. Level sides and screw in cross brace under the chalk line with 1 5/8screws. Measure between cross brace and floor, cut 2x4s to fit. Drillpilot holes as shown and secure cross brace to framing with 2 1/2 inchscrews. Repeat process with front entrance, but use a 1x3 turned on itsside as a framing footer as shown.backviewfrontviewbackviewfrontviewUse scrap plywood to cut front and back walls of cat house. Measure between framing to determine size. Place wall boards against opening anddraw cat house door with pencil. Cat doors should be 6 inches high and6 inches wide. Front door is flush with the 1x3 on its side. Back doorshould be flush with cat house floor. Drill a starter hole and cut outdoor with jig saw. Attach both walls with 1 5/8 screws.6
Cut 2x4s as shown to frame the roof lid. Attachflush with sides using 2 1/2 inch screws throughframing and 1 5/8 screws through plywood. Whenoutside framing is complete meausre inside lengthand cut 1x3s as shown to fit inside framing. Leaveone inch space between 2x4 frame and 1x3. This gapwill be where the lid fits around the walls of thecat house. Attach with 1 5/8 screws through plywood and 2 1/2 inch screws through pilot holes inframing.two 1x3smark fulcrummark endpiecePlace roof piece temporarily oncat house. Plywood sidesshould fit nicely inside roofframing. Adjust overhang sizeto shelter porch area, but notrestrict hinged movement. Onceyou have determined correctoverhang size place a pencilmark on the inside of the roofframing. Next, mark where theend piece will go as shown indiagram.7
Lift lid off cat house preservingpencil marks. Cut 1x3s to fit between framing as shown. Screw inplace with 1 5/8 screws throughplywood. Use additional 2 1/2 inscrews to toe nail the front piecein place.frontviewAttach two hinges to the front wall at thefulcrum. Place the roof lid back on andline up the 1x3 cross brace with the hinges.Screw hinges into 1x3 cross brace attachingroof.8
Wrap roof lid with roofing material as if wrapping a present. Staple underneath lid neatly. Use roofing materialto waterproof deck area staple neatly as shown in pictures.Attach hook and latch to lid so roof doesn’t fall when youhave the cat house in the open position. Cut pieces ofcanvas drop cloth for use as door. Staple canvas pieces inplace as shown in picture. Fill cat shelter with straw andsprinkle some catnip inside to attract ferals.9
shelters you will need power tools. If you are unable to build the shelter yourself, we recommend reaching out to a local carpenter or handyman who likely has many of the materials around from other projects. The shelters built from these plans should last for many years. You should clean th