Transcription
American Kestrel Nest Box PlanArt GingertPO Box 185West Cornwall CT 06796Updated Spring 2015These plans for the construction of an American Kestrel (Falcosparverius) nest box are based on experience gained during more than thirtyyears of field work in northwest and north-central Connecticut (NationalAudubon Society and individually) with a now successful, well-establishedpopulation of kestrels. It is hoped that the information will be used by raptorenthusiasts elsewhere who are interested in the welfare of this open countryfalcon, whose numbers continue to decline in several regions of NorthAmerica.Notes on Design The side-opening design of the nest box -- with fixed Side Stop -- serves a number of practical purposes.The box is much safer to monitor than if it were top-opening; wood shavings, eggs and nestlings are secure;and adult birds and nestlings are easier to capture for banding and research work. The floor size for this nest box design provides almost 93 square inches, which is close to 50% larger thanthe 8”x 8” floors recommended in the majority of American Kestrel nest box designs available in the literature or online. Having observed breeding kestrels using wood duck boxes in drained beaver swampsyears ago, I realized that more living space was significantly advantageous for broods of five or six nestlingswhich spend up to a month in the nest boxes. Though a 3” diameter entrance hole is standard on many plans, a 3”x 4” vertical oval hole provides moreroom for older nestlings looking outwards from the inside Perch, and may also offer a place for adult malepair-bonding display early in the breeding season.Further notes regarding Nest Box Sites and Installation (choosing good American Kestrel breeding habitat,selecting ideal box locations, and options for safely erecting and monitoring a kestrel box) will be available.Good luck with your own efforts in assisting these beautiful raptors, and I welcome inquiries regardingwildlife management work with American Kestrels.free to distribute with credit to authorArt Gingert PO Box 185 West Cornwall CT 067961
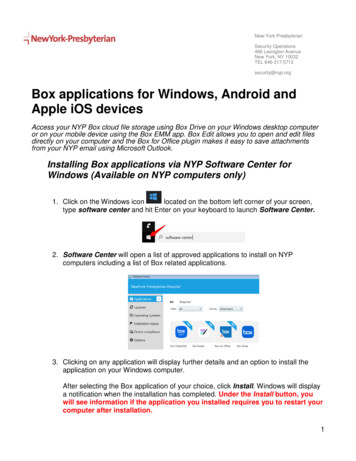
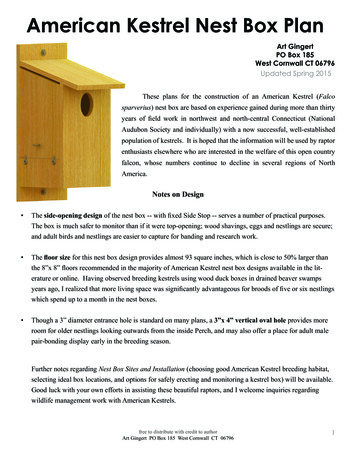
9 5/8”ROOFFIXEDSIDE20”11 1/4”17 3/8”14 1/2”American Kestrel Nest Box Plan15 bevel3 3/4”15 anEYEBOLT3”placementguidelinefor Fixed SideBACK5”45 bevelSIDE STOP9 5/8”26”3 1/2”HINGEDSIDEapprox.12 1/2”1/2”FRONTapprox. 1417 3/8”gleFLOOR45 nippedcorners1 1/2”free to distribute with credit to authorArt GingertPO Box 185West Cornwall CT 0679613/16”6”PERCH2
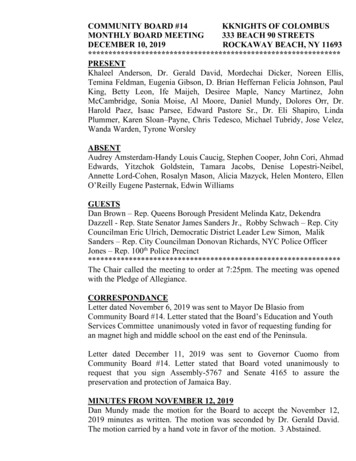
Notes on Materials A great choice for lumber is Type EWP, 1x12 “rough one side” white pine, which is not only easy to workwith, lightweight and quite aesthetic, but also inexpensive. It is most often found in a thickness of13/16”. Approximately 10’ of 1x12 EWP lumber is needed per box, allowing for minimal waste andavoidance of knots, cracks, etc. Average 2015 prices are 1.50 per lineal foot. Cedar is also a good choice,but pricier, and oak, though durable, is heavier than needed. Avoid using 1” rough-cut sawmill pine, whichis much harder to work with and creates a heavy, unwieldy nest box which can be unsafe to deal with duringinstallation on post, tree, or building. For fasteners, Torx-head GRK screws (2” x #8 **Trimhead type) are superb. They are strong, easy to usewith a cordless drill, look good, and most importantly, they will not split the lumber near the ends of pieces(which may happen with standard GRKs, decking screws or nails). Approximately 35 screws per box. The use of a light bead of high quality PL Premium construction adhesive on all joined edges guarantees astrong, weatherproof nest box with tight joints. Do not paint or otherwise treat with a wood preservative. The EWP pine will weather to a warm gray colornaturally and last in all weathers and seasons for several decades, if well constructed. Approximate cost for lumber & hardware materials is 20.00 per nest box, at 2015 prices.Assembly Sequence:1. Attach Back to Fixed Side, then secure Floor toBack and Fixed Side.2. Attach Front (with oval entrance hole and insidePerch) to Fixed Side and Floor.3. Attach Roof to Fixed Side, Front and Back.4. Cut 45 bevel across Hinged Side, check fit, andsecure Side Stop to Back, Front and Floor.5. Finally, attach Hinged Side using hinge nails. Art Gingert/Wildlands Photographyfree to distribute with credit to authorArt Gingert PO Box 185 West Cornwall CT 067963
Construction Notes Quality carpentry in construction is important for many reasons -- for durability, appearance,weather “tightness” and ultimately the safety of the bird species which may use the box. A miter or radial arm saw is quite useful for cutting out nest box pieces, especially for the bevel and anglecuts, and for incidental trimming. Use a table saw to trim some of the 1x12 EWP boards to 9 5/8” as needed(see Nest Box Plan). If a number of boxes are needed, it is helpful to make a “jig” with support rails to assist in securing the Backof the box to the Fixed Side, which is the first step in construction. Drawing a short guideline 3 ½” downfrom the top of the Back is helpful for positioning these two pieces, which ensures adequate space (2 ½”)at the top and bottom of the Back for the lag screws used when mounting the box. The Fixed Side can beinstalled on either the right or left side of the nest box, depending on the terrain at a prospective site or personal preference when monitoring. The Floor piece is inset upwards 1/8” in order to keep rainwater from seeping into the joints. Be sure to testthe fit of this piece against the two sides, for both width and depth, since it may need to be trimmed slightly.Nip off small 3/8” sided triangles from each corner before securing the Floor. This ensures that however thebox is mounted, any rainwater entering the box will find its way out at the lowest corner and drainage hole. A pattern can be made for the 3” x 4” oval entrance hole from wood, cardboard or plastic. A jigsaw can beused to cut out the oval, and 80 grit sandpaper wrapped around a 1” diameter dowel works well as a tool forsmoothing the raw edges. A small Perch piece is very useful, secured horizontally inside the box, centered 2” below the base of theentrance hole. A bead of construction adhesive on the Perch helps it stay in place while the Front is turnedover, braced, and the Perch screwed in place from the outside (using 2 screws, approximately 8” down fromthe roof, and 4” in from each side of box). When securing the Front, carefully align it with the Fixed Side. Trim bottom edge of Front if necessary. Cut the 45 bevel across the Hinged Side, with the cut edge of the upper part overlapping the lower part(shingle-like). Check for good fit with both pieces, leaving a 3/8” space below the top edge of the Front toallow for “hinging” & ventilation. If the Hinged Side is tight and needs trimming along one of its verticaledges, use a pencil with one’s hand inside the entrance hole to mark it. One can also trim the lower edgeof the Side Stop if needed. Secure the Side Stop piece to the Front, Back and Floor. ** It is helpful to drillsmall-diameter pilot holes before installing two or three screws to attach the Side Stop to the Floor. Thisusually prevents any splitting of the Side Stop as drying occurs over time. (Alternately, the Side Stop can bemade from an additional piece of wood, orienting the grain so it is perpendicular to that of the Hinged Side.) The “hinge nails” for the Hinged Side are placed exactly in line with each other – use a combination squareto mark the locations. Start with a mark for the nail on the Front, 2” down from the top. Use a thin woodshim to hold the Hinged Side exactly in place, and a thin drill bit to make pilot holes for two 8 pennygalvanized common nails before hammering them home in turn.free to distribute with credit to authorArt Gingert PO Box 185 West Cornwall CT 067964
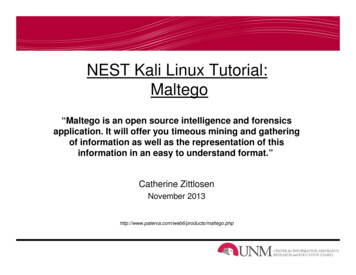
Select a clear piece of wood when cutting out the Roof -- or one with few imperfections -- whichwill help with durability. The Roof is best secured by working from the back of the box. Apply athick bead of construction adhesive to the beveled edge of the Roof and use some force to squeezethe Roof tightly against the Back, creating a totally weatherproof seal which is quite durable in thefield. A high quality caulk (like clear Lexel) could also be used with this step. Start by securing theRoof to the Fixed Side, and then to the Front. Make sure to put several screws through the Back andinto the rear edge of the Roof to ensure a tight, waterproof joint. A 5/16” x 2 ½” zinc-plated (or stainless steel) eye bolt (Stanley Tool Co. #N221-150) provides astrong purchase for opening the Hinged Side, which may be tight in humid weather. Secure the eyebolt with a flat washer and lock nut on the inside of the Hinged Side, 3” up from the bevel cut. A1 ¼” wooden cabinet knob is a nice-looking alternative, though it can dry out and split over time. To fasten the Hinged Side securely, one can use two 1 ¼” galvanized Screen & Storm series HalfTurn Buttons (Stanley Tool Co. #38-0010) at the top of the Side Stop, each placed 2” in from theedges of the box. Mark locations for two, 5/16” box mounting holes at the top and bottom of the Back piece– centered, and 1 ½” in from the edges – and drill them. It is suggested that two 5/16” x 3 ½”galvanized lag screws and washers be used for mounting (use shorter lags for utility poles or barnsides). A single 8 penny galvanized common nail (use thin pilot hole) can be driven into the lower edge ofthe Back piece, near the base of the Fixed Side. Leaving only ½” of the nailhead showing providesa very useful place to hang a small bucket (or stuff sack filled with wood shavings) when visitingthe nest box for monitoring purposes. As the last step in assembly, either PL Premium construction adhesive or clear Lexel caulk can beused to seal any exposed end grain. This is very effective in limiting weathering in these susceptibleareas, and will measurably extend the life of the nest box. Thin latex or vinyl gloves can be wornwhile using a 1” wide putty knife (or fingers) to apply and spread a protective coating on thefollowing: Top and bottom edges of Back and front edge of Roof Bottom edges of Front and Fixed Side Top and bottom edges of the Hinged Side and Side StopIt is also a good practice to seal the exposed edges of the entrance hole, where splitting can occur.Making a quick swipe with the sealant over any knots or small cracks is also recommended. Using EWP pine lumber and GRK Trimhead screws, the completed nest box will weigh 12 to 13pounds. The name or identifying logo of a sponsoring organization can be applied to the Fixed Side of thebox if desired.free to distribute with credit to authorArt Gingert PO Box 185 West Cornwall CT 067965
These plans for the construction of an American Kestrel (Falco sparverius) nest box are based on experience gained during more than thirty years of field work in northwest and north-central Connecticut (National Audubon Society and individually) with a