Transcription
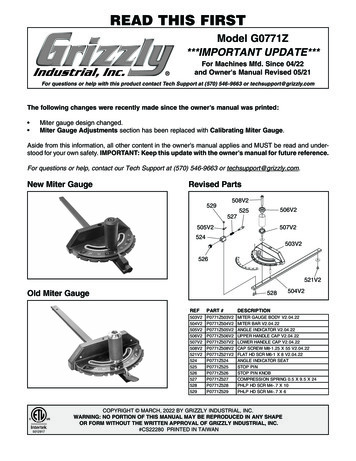
READ THIS FIRSTModel G0771Z***IMPORTANT UPDATE***For Machines Mfd. Since 04/22and Owner's Manual Revised 05/21For questions or help with this product contact Tech Support at (570) 546-9663 or techsupport@grizzly.comThe following changes were recently made since the owner's manual was printed: Miter gauge design changed.Miter Gauge Adjustments section has been replaced with Calibrating Miter Gauge.Aside from this information, all other content in the owner's manual applies and MUST be read and understood for your own safety. IMPORTANT: Keep this update with the owner's manual for future reference.For questions or help, contact our Tech Support at (570) 546-9663 or techsupport@grizzly.com.New Miter GaugeRevised Old Miter Gauge5012917528504V2REFPART R GAUGE BODY V2.04.22MITER BAR V2.04.22ANGLE INDICATOR V2.04.22UPPER HANDLE CAP V2.04.22LOWER HANDLE CAP V2.04.22CAP SCREW M8-1.25 X 55 V2.04.22FLAT HD SCR M6-1 X 8 V2.04.22ANGLE INDICATOR SEATSTOP PINSTOP PIN KNOBCOMPRESSION SPRING 0.5 X 9.5 X 24PHLP HD SCR M4-.7 X 10PHLP HD SCR M4-.7 X 6COPYRIGHT MARCH, 2022 BY GRIZZLY INDUSTRIAL, INC.WARNING: NO PORTION OF THIS MANUAL MAY BE REPRODUCED IN ANY SHAPEOR FORM WITHOUT THE WRITTEN APPROVAL OF GRIZZLY INDUSTRIAL, INC.#CS22280 PRINTED IN TAIWAN
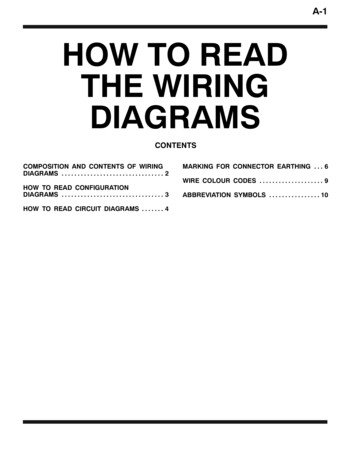
CalibratingMiter GaugeThe miter gauge adjusts between 60 left and60 right. The angle indicator should indicate theangle of the miter body in relation to the blade, butit can be calibrated if these values do not match.Tools NeededQtyPhillips Head Screwdriver. 190 Square. 1— If angle indicator does point to 90 whenmiter body is square to blade, no adjustment is necessary.— If angle indicator does not point to 90 when miter body is square to blade, proceed to Step 5.5.Loosen Phillips head screw shown in Figure3, adjust indicator so it points to 90 , thentighten screw to secure.To calibrate miter gauge:1.DISCONNECT MACHINE FROM POWER!2.Slide miter gauge into T-slot on table.3.Loosen miter handle and pull stop pin knob(see Figure 1).IndicatorMiter HandleFigure 3. Location of angle indicator and Phillipshead screw.Stop PinKnobFigure 1. Miter gauge adjustment components.4.Place square evenly against miter body andblade, as shown in Figure 2.SquareBladeMiter GaugeFigure 2. Miter body square to blade.-2-G0771Z Update (Mfd. Since 04/22)
MODEL G0771Z10" HYBRID TABLE SAWOWNER'S MANUAL(For models manufactured since 04/22)5012917COPYRIGHT OCTOBER, 2016 BY GRIZZLY INDUSTRIAL, INC., REVISED MARCH, 2022 (CS)WARNING: NO PORTION OF THIS MANUAL MAY BE REPRODUCED IN ANY SHAPEOR FORM WITHOUT THE WRITTEN APPROVAL OF GRIZZLY INDUSTRIAL, INC.#KB18420 PRINTED IN TAIWAN***Keep for Future Reference***V6.03.22
This manual provides critical safety instructions on the proper setup,operation, maintenance, and service of this machine/tool. Save thisdocument, refer to it often, and use it to instruct other operators.Failure to read, understand and follow the instructions in this manualmay result in fire or serious personal injury—including amputation,electrocution, or death.The owner of this machine/tool is solely responsible for its safe use.This responsibility includes but is not limited to proper installation ina safe environment, personnel training and usage authorization,proper inspection and maintenance, manual availability and comprehension, application of safety devices, cutting/sanding/grinding toolintegrity, and the usage of personal protective equipment.The manufacturer will not be held liable for injury or property damagefrom negligence, improper training, machine modifications or misuse.Some dust created by power sanding, sawing, grinding, drilling, andother construction activities contains chemicals known to the Stateof California to cause cancer, birth defects or other reproductiveharm. Some examples of these chemicals are: Lead from lead-based paints.Crystalline silica from bricks, cement and other masonry products.Arsenic and chromium from chemically-treated lumber.Your risk from these exposures varies, depending on how often youdo this type of work. To reduce your exposure to these chemicals:Work in a well ventilated area, and work with approved safety equipment, such as those dust masks that are specially designed to filterout microscopic particles.
Table of ContentsINTRODUCTION. 2Machine Description. 2Contact Info. 2Manual Accuracy. 2Identification. 3Controls & Components. 4Glossary of Terms. 5Machine Data Sheet. 6SECTION 5: SHOP-MADE SAFETYACCESSORIES. 46Featherboards. 46Push Sticks. 49Push Blocks. 50Narrow-Rip Auxiliary Fence & Push Block. 51Outfeed & Support Tables. 53Crosscut Sled. 53SECTION 1: SAFETY. 8Safety Instructions for Machinery. 8Additional Safety for Table Saws. 10Preventing Kickback. 11Protecting Yourself From Kickback. 11SECTION 6: ACCESSORIES. 54SECTION 2: POWER SUPPLY. 12Converting Voltage to 240V. 14SECTION 3: SETUP. 15Needed for Setup. 15Unpacking. 15Hardware Recognition Chart. 16Inventory. 17Cleanup. 18Site Considerations. 19Assembly. 20Dust Collection. 24Test Run. 25Recommended Adjustments. 25SECTION 4: OPERATIONS. 26Operation Overview. 26Workpiece Inspection. 27Non-Through & Through Cuts. 27Blade Requirements. 28Blade Selection. 28Blade Installation. 30Blade Guard Assembly. 31Riving Knife. 33Ripping. 35Crosscutting. 36Miter Cuts. 36Blade Tilt/Bevel Cuts. 37Dado Cutting. 37Rabbet Cutting. 39Resawing. 41SECTION 7: MAINTENANCE. 56Schedule. 56Cleaning & Protecting. 56Lubrication. 57SECTION 8: SERVICE. 58Troubleshooting. 58Blade Tilt Calibration. 60Miter Slot to Blade Parallelism. 62Spreader or Riving Knife Alignment. 64Adjusting Fence. 65Calibrating Fence to Blade. 67Fence Scale Calibration. 68Table/Dado Insert Adjustment. 69Calibrating Miter Gauge. 69Tensioning & Replacing Belt. 70SECTION 9: WIRING. 71Wiring Safety Instructions. 71Wiring Diagram. 72Electrical Components. 73SECTION 10: PARTS. 74Main. 74Cabinet. 76Fence & Rails. 77Blade Guard. 78Miter Gauge. 79Labels & Cosmetics. 80WARRANTY & RETURNS. 81
INTRODUCTIONMachine DescriptionManual AccuracyThis hybrid table saw features a powerful 2 HPmotor, steel cabinet-type stand with a 4" dust port,cast-iron trunnions, and a precision-ground castiron table with extension wings.We are proud to provide a high-quality owner’smanual with your new machine!Includes an easy-glide fence, miter gauge, quickrelease spreader/blade guard assembly, and a10" x 40T saw blade.Contact InfoWe stand behind our machines! If you have questions or need help, contact us with the informationbelow. Before contacting, make sure you get theserial number and manufacture date from themachine ID label. This will help us help you faster.Grizzly Technical Support1815 W. BattlefieldSpringfield, MO 65807Phone: (570) 546-9663Email: techsupport@grizzly.comWe made every effort to be exact with the instructions, specifications, drawings, and photographsin this manual. Sometimes we make mistakes, butour policy of continuous improvement also meansthat sometimes the machine you receive isslightly different than shown in the manual.If you find this to be the case, and the differencebetween the manual and machine leaves youconfused or unsure about something, check ourwebsite for an updated version. We post currentmanuals and manual updates for free on our website at www.grizzly.com.Alternatively, you can call our Technical Supportfor help. Before calling, make sure you write downthe Manufacture Date and Serial Number fromthe machine ID label (see below). This informationis required for us to provide proper tech support,and it helps us determine if updated documentation is available for your machine.We want your feedback on this manual. What didyou like about it? Where could it be improved?Please take a few minutes to give us feedback.Grizzly Documentation ManagerP.O. Box 2069Bellingham, WA 98227-2069Email: manuals@grizzly.com-2-Manufacture DateSerial NumberModel G0771Z (Mfd. Since 04/22)
IdentificationBecome familiar with the names and locations of the controls and features shown below to better understandthe instructions in this manual.LeftExtensionWingMiterGaugeBlade FFSwitchMotor CoverBladeTilt LockBladeHeight LockBlade TiltHandwheelFrontFenceRailBlade HeightHandwheelBlade TiltScaleFence LockHandle4" DustPortFigure 1. Model G0771Z identification of main controls and components.For Your Own Safety Read Instruction Manual Before Operating Sawa) Wear eye protection.b) Use saw-blade guard and spreader for every operation for which it can be used, including allthrough sawing.c) Keep hands out of the line of saw blade.d) Use a push-stick when required.e) Pay particular attention to instructions on reducing risk of kickback.f) Do not perform any operation freehand.g) Never reach around or over saw blade.Model G0771Z (Mfd. Since 04/22)-3-
Controls &ComponentsTo reduce your risk ofserious injury, read thisentire manual BEFOREusing machine.B. Blade Height Handwheel: Adjusts bladeheight from 0"–31 4".C. Blade Tilt Handwheel: Adjusts angle ofblade tilt from 90 –45 .D. Handwheel Locks: Lock blade heightand angle when tightened (one on eachhandwheel).DRefer to Figures 2–4 and the following descriptions to become familiar with the basic controls ofthis machine.A. ON/OFF Switch: Starts and stops the motor.The switch can be disabled for safety byremoving the key.BNote: Paddle cover must be lifted to accessON switch.Figure 3. Blade adjustment handwheels andlocks.E.ACFence Lock: Locks fence when pusheddown, unlocks fence when pulled up.EFigure 2. ON/OFF switch.Figure 4. Fence lock handle.-4-Model G0771Z (Mfd. Since 04/22)
Glossary of TermsThe following is a list of common definitions, terms and phrases used throughout this manual as they relateto this table saw and woodworking in general. Become familiar with these terms for assembling, adjustingor operating this machine.Arbor: A metal shaft extending from the drivemechanism which the blade is attached to.Bevel Edge Cut: A cut made with the bladetilted to an angle between 0 and 45 to cuta beveled edge onto a workpiece. Refer toPage 37 for more details.Blade Guard Assembly: Metal or plastic safetydevice that mounts over the saw blade. Itsfunction is to prevent the operator from coming into contact with the saw blade. Refer toPage 31 for more details.Parallel: Being an equal distance apart at everypoint along two given lines or planes (i.e. therip fence face is parallel to the face of the sawblade).Perpendicular: Lines or planes that intersect andform right angles (i.e. the blade is perpendicular to the table surface).Push Stick: Safety device used to push theworkpiece through a cutting operation. Usedmost often when rip cutting thin workpieces.Refer to Page 49 for more details.Crosscut: Cutting operation in which the cut ismade perpendicular to the grain of wood.Refer to Page 36 for more details.Rabbet: Cutting operation that creates anL-shaped channel along the edge of theworkpiece. Refer to Page 39 for more details.Dado Blade: Blade or set of blades that are usedto cut grooves and rabbets. This saw andarbor are not intended to safely use a dadoblade larger than 13 16" wide as specified onPage 7.Rip Cut: Cutting operation in which the cut ismade parallel to the grain of the wood. Referto Page 35 for more details.Dado Cut: Cutting operation that uses a dadoblade to cut a flat bottomed groove into theface of the workpiece. Refer to Page 37 formore details.Featherboard: Safety device used to keep theworkpiece against the rip fence and againstthe table surface. Refer to Page 46 for moredetails.Kerf: The resulting cut or gap in the workpieceafter the saw blade passes through during acutting operation.Kickback: An event in which the workpiece ispropelled back towards the operator, usuallyat a very high rate of speed. See Page 11 forinformation about ways to avoid kickback.Non-Through Cut: A cut in which the blade doesnot cut through the top of the workpiece.Refer to Page 27 for more details.Model G0771Z (Mfd. Since 04/22)Riving Knife: Similar to the spreader however,the top of the riving knife is slightly lower thanthe top of the blade which allows non-throughcuts. See Page 33 for more details.Spreader/Splitter: Metal plate located behindthe blade that keeps the cut workpiece frompinching the blade to reduce the possibility ofkickback. Spreaders will typically have antikickback pawls attached.Straightedge: A tool used to check the flatness,parallelism, or consistency of a surface.Thin Kerf Blade: A blade with a kerf or thicknessthat is thinner than a standard blade. Thinkerf blades cannot be used on this saw without using a thin-kerf riving knife.Through Cut: A cut in which the blade cutscompletely through the workpiece. Refer toPage 28 for more information.-5-
MACHINE DATASHEETCustomer Service #: (570) 546-9663 · To Order Call: (800) 523-4777 · Fax #: (800) 438-5901MODEL G0771Z 10" HYBRIDMODEL TABLEG0771ZSAW WITH T‐SHAPEDFENCE10" HYBRIDTABLE SAWProduct Dimensions:Weight. 286 lbs.Width (side-to-side) x Depth (front-to-back) x Height. 57-1/2 x 37-1/2 x 35-1/2 in.Footprint (Length x Width). 21 x 19-1/2 in.Shipping Dimensions:Carton #1Type. Cardboard Box on Wood SkidsContent. MachineWeight. 330 lbs.Length x Width x Height. 30 x 26 x 44 in.Must Ship Upright. YesCarton #2Type. Cardboard BoxContent. FenceWeight. 41 lbs.Length x Width x Height. 66 x 16 x 6 in.Must Ship Upright. YesElectrical:Power Requirement. 120V or 240V, Single-Phase, 60 HzPrewired Voltage. 120VFull-Load Current Rating. 15A at 120V, 7.5A at 240VMinimum Circuit Size. 20A at 120V, 15A at 240VConnection Type. Cord and PlugPower Cord Included. YesPower Cord Length. 6 ft.Power Cord Gauge. 14 AWGPlug Included. YesIncluded Plug Type. 5-15 for 120VRecommended Plug Type. 6-15 for 240VSwitch Type. Toggle ON/OFF Switch with Stop PlateMotors:MainType. TEFC Capacitor-Start InductionHorsepower. 2 HPPhase. Single-PhaseAmps. 15A/7.5ASpeed. 3450 RPMPower Transfer . Belt DriveBearings. Sealed & Permanently LubricatedModel G0771Z-6-The information contained herein is deemed accurate as of 10/10/2016 and represents our most recent product specifications.Due to our ongoing improvement efforts, this information may not accurately describe items previously purchased.PAGE 1 OF 3Model G0771Z (Mfd. Since 04/22)
Main Specifications:Main InformationTable Saw Type. HybridMaximum Blade Diameter. 10 in.Arbor Size. 5/8 in.Arbor Speed. 3450 RPMMaximum Width of Dado. 13/16 in.Blade Tilt Direction. LeftMax Blade Tilt. 45 deg.Maximum Depth of Cut At 90 Degrees. 3-1/4 in.Maximum Depth of Cut At 45 Degrees. 2-1/4 in.Max Rip Right of Blade w/Included Fence & Rails. 30 in.Max Rip Left of Blade w/Included Fence & Rails. 15 in.Additional Blade InformationIncluded Blade Information. 10" x 40TRiving Knife/Spreader Thickness. 0.090 in.Required Blade Body Thickness. 0.060 – 0.086 in.Required Blade Kerf Thickness. 0.094 – 0.126 in.Rim Speed at Max Blade Diameter. 9025 FPMTable InformationFloor to Table Height. 35-3/8 in.Table Size with Extension Wings Width. 40-1/2 in.Table Size with Extension Wings Depth. 27 in.Distance Front of Table to Center of Blade. 15-1/2 in.Distance Front of Table to Blade At Maximum Cut. 11-1/2 in.Main Table Size Thickness. 1-5/8 in.Fence InformationFence Type. Camlock T-Shape w/Aluminum FaceFence Size Length. 35-5/8 in.Fence Size Width. 3-1/4 in.Fence Size Height. 2-7/16 in.Fence Rail Type. Extruded AluminumFence Rail Length. 64 in.Fence Rail Width. 3-1/8 in.Fence Rail Height. 2-3/8 in.Miter Gauge InformationMiter Gauge Slot Type. T-SlotMiter Gauge Slot Size Width. 3/4 in.Miter Gauge Slot Size Height. 3/8 in.ConstructionTable. Cast IronWings. Cast IronCabinet. Pre-Formed SteelTrunnions. Cast IronFence Assembly. AluminumRails. AluminumMiter Guage Construction. AluminumGuard. Aluminum and PlasticBody/Cabinet Paint Type/Finish. Powder CoatedArbor Bearings. Sealed and Permanently LubricatedOther Related InformationNumber of Dust Ports. 1Dust Port Size. 4 in.Compatible Mobile Base. D2057AModel G0771ZThe information contained herein is deemed accurate as of 10/10/2016 and represents our most recent product specifications.Due to our ongoing improvement efforts, this information may not accurately describe items previously purchased.Model G0771Z (Mfd. Since 04/22)PAGE 2 OF 3-7-
SECTION 1: SAFETYFor Your Own Safety, Read InstructionManual Before Operating This MachineThe purpose of safety symbols is to attract your attention to possible hazardous conditions.This manual uses a series of symbols and signal words intended to convey the level of importance of the safety messages. The progression of symbols is described below. Remember thatsafety messages by themselves do not eliminate danger and are not a substitute for properaccident prevention measures. Always use common sense and good judgment.Indicates an imminently hazardous situation which, if not avoided,WILL result in death or serious injury.Indicates a potentially hazardous situation which, if not avoided,COULD result in death or serious injury.Indicates a potentially hazardous situation which, if not avoided,MAY result in minor or moderate injury. It may also be used to alertagainst unsafe practices.NOTICEAlerts the user to useful information about proper operation of themachine to avoid
Blade Tilt Scale Blade Height Handwheel Blade Height Lock Rear Fence Rail ON/OFF Switch Blade Tilt Lock Blade Guard Motor Cover Fence Lock Handle Miter Gauge Identification For Your Own Safety Read Instruction Manual Before Operating Saw a) Wear eye protection. b) Use saw-blade guard and

