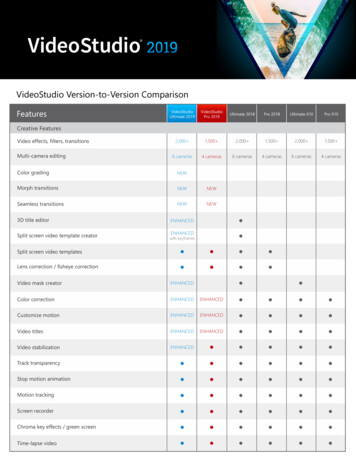
Transcription
Declaration of ConformityFCC WarningManufacturer: InFocus Corporation, 13190 SW 68th Parkway, Suite 200, Portland, Oregon97223-8368 USAThis device complies with part 15 of the FCC Rules. Operation is subject to the following twoconditions: (1) This device may not cause harmful interference, and (2) this device mustaccept any interference received, including interference that may cause undesired operation.Note: This equipment has been tested and found to comply with the limits for a Class B digitaldevice, pursuant to part 15 of the FCC Rules. These limits are designed to provide reasonableprotection against harmful interference in a residential installation. This equipment generates,uses and can radiate radio frequency energy and, if not installed and used in accordance withthe instructions, may cause harmful interference to radio communications. However, there isno guarantee that interference will not occur in a particular installation. If this equipment doescause harmful interference to radio or television reception, which can be determined byturning the equipment off and on, the user is encouraged to try to correct the interference byone or more of the following measures:We declare under our sole responsibility that this projector conforms to the followingdirectives and norms:ErP Directive 2009/125/ECEMC Directive 2004/108/ECEMC: EN 55022, EN 55024, EN 61000-3-2, EN 61000-3-3Low Voltage Directive 2006/95/ECSafety: IEC 60950-1:2005 (2nd Edition) A1: 2009 and EN 60950-1:2006 A11:2009 A1:2010 A12:2011--Reorient or relocate the receiving antenna.--Increase the separation between the equipment and receiver.Trademarks--Connect the equipment into an outlet on a circuit different from that to which the receiver isconnected.Apple, Macintosh, and PowerBook are trademarks or registered trademarks of AppleComputer, Inc. IBM is a trademark or registered trademark of International BusinessMachines, Inc. Microsoft, PowerPoint, and Windows are trademarks or registered trademarksof Microsoft Corporation. Adobe and Acrobat are trademarks or registered trademarks ofAdobe Systems Incorporated. DLP , DLP Link and the DLP logo are registered trademarksof Texas Instruments and BrilliantColor is a trademark of Texas Instruments. InFocus, InFocus, and INFOCUS (stylized) are either registered trademarks or trademarks of InFocusCorporation in the United States and other countries.--Consult the dealer or an experienced radio/TV technician for help.Changes or modifications not expressly approved by InFocus Corporation may void authorityto operate the equipment.CanadaThis Class B digital apparatus complies with Canadian ICES-003. Cet appareil numérique dela classe B est conforme à la norme NMB-003 du Canada.NOTE: This product is covered electrical and electronic equipment under theAgency ApprovalsEuropean Union's Waste from Electrical and Electronic Equipment ("WEEE")Directive (2002/96/EC). The WEEE Directive requires that coveredequipment be collected and managed separately from typical household wastein all EU member states. Please follow the guidance of your localenvironmental authority or ask the shop where you purchased the product forcollection or recycling options.cMETusOther specific Country Approvals may apply. Please see product certification label.This document applies to regulatory models IN112x, IN114x, IN116x, IN118HDx,IN118HDxc, IN119HDx, IN119HDxc.Input ratings: 100-240Vac, 2.6A, 50-60HzInFocus reserves the right to alter product offerings and specifications at any time withoutnotice.1
Table of ContentsIntroductionPositioning the projectorConnecting a computer sourceVGA connectionConnecting powerOptional computer connectionsDisplaying an imageAdjusting the imageConnecting a video deviceVideo device connectionsHDMI connectionComposite video connectionVGA connectionComponent video connectionS-video connectionAudioShutting down the projectorTroubleshooting your setupUsing the remote controlUsing the audioUsing the keypad buttonsOptimizing computer imagesPresentation featuresOptimizing video imagesCustomizing the projectorUsing the menusBasic MenuAdvanced MenuMaintenanceCleaning the lensUsing the security lockReplacing the projection 627313131322
Important Operating Considerations for Safety Refer to this guide for proper startup and shutdown procedures. Follow all warnings and cautions in this manual and on the projector. Place the projector in a horizontal position no greater than 15 degrees off axis. Locate the projector at least 4' (1.2m) away from any heating or cooling vents. Do not block ventilation openings. Locate the projector in a well-ventilatedarea without obstructions to intake or exhaust vents. Do not place the projectoron a tablecloth or other soft covering that may block the vents. Do not place the projector in direct sunlight, humid, greasy or dusty places orin places where the projector may come into contact with smoke or steam. Do not touch or block the projector lens with any objects as this can damagethe projector lens. Scratches, gouges and other lens damage are not covered bythe product warranty.Do not look directly into the lens while the projector is being used. Do not drop the projector. Do not spill liquid on the projector. Spilled liquid may damage the projector. Use the power cord provided. Connect the power cord to a receptacle with aprotective safety (earth) ground terminal. A surge-protected power strip isrecommended. Do not overload wall outlets. When disconnecting the power cord, hold the plug, not the cord. Wash hands after handling the cables supplied with this product. The projector remote control uses batteries. Make sure the batteries’ polarity( /-) is aligned correctly. Dispose of used batteries in accordance with localdisposal laws. Use an InFocus approved ceiling mount kit for proper fitting, ventilation andinstallation. The warranty does not cover any damage caused by use of nonapproved ceiling mount kits or by installing in an improper location. When the projector is ceiling mounted, wear protective eyewear to prevent eyeinjury before opening lamp door. Refer all service to qualified service personnel. Servicing your own projectorcan be dangerous to you and will void the warranty. Only use replacement parts specified by InFocus. Unauthorized substitutionsmay result in fire, electrical shock, or injury, and may void the warranty Only genuine InFocus lamps are tested for use in this projector. Use of nonInFocus lamps may cause electrical shock and fire, and may void the projectorwarranty. Hg – Lamp contains mercury. Manage in accordance with localdisposal laws. See www.lamprecycle.org. The projector uses a high-pressure mercury glass lamp. The lamp may failprematurely, or it may rupture with a popping sound if jolted, scratched, orhandled while hot. The risk of lamp failure or rupture also increases as thelamp age increases; please replace the lamp when you see the “Replace Lamp”message. In the unlikely event of a lamp rupture, particles may exit through the projectorvents. Please keep people, food, and drinks at least 3’ (1m) away from allprojector vents. For ceiling applications, keep people, food and drinks out ofthe "keep out" area under and around the projector, as indicated by theillustration.3’ / 13’8’ / 2.4 m5’m.5/1/1mm3’3’ / 1/1mmFollow these instructions to help ensure image quality and lamp life over the life ofthe projector. Failure to follow these instructions may affect the warranty. Forcomplete details of the warranty, see the Warranty Booklet.3
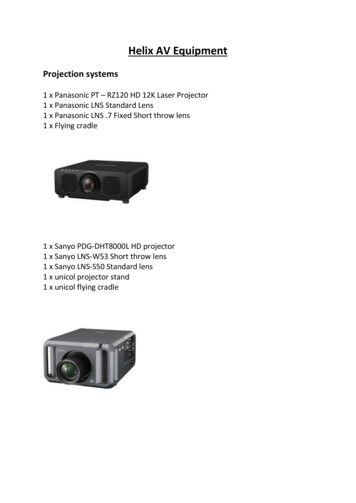
IntroductionIN112x/IN114x/IN116xkeypadYour new digital projector is simple to connect, easy to use, and straightforward tomaintain. It is a versatile projector that is flexible enough for business presentationsand home video viewing too. The IN112x has native SVGA 800 x 600 resolution,the IN114x has native XGA 1024 x 768 resolution, the IN116x has native WXGA1280 x 800 resolution, and the IN118HDx/IN118HDxc/IN119HDx/IN119HDxchave native 1080p 1920 x 1080 resolution. They are compatible with a wide varietyof computers and video devices.lamp coverremote controlreceiver (IR)Product specificationsTo read the latest specifications on your multimedia projector, be sure to visit ourwebsite at www.infocus.com, as specifications are subject to change.zoomlenssecurity barIN118HDx/IN118HDxc/IN119HDx/IN119HDxckeypadlamp coverAccessorieszoomThe standard accessories that came with your projector are listed in the includedQuick Start Guide. Optional accessories can be found on our website atwww.infocus.com/support or at your retailer or dealer.Online registrationremote controlreceiver (IR)Register your projector on our website at www.infocus.com/register to activateyour warranty and receive product updates, announcements, and registrationincentives.focuspower cordconnectorconnectorpanel4lenssecurity bar
Connector panelIN112x/IN114x/IN116x/IN118HDx/IN119HDxThe projector provides both computer and video connection HDx: audio in/outVGA computer (2)Composite videoHDMIS-videoUSB connector for firmware upgrades, mouse control and Screen Save mode.Monitor out, for VGA pass through to an external monitor.Audio inputs for video and computer.Audio output to external speakers.RS-232 serial control. Command control codes are on our support website atwww.infocus.com/support.computercomposite videoHDMIRS232USBsecurity xc: VGA computer (1)HDMIUSB connector for firmware upgrades, mouse control and Screen Save mode.Audio inputs for video and computer.Audio output to external speakers.RS-232 serial control. Command control codes are on our support website atwww.infocus.com/support.audio in/outcomputerHDMIRS232USBsecurity lock5
Positioning the projectorTable 1: IN112x (SVGA)/IN114x(XGA) Screen sizeThrow Ratio 1.9 to 2.09To determine where to position the projector, consider the size and shape of yourscreen, the location of your power outlets, and the distance between the projectorand the rest of your equipment. Here are some general guidelines: Position the projector on a flat surface at a right angle to the screen. The projectormust be at least 39.4” (1.0m) from the projection screen.If you are installing the projector on the ceiling, we strongly recommend usingInFocus approved ceiling mounts for proper fitting, ventilation and installation.Refer to the installation guide that comes with the InFocus Ceiling Mount Kit (p/nPRJ-MNT-UNIV) for more information. The warranty does not cover any damagecaused by use of non-approved ceiling mount kits or by installing in an improperlocation. To turn the image upside down, see “Ceiling mount” on page 28. Werecommend using an InFocus authorized ceiling mount.Position the projector the desired distance from the screen. The distance from thelens of the projector to the screen and the video format determine the size of theprojected image.60 incheshigh imagebottom of image 9inches above centerof lensSize of theProjected ImageWidth(inches/m)Distance to screenDiagonal ScreenSize (inches/m)Minimum distance(inches/m)Maximum �/3.1m228”/5.8m251”/6.4mTable 2: IN116x (WXGA) Screen sizeThrow Ratio 1.5 to 1.8Projection angleDiagonal ScreenSize (inches/m)Size of theProjected ”/3.7m216”/5.5m260”/6.6mDistance to screenMinimum distance(inches/m)Maximum distance(inches/m)lens centerTable 3: IN118HDx/IN119HDx (1080p) Screen sizeThrow Ratio 1.15 to 1.5Minimum Distance toScreenOffsetOffset for 60in. Image39.4"/1.0m15% -5%9"/22.9cm6Size of theProjected ImageWidth(inches/m)Distance to screenDiagonal ScreenSize (inches/m)Minimum distance(inches/m)Maximum /4.1m184”/4.7m240”/6.1m
Table 4: IN118HDxc/IN119HDxc (1080p) Screen sizeThrow Ratio 1.4 to 1.7Size of theProjected ImageWidth(inches/m)Distance to screenDiagonal ScreenSize (inches/m)Minimum distance(inches/m)Maximum /4.1m224”/5.7m272”/6.9m7
Connecting a computer sourceconnect VGA cableVGA connectionConnect one end of the provided computer cable to th Computer 1/Computer 2connector on the projector and the other to the VGA connector on your computer. Ifyou are using a desktop computer, you will need to disconnect the monitor cablefrom the computer’s video port first.HDMI connectionconnect HDMIHDMI is a standard, uncompressed, all-digital audio/video interface. HDMIprovides an interface between sources, such as set-top boxes, DVD players, andreceivers and your projector. Plug an HDMI cable into the video-out connector onthe video device and into the HDMI connector on the projector.Connecting powerconnect powerConnect the black power cord to the Power connector on the rear of the projectorand to your electrical outlet. If the Power Saving Mode feature is off, the PowerLED on the Status Indicator Panel (page 12) blinks green. If the Power SavingMode feature is on, the Power LED is steady amber. By default, this feature is off.You can change the setting, see page 29. NOTE: Always use the power cord thatshipped with the projector.Optional computer connectionsconnect audio cableTo get sound from the projector, connect an audio cable (optional cable, notincluded) to your computer and to th Audio 1/Audio 2 connector on the projector.You may also need an adapter.If you are using a desktop computer and want to see the image on your computerscreen as well as on the projection screen, connect to the desktop’s computer cableto Computer 1 and the desktop’s monitor cable to the Monitor Out connector onthe projector.NOTE: Not available on the IN118HDxc or IN119HDxc.8
Displaying an imagepress Power buttonPress the Power button.The Power LED blinks green, and the fans start to run. When the lamp comes on,the start up screen displays and the Power LED turns solid green. It can take up to aminute for the image to achieve full brightness. Note: When the feature, AC PowerOn, is enabled, the projector automatically turns on when power is connected. Thisallows control of ceiling mounted projectors with a wall power switch.turn on computer orvideo deviceNo start up screen? Get help on page 13.Turn on your computer or video device.The image should appear on the projection screen. If it doesn’t, press the Sourcebutton on the projector’s keypad or remote.If you are using a VGA cable to connect your computer to the projector:activate laptop’s external portmonitor key orLCD/CRT keyIf using a laptop, make sure its external video port is active.Many laptops do not automatically turn on their external video port when aprojector is connected. Usually a key combination like FN F8 or CRT/LCD keyturns the external display on and off. Locate a function key labeled CRT/LCD or afunction key with a monitor symbol. Press FN and the labeled function keysimultaneously.FN keyRefer to your laptop's documentation for more information about yourlaptop's key combination.No laptop image? Try pressing the Auto Image button on the remote. Gethelp on page 13.9
Adjusting the imageadjust heightIf necessary, adjust the height of the projector by rotating the elevator foot to extendthe foot.elevatorfootIf necessary, rotate the leveling foot located at the rear of the projector.Avoid placing your hands near the hot exhaust vent at the front of the projector.adjust distancePosition the projector the desired distance from the screen at a 90 degree angle tothe screen.See page 6 for a table listing screen sizes and distances.adjust zoom and focusAdjust the zoom or focus.If the image is not square, first make sure that the projector is perpendicular to thescreen. If the image is larger or smaller on the top or bottom edge of the screen,press the top Keystone buttonto reduce the upper part of the image, and pressto reduce the lower part.the bottom Keystone buttonadjust keystoneIf the left or right side of the screen is larger or smaller the other, you can turn theprojector to the left or to the right a few degrees to square the image.Adjust the Contrast or Brightness in the Basic Menu. See page 26 for help withthese menu adjustments.adjust Basic Menu10
Connecting a video deviceVGA connectionIf your video device has a 15-pin VGA output, plug one end of the includedcomputer cable into the VGA connector on your video source. This connector maybe labeled “To Monitor” on the video source. Plug the computer cable into eitherthe Computer 1 or Computer 2 connector on the projector.You can connect video devices such as VCRs, DVD players, camcorders, digitalcameras, video game consoles, HDTV receivers, and TV tuners to the projector.You can connect the audio directly to the projector to get sound from the built-inspeaker, or you can bypass the projector’s audio system and connect the audiodirectly from your source to a stereo or home theater system.Component video connectionYou can connect the projector to most video devices that can output video. Youcannot directly connect the coaxial cable that enters your house from a cable orsatellite company, the signal must pass through a tuner first. Examples of tuners aredigital cable boxes, VCRs, digital video recorders, and satellite TV boxes.Basically, any device that can change channels is considered a tuner.If your HD video device has component connectors, an optional Component toVGA adapter can be used. Plug the component cable into the video device. Plug theother end of the component cable into the adapter and plug the adapter into theComputer 1 or Computer 2 connector.Before connecting your projector, you should decide which aspect ratio you want touse. The projector’s Aspect Ratio setting is accessed through the Resize button onthe remote or through the projector’s Basic Menu. See page 26 for moreinformation.S-video connectionPlug the S-video cable’s connector into the video-out connector on the video device.Plug the other connector into the S-Video connector on the projector.Video device connectionsNOTE: Not available on the IN118HDxc or IN119HDxc.No video cables are provided with the projector. You can order cables from InFocusor provide your own.AudioFor audio, connect a 3.5mm stereo cable to the Audio 1/Audio 2 connector on theprojector and to your source. If your source uses RCA audio connectors, a Y-cableor adapter may be used. (Note: A separate audio connection is not required forHDMI source inputs.)HDMI connectionHDMI is a standard, uncompressed, all-digital audio/video interface. HDMIprovides an interface between sources, such as set-top boxes, DVD players, andreceivers and your projector. Plug an HDMI cable into the video-out connector onthe video device and into the HDMI connector on the projector.Composite video connectionPlug the composite video cable’s yellow connector into the video-out connector onthe video device. Plug the other yellow connector into the yellow Video connectoron the projector.NOTE: Not available on the IN118HDxc or IN119HDxc.11
Shutting down the projectorTable 5: Status Indicator LightsAuto Off TimeThe projector also has an Auto Off Time feature that automatically turns theprojector off after no active sources are detected and no user interaction with theprojector is performed for 30 minutes. By default, this feature is off. You canchange the length of time, see page 30.Operational ModeStatus Indicator LightsNormal operationPOWER: Solid greenTEMP: OffLAMP: OffTurning off the projectorPowering upTo turn the projector off, press the Power button on the remote or keypad. The lampturns off and the Power LED blinks amber for 30 seconds while the fans continue torun to cool the lamp. If the Power Saving Mode feature is on and when the lamp hascooled, the LED lights amber and the fans stop. If the Power Saving Mode feature isoff and when the lamp has cooled, the LED blinks green and the fans stop. Unplugthe power cable to completely power off the projector.POWER: Blinks greenTEMP: OffLAMP: OffPowering downPOWER: Blinks amberTEMP: OffLAMP: OffStandby with Power Saving Mode offPOWER: Blinks greenTEMP: OffLAMP: OffStandby with Power Saving Mode onPOWER: Solid amberTEMP: OffLAMP: OffFan failurePOWER: Blinks amberTEMP: Blinks redLAMP: Blinks redLamp failed to ignitePOWER: Solid amberTEMP: Blinks redLAMP: Blinks redLamp is at the end of its lifePOWER: Solid amberTEMP: Blinks redLAMP: Blinks redProjector is overheatingPOWER: Solid amberTEMP: Blinks redLAMP: OffTroubleshooting your setupIf your image appears correctly on the screen, skip to the next section. If it does not,troubleshoot the setup.The Status Indicator Lights on top of the projector indicate the operational state ofthe projector and can help you with troubleshooting.12
ProblemSolutionResultNo start up screenPlug power cord into the projectorpress the Power buttonCorrect imageStartupScreenOnly start up screen appearsPress the SOURCE buttonactivate laptop’s external portComputer image projectedStartupScreenAARestart laptopA13
ProblemNo computer image, just the words “Signal out ofrange”SolutionResultPress the Auto Image button on remoteAdjust computer refresh rate (Windows 7: ControlPanel Display Screen Resolution AdvancedSettings Adapter tab). Varies per operating system.Computer image projectedASignal out ofthe rangeAAYou may also need to set a different resolution onyour computer, as shown in the following problem,“image fuzzy or cropped”Only my laptop’s background appears, not theDesktop iconsChange the Multiple Display setting to "Duplicatethese displays" (Windows 7: Control Panel Display Screen Resolution). Varies per operating system.Background and Desktop projectedAAAA14
ProblemSolutionImage fuzzy or croppedAImage not centered on screenAResultChange the computer's "Resolution" setting to matchthe projector's resolution (Windows 7: Control Panel Display Screen Resolution). Varies per operatingsystem.Move projector, adjust heightAdjust horizontal orvertical position inAdvanced Menu Image PC. menu15Image clear and not croppedACorrect image
ProblemSolutionResultImage not squareAdjust Keystone on keypadSquare imageImage not sharpAdjust Sharpness in the Basic MenuCorrect imageImage does not fit 4:3 or 16:9 screenChange aspect ratio to 4:3 or 16:9 in Basic Menu Aspect Ratio menuCorrect image16
ProblemSolutionResultImage upside downTurn off Ceiling Mount in Basic menuCorrect imageTurn off Rear Project in Advanced Menu Setup Image Setup. menuCorrect imageAdjust the items in the Advanced Menu Image Color. menuCorrect imageAImage reversed left to rightAProjected colors don’t match sourceCOLORCOLOR17
ProblemSolutionResultThe video embedded in my PowerPointpresentation does not play on the screenTurn off the internal LCD display on your laptopEmbedded video plays correctlyAAABBLamp won’t turn on, the projector is overheatingMake sure vents aren’t blocked, turn off the projectorand allow it to cool for one minuteLamp turns onStartupScreenOverheatingindicator18B
ProblemSolutionResult“Replace lamp” message appears at startup, lampwon’t turn onLamp must be replaced (see page 32)Lamp turns onlamp doorreplace lampStill need assistance?If you need assistance, visit our website at www.infocus.com/support or call us.See the Quick Start Guide for support contact information.This product is backed by a limited warranty. An extended warranty plan may bepurchased from your dealer. When sending the projector in for repair, werecommend shipping the unit in its original packing material, or having aprofessional packaging company pack the unit. Please insure your shipment for itsfull value.19StartupScreen
Using the remote control The remote uses two (2) AAA batteries (not provided). They are easily installed byremoving the cover from the remote’s back, aligning the and - ends of thebatteries, sliding them into place, and then replacing the cover.Caution: When replacing the remote batteries, be aware that using batteries other thanAAA batteries may risk severe damage to the remote. When disposing of thebatteries, be sure to do so in an enviromentally proper manner.If the remote control gets wet, wipe it dry immediately. Avoid excessive heat and humidity. Ensure the batteries' polarity ( /-) is aligned correctly. Do not mix new and old batteries together, or mix different types of batteriestogether. Replace the batteries as soon as they run out. Remove batteries from the remote control when storing or not in use for a prolonged period.Troubleshooting the remote To operate, point the remote at the front of the projector (not at the computer). Therange of optimum operation is about 15 feet (4.5m).Press the remote’s Menu button to open the projector’s menu system. Use the arrowbuttons to navigate, and the Select button to select features and adjust values in themenus. See page 25 for more info on the menus.The remote also has: Volume buttons adjust the sound.Custom button that can be assigned to a special function, like Blank Screen orFreeze (see page 28).Source button brings up a menu of all possible sources allowing the user toswitch the active source.Blank button to blank the screen.Presets button to select stored settings (see page 26).Mute button to silence the audio.Make sure the batteries are installed in the proper orientation and are not dead.Make sure you’re pointing the remote at the projector or the screen, not thecomputer, and are within the remote range of 15 feet (4.5m). For best results,point the remote at the projector.navigationbuttonsPress the remote’s Power button to turn the projector on and off (see page 9 forshutdown info). Auto Image button to resynch the projector to the source.Resize button to switch among aspect ratios (see page 26).Help button to get help with connecting sources and improving the picture.ESC button to go back to previous OSD menu.PC button to cycle through the computer sources.Video button to cycle through the video sources.Keystone buttons adjust the squareness of the imageMagnify buttons magnify and reduce the projected picture size.Freeze button to pause the projected image.Overscan button remove noise around the video image.AV Mute button blanks the projected image and mutes audio.20
Using the audioconnect audio cableUsing the projector’s speakersConnect the audio source to the Audio 1/Audio 2 connectors to hear audio throughthe projector speakers.Amplified speakers may also be connected to the projector using the Audio Outconnector.To adjust the volume, press the Volume buttons on the remote.Troubleshooting AudioIf you aren’t hearing the audio, check the following: Make sure the audio cable is connected to the Audio 1/Audio 2 connector onthe projector, and that the other end of the cable is connected to an Audio Outconnector on the source (not a “line-in” or “microphone” connector).Make sure the volume is turned up enough. Press the Volume button on theremote.Make sure the correct source is active.Adjust the audio source.If playing a video, make sure the playback has not been paused.21
Using the keypad buttonsMost buttons are described in detail in other sections, but here is an overview oftheir functions:Power–turns the projector on and off (page 9).Right arrow - When the menu is displayed, the right arrow button navigatesthrough the menu.Up arrow/Keystone - When the menu is displayed, the up arrow button navigatesthrough the menu. When the menu is not displayed, this button adjusts the squareness of the image (page 10).Down arrow/Keystone - When the menu is displayed, the down arrow button navigates through the menu. When the menu is not displayed, this button adjusts themenu navigationbuttonssquareness of the image (page 10).Left arrow - When the menu is displayed, the left arrow button navigates throughthe menu.Enter - Activates the selected On-Screen Display (OSD) menu item.Menu/Exit - Turns on the On-Screen Display (OSD) menu. Goes back to previousOSD menu, exits and saves menu settings.Auto - Resynchronizes the projector to the source.Blank - Displays a solid color or factory logo screen.Source - Brings up a menu of available sources.22
Optimizing computer imagesPresentation featuresAfter the projector is running and the image is on the screen, you can optimize theimage using the onscreen menus. For general information on using the menus, seepage 25.Several features are provided to make giving presentations easier. Here is anoverview, details are found in the menu section. Select default image settings using a preset appropriate to your environment.Adjust the Keystone, Contrast, or Brightness (page 26).Change the Aspect Ratio. Choose the option that best fits your input source(page 26).Adjust the Color Temperature (page 27).Adjust the Phase, Tracking, or Horizontal or Vertical position (page 27).Once you have optimized the image for a particular source, you can save thesettings using Presets. This allows you to quickly recall these settings later(page 26). 23The Custom key allows you to assign various features to the button. Thedefault effect is Source Info, which displays information about the projectorand current source. See page 28 for details.The Search Screen option lets you change the appearance of the blank screenand start up screen (page 29).Auto Off Time is provided to automatically shut down the projector
IN118HDxc, IN119HDx, IN119HDxc. Input ratings: 100-240Vac, 2.6A, 50-60Hz InFocus reserves the right to alter product offerings and specifications at any time without notice. 2 Table of Contents Introduction 4 Pos