Transcription
BOWL LIFT STAND MIXERINSTRUCTIONS AND RECIPES1-800-541-6390Details Inside9708307C
Hassle-Free Replacement WarrantyWe’re so confidentthe quality of ourproducts meets theexacting standards ofKitchenAid that, ifyour stand mixershould fail within thefirst year of ownership, KitchenAidwill arrange to deliver an identicalor comparable replacement to yourdoor free of charge and arrange tohave your “failed” stand mixerreturned to us. Your replacementstand mixer will also be covered byour one year full warranty. Pleasefollow these instructions to receivethis quality service.If you reside in the 50 UnitedStates and your KitchenAid standmixer should fail within the firstyear of ownership, simply call ourtoll-free Customer SatisfactionCenter at 1-800-541-6390, 8 a.m.to 8 p.m., Monday through Friday,10 a.m. to 5 p.m., Saturday, EasternTime. Give the consultant yourcomplete shipping address. (No P.O.Box Numbers, please.)When you receive yourreplacement stand mixer, use thecarton and packing materials topack up your “failed” stand mixer.In the carton, include your nameand address on a sheet of paperalong with a copy of the proof ofpurchase (register receipt, creditcard charge slip, etc.).For a detailed explanation ofwarranty terms and conditions,including how to arrange for serviceoutside the United States, see theWarranty section.Proof of Purchase and Product RegistrationAlways keep a copy of the salesreceipt showing the date ofpurchase of your stand mixer. Proofof purchase will assure you of inwarranty service.Before you use your stand mixer,please fill out and mail yourproduct registration card packedwith the stand mixer. This card willenable us to contact you in theunlikely event of a product safetynotification and assist us incomplying with the provisions ofthe Consumer Product Safety Act.This card does not verify yourwarranty.Please complete the following foryour personal records:Model NumberSerial NumberDate PurchasedStore Name2
Table of ContentsHassle-Free Replacement Warranty.Inside Front CoverProduct Registration Card.Inside Front CoverStand Mixer Safety .4Important Safeguards.4Warranty.5For the 50 United States and District of Columbia .5For Puerto Rico.6Arranging for Service after the Warranty Expires.6Arranging for Service Outside the 50 United States and Puerto Rico .6Ordering Accessories and Replacement Parts .6Electrical Requirements.7Troubleshooting Problems.7About Your MixerBowl Lift Stand Mixer Features .8Assembling Your Bowl Lift Mixer.9Using the Pouring Shield .10Using Your KitchenAid Attachments .11Mixing Time .11Mixer Use.11Care and Cleaning .12Beater to Bowl Clearance .12Speed Control Guide - 10 Speed Mixers.13Mixing Tips .14Egg Whites .15Whipped Cream .15Attachments and Accessories - General Instructions .16Appetizers, Entrees, and Vegetables .17Cakes and Frostings.27Cookies, Bars, and Candies.40Pies and Desserts .50Yeast Breads and Quick Breads .55General Instructions for Mixing and Kneading Yeast Dough .55Bread Making Tips.56KitchenAid Attachments and Accessories .803
Stand Mixer SafetyYour safety and the safety of others are very important.We have provided many important safety messages in this manual and on yourappliance. Always read and obey all safety messages.This is the safety alert symbol.This symbol alerts you to potential hazards that can kill or hurtyou and others.All safety messages will follow the safety alert symbol and eitherthe word “DANGER” or “WARNING.” These words mean:You can be killed or seriouslyinjured if you don’t immediatelyfollow instructions.You can be killed or seriouslyinjured if you don’t followinstructions.All safety messages will tell you what the potential hazard is, tell you how toreduce the chance of injury, and tell you what can happen if the instructions arenot followed.not followed.IMPORTANT SAFEGUARDSWhen using electrical appliances, basic safety precautions should always befollowed including the following:1. Read all instructions.2. To avoid risk of electrical shock, do not put stand mixer in water orother liquid.3. Close supervision is necessary when any appliance is used by or nearchildren.4. Unplug stand mixer from outlet when not in use, before putting on ortaking off parts and before cleaning.5. Avoid contacting moving parts. Keep hands, hair, clothing, as well asspatulas and other utensils away from beater during operation toreduce the risk of injury to persons and/or damage to the stand mixer.6. Do not operate stand mixer with a damaged cord or plug or after thestand mixer malfunctions, or is dropped or damaged in any manner.Return appliance to the nearest authorized service center forexamination, repair or electrical or mechanical adjustment. Call theKitchenAid Customer Satisfaction Center at 1-800-541-6390 for moreinformation.7. The use of attachments not recommended or sold by KitchenAid maycause fire, electrical shock or injury.8. Do not use the stand mixer outdoors.9. Do not let the cord hang over edge of table or counter.10. Remove flat beater, wire whip or dough hook from stand mixer beforewashing.SAVE THESE INSTRUCTIONSTHIS PRODUCT IS DESIGNED FOR HOUSEHOLDUSE ONLY.4
KitchenAid Stand Mixer Warranty forthe 50 United States and District of ColumbiaThis warranty extends to the purchaser and any succeeding owner forstand mixers operated in the 50 United States and District of Columbia.Length ofWarranty:KitchenAid Will PayFor Your Choice of:One Year FullWarranty from date ofpurchase.Hassle-FreeReplacement of yourstand mixer. Seeinside front cover fordetails on how toarrange for service, orcall the CustomerSatisfaction Centertoll-free at1-800-541-6390.ORThe replacement partsand repair labor coststo correct defects inmaterials andworkmanship. Servicemust be provided byan AuthorizedKitchenAid ServiceCenter. See theKitchenAid StandMixer Warranty forPuerto Rico on thefollowing page onhow to arrange forservice.KitchenAid Will NotPay For:A. Repairs when standmixer is used inother than normalsingle family homeuse.B. Damage resultingfrom accident,alteration, misuseor abuse.C. Any shipping orhandling costs todeliver your standmixer to anAuthorized ServiceCenter.D. Replacement partsor repair laborcosts for standmixers operatedoutside the 50United States andDistrict ofColumbia.KITCHENAID DOES NOT ASSUME ANY RESPONSIBILITY FOR INCIDENTALOR CONSEQUENTIAL DAMAGES. Some states do not allow the exclusionor limitation of incidental or consequential damages, so this exclusion maynot apply to you. This warranty gives you specific legal rights and you mayalso have other rights which vary from state to state.5
KitchenAid Stand Mixer Warrantyfor Puerto RicoA limited one year warranty extendsto the purchaser and anysucceeding owner for stand mixersoperated in Puerto Rico. During thewarranty period, all service must behandled by an AuthorizedKitchenAid Service Center. Pleasebring the stand mixer, or ship itprepaid and insured, to the nearestAuthorized Service Center. Call tollfree 1-800-541-6390 to learn thelocation of a Service Center nearyou. Your repaired stand mixer willbe returned to you prepaid andinsured.Arranging for Serviceafter the Warranty ExpiresFor service information, call toll-free1-800-541-6390 or write to:Customer Satisfaction Center,KitchenAid Portable Appliances, P.O.Box 218, St. Joseph, MI 490850218.Arranging for Service Outsidethe 50 United States and Puerto RicoConsult your local KitchenAid dealeror the store where you purchasedthe stand mixer for information onhow to obtain service.Ordering Accessories and Replacement PartsTo order accessories or replacementparts for your stand mixer, call tollfree 1-800-541-6390 or write to:Customer Satisfaction Center,KitchenAid Portable Appliances, P.O.Box 218, St. Joseph, MI 490850218.6
Electrical RequirementsVolts: 120 A.C. only. Hertz: 60The wattage rating for your standmixer is printed on the serial plate.Do not use an extension cord. If thepower supply cord is too short,have a qualified electrician orserviceman install an outlet near theappliance.Electrical Shock HazardPlug into a grounded 3 prongoutlet.The maximum rating is based onthe attachment that draws thegreatest load (power). Otherrecommended attachments maydraw significantly less power.Do not remove ground prong.Do not use an adapter.Do not use an extension cord.Failure to follow theseinstructions can result indeath, fire, or electrical shock.Troubleshooting ProblemsPlease read the following beforecalling your service center.1. The stand mixer may warm upduring use. Under heavy loadswith extended mixing timeperiods, you may not be able tocomfortably touch the top of thestand mixer. This is normal.2. The stand mixer may emit apungent odor, especially whennew. This is common withelectric motors.3. If the flat beater hits the bowl,stop the stand mixer. See the“Beater to Bowl Clearance”section.If your stand mixer shouldmalfunction or fail to operate,please check the following:- Is the stand mixer plugged in?- Is the fuse in the circuit to thestand mixer in working order? Ifyou have a circuit breaker box, besure the circuit is closed.- Turn the stand mixer off for10-15 seconds, then turn it backon. If the mixer still does not start,allow it to cool for 30 minutesbefore turning it back on.- If the problem is not due to oneof the above items, see the“Arranging for Service” section.- Do not return the stand mixer tothe retailer as they do not provideservice.Keep a copy of the sales receiptshowing the date of purchase.Proof of purchase will assure you ofin-warranty service.7
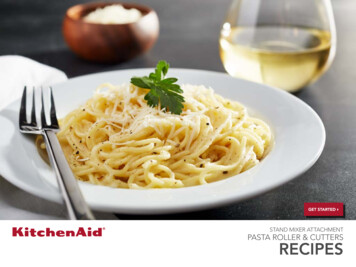
Bowl Lift Stand Mixer FeaturesMotor HeadAttachment Hub(See the “Attachments andAccessories” section.)SpeedControlKnobAttachmentKnobRESETOFF/0 STIRBowl Lift Handle(not shown)Bowl HeightAdjustmentScrewBeaterShaftStainless SteelBowlLocating PinsBowl HandleBowl SupportWire WhipFlat BeaterPowerKnead Spiral Dough Hook8
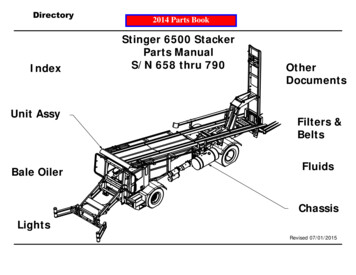
Assembling Your Bowl Lift MixerTo Lower Bowl1. Rotate handle back and down.To Remove Bowl1. Be sure speed control is OFF andstand mixer is unplugged.2. Place bowl lift handle in downposition3. Remove flat beater, wire whip,or spiral dough hook.4. Grasp bowl handle and liftstraight up and off locating pins.To Attach Flat Beater,Wire Whip, or PowerKnead Spiral Dough Hook1. Slide speed control to OFF andunplug.2. Slip flat beater on beater shaft.Electrical Shock HazardPlug into a grounded 3 prongoutlet.Do not remove ground prong.Do not use an adapter.Do not use an extension cord.Failure to follow theseinstructions can result indeath, fire, or electrical shock.To Attach Bowl1. Be sure speed control is OFF andstand mixer is unplugged.2. Place bowl lift handle in downposition.3. Fit bowl supports over locatingpins.4. Press down on back of bowluntil bowl pin snaps into springlatch.5. Raise bowl before mixing.6. Plug into a grounded 3 prongoutlet.Pin3. Turn beater to right, hookingbeater over the pin on shaft.4. Plug into a grounded 3 prongoutlet.To Remove Flat Beater,Wire Whip, or PowerKnead Spiral Dough Hook1. Slide speed control to OFF andunplug.2. Press beater upward and turn tothe left.3. Pull beater from beater shaft.Household Stand MixerSpeed ControlRaiseRESETOFF/0To Raise Bowl1. Rotate handle to straight-upposition.2. Bowl must always be in raised,locked position when mixing.9STIRPlug into a grounded 3 prongoutlet. Speed control lever shouldalways be set on lowest speed forstarting, then gradually moved todesired higher speed to avoidsplashing ingredients out of bowl.See the “Speed Control Guide”section.
Auto-Reset Motor ProtectionIf the stand mixer stops due tooverload, slide the speed controllever to OFF. After a few minutes,the stand mixer will automaticallyreset. Slide the Speed Control Leverto the desired speed and continuemixing.If the stand mixer does not restart,see the “Troubleshooting Problems”section.Using the Pouring Shield*Attaching the Pouring Shield*1. Make sure the speed control leveris set to the OFF/0 position.2. Unplug the stand mixer.3. Attach desired accessory and raisethe mixing bowl.4. Slide pouring shield collar aroundbeater shaft, centering collar overrim of bowl.Using the Pouring ShieldPour ingredients into the mixingbowl through the chute portion ofshield.IMPORTANT: Make sure the guideson the bottom of the chute rest onthe rim of the bowl to keepingredients from falling outside thebowl as they are added.PouringChuteRemoving the Pouring Shield1. Make sure the speed control leveris set to the OFF/0 position.2. Unplug the stand mixer.3. Remove pouring chute from collar.4. Slide pouring shield collar offbowl.5. Lower the bowl support byturning the bowl-lift leverclockwise.6. Remove accessory and the mixingbowl.Cleaning the Pouring ShieldWash in warm sudsy water. If youwish, you may place on the top rackof your dishwasher.*If Pouring Shield is included.10
Using Your KitchenAid AttachmentsFlat Beater for normal to heavy mixtures:cakesbiscuitscreamed frostingsquick breadscandiesmeat loafcookiesmashed potatoespie pastryWire Whip for mixtures that need air incorporated:eggssponge cakesegg whitesangel food cakesheavy creammayonnaiseboiled frostingssome candiesPowerKnead Spiral Dough Hook for mixing and kneadingyeast doughs:breadscoffee cakesrollsbunspizza doughMixing TimeYour KitchenAid stand mixer willmix faster and more thoroughlythan most other electric standmixers. Therefore, the mixing timein most recipes must be adjusted toavoid overbeating. With cakes, forexample, beating time may be halfas long as with other stand mixers.Mixer UseThe bowl and beater are designedto provide thorough mixingwithout frequent scraping. Scrapingthe bowl once or twice duringmixing is usually sufficient. Turnstand mixer off before scraping.The stand mixer may warm upduring use. Under heavy loads withextended mixing time, you may notbe able to comfortably touch thetop of the stand mixer. This isnormal.Injury HazardUnplug mixer before touchingbeaters.Failure to do so can result inbroken bones, cuts or bruises.NOTE: Do not scrape bowl whilestand mixer is operating.11
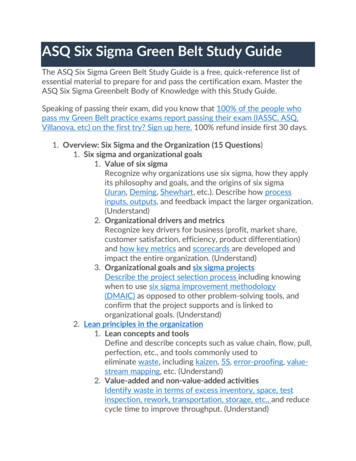
Care and CleaningNOTE: Always be sure to unplugstand mixer before cleaning. Wipestand mixer with a soft, damp cloth.Do not use household/commercialcleaners. Do not immerse in water.Wipe off beater shaft frequently,removing any residue that mayaccumulate.Bowl, white flat beater and whitespiral dough hook may be washedin an automatic dishwasher. Or,clean them thoroughly in hot sudsywater and rinse completely beforedrying. Wire whip, burnished spiraldough hook and burnished flatbeater should be hand washed anddried immediately. Do not washwire whip, burnished spiral doughhook and burnished flat beater in adishwasher. Do not store beaterson shaft.Beater to Bowl ClearanceYour stand mixer is adjusted at the factory so the flat beater just clears thebottom of the bowl. If, for any reason, the flat beater hits the bottom ofthe bowl or is too far away from the bowl, you can correct the clearanceeasily.1. Unplug stand mixer.2. Place bowl lift handle in downposition.3. Attach flat beater.4. Adjust so flat beater just clearsbottom surface of bowl when inlifted position by turning screw(A) counterclockwise to raise thebowl and clockwise to lower thebowl. Just a slight turn is all thatis required: the screw will notrotate more than 1 4 turn(90 degrees) in either direction.(The full range of adjustment is1 2 turn, or 180 degrees.)5. Place bowl lift handle in upposition to check clearance.6. Repeat steps 4 and 5 ifnecessary.NOTE: When properly adjusted, theflat beater will not strike on thebottom or side of the bowl. If theflat beater or the wire whip is soclose that it strikes the bottom ofthe bowl, coating may wear off thebeater or wires on whip may wear.A12
Speed Control GuideAll speeds have the Soft Start feature which automatically starts the standmixer at a lower speed to help avoid ingredient splash-out and “flour puff”at start-up then quickly increases to the selected speed for optimalperformance.Number of SpeedStirSpeedSTIRFor slow stirring, combining, mashing,starting all mixing procedures. Use toadd flour and dry ingredients to batter,and add liquids to dry ingredients. Donot use STIR speed to mix or kneadyeast doughs.2SLOW MIXINGFor slow mixing, mashing, fasterstirring. Use to mix and knead yeastdoughs, heavy batters and candies;start mashing potatoes or othervegetables; cut shortening into flour;mix thin or splashy batters. Use withCan Opener attachment.4MIXING,BEATINGFor mixing semi-heavy batters, such ascookies. Use to combine sugar andshortening and to add sugar to eggwhites for meringues. Medium speedfor cake mixes. Use with: Food Grinder,Rotor Slicer/Shredder, Pasta Roller, andFruit/Vegetable Strainer.6BEATING,CREAMINGFor medium-fast beating (creaming) orwhipping. Use to finish mixing cake,doughnut, and other batters. Highspeed for cake mixes. Use with CitrusJuicer attachment.8FAST BEATING,WHIPPINGFor whipping cream, egg whites, andboiled frostings.10FAST WHIPPINGFor whipping small amounts of cream,egg whites or for final whipping ofmashed potatoes. Use with PastaMaker and Grain Mill attachments.NOTE: Will not maintain fast speedsunder heavy loads, such as when usingPasta Maker or Grain Mill attachments.Use Speed 2 to mix or knead yeast doughs. Use of any other speed createshigh potential for stand mixer failure. The PowerKnead Spiral DoughHook efficiently kneads most yeast dough within 4 minutes.13
Mixing TipsConverting Your Recipefor the MixerAdding IngredientsAlways add ingredients as close toside of bowl as possible, notdirectly into moving beater. ThePouring Shield can be used tosimplify adding ingredients.NOTE: If ingredients in very bottomof bowl are not thoroughly mixed,then the beater is not far enoughinto the bowl. See the “Beater toBowl Clearance” section.The mixing instructions for recipesin this book can guide you inconverting your own favoriterecipes for preparation with yourKitchenAid stand mixer. Look forrecipes similar to yours and thenadapt your recipes to use theprocedures in the similarKitchenAid recipes.For example, the “quick mix”method (sometimes referred to asthe “dump” method) is ideal forsimple cakes, such as the QuickYellow Cake and Easy White Cakeincluded in this book. This methodcalls for combining dry ingredientswith most or all liquid ingredientsin one step.More elaborate cakes, such asCaramel Walnut Banana Torte,should be prepared using thetraditional cake mixing method.With this method, sugar and theshortening, butter or margarine arethoroughly mixed (creamed) beforeother ingredients are added.For all cakes, mixing times maychange because your KitchenAid stand mixer works more quicklythan other mixers. In general,mixing a cake with the KitchenAid stand mixer will take about half thetime called for in most cakerecipes.To help determine the idealmixing time, observe the batter ordough and mix only until it has thedesired appearance described inyour recipe, such as “smooth andcreamy.”To select the best mixing speeds,use the “Speed Control Guide”section.Cake MixesWhen preparing packaged cakemixes, use Speed 2 for low speed,Speed 4 for medium speed, andSpeed 6 for high speed. For bestresults, mix for the time stated onthe package directions.Adding Nuts, Raisins, orCandied FruitsFollow individual recipes forguidelines on including theseingredients. In general, solidmaterials should be folded in thelast few seconds of mixing on STIRSpeed. The batter should be thickenough to keep the fruit or nutsfrom sinking to the bottom of thepan during baking. Sticky fruitsshould be dusted with flour forbetter distribution in the batter.Liquid MixturesMixtures containing large amountsof liquid ingredients should bemixed at lower speeds to avoidsplashing. Increase speed only aftermixture has thickened.14
Egg WhitesWhipped CreamPlace room temperature egg whitesin clean, dry bowl. Attach bowl andwire whip. To avoid splashing,gradually turn to designated speedand whip to desired stage. See chartbelow.Pour cold whipping cream intochilled bowl. Attach bowl and wirewhip. To avoid splashing, graduallyturn to designated speed and whipto desired stage. See chart below.AMOUNT 4 cup (50 mL) .GRADUALLY to 10 2 cup (125 mL) .GRADUALLY to 101 cup (250 mL) .GRADUALLY to 81 pint (500 mL).GRADUALLY to 8AMOUNTSPEEDSPEED11 egg white .GRADUALLY to 102-4 egg whites.GRADUALLY to 86 or moreegg whites.GRADUALLY to 81Whipping StagesWhipping StagesWatch cream closely duringwhipping. Because yourKitchenAid stand mixer whips soquickly, there are just a fewseconds between whipping stages.Look for these characteristics:With your KitchenAid stand mixer,egg whites whip quickly. So, watchto avoid overwhipping. This list tellsyou what to expect.FrothyLarge, uneven air bubbles.Begins to ThickenCream is thick and custard-like.Begins to Hold ShapeAir bubbles are fine and compact;product is white.Holds its ShapeCream forms soft peaks when wirewhip is removed. Can be foldedinto other ingredients when makingdesserts and sauces.Soft PeakTips of peaks fall over when wirewhip is removed.StiffCream stands in stiff, sharp peakswhen wire whip is removed. Usefor topping on cakes or desserts, orfilling for cream puffs.Almost StiffSharp peaks form when wire whipis removed, but whites are actuallysoft.Stiff but not DrySharp, stiff peaks form when wirewhip is removed. Whites areuniform in color and glisten.Stiff and DrySharp, stiff peaks form when wirewhip is removed. Whites arespeckled and dull in appearance.15
Attachments and AccessoriesGeneral InformationKitchenAid Attachments are designed to assure long life. The attachmentpower shaft and hub socket are of a square design, to eliminate anypossibility of slipping during the transmission of power to the attachment.The hub and shaft housing are tapered to assure a snug fit, even afterprolonged use and wear. KitchenAid Attachments require no extra powerunit to operate them; the power unit is built-in.See the Use and Care Guide that came with your stand mixer attachmentsfor speed settings and operating time.AttachmentKnobHingedHub CoverAttachmentPower Shaft‡AttachmentHousing AttachmentHub SocketNotch‡Not part of mixer.PinAttachment ShaftHousingGeneral InstructionsTo Attach1. Turn stand mixer off andunplug.2. Loosen attachment knob byturning it counterclockwise.3. Flip up hinged hub cover.4. Insert attachment shaft housinginto attachment hub, makingcertain that attachment powershaft fits into square attachmenthub socket. It may be necessaryto rotate attachment back andforth. When attachment is inproper position, the pin on theattachment will fit into thenotch on the hub rim.5. Tighten attachment knob byturning clockwise untilattachment is completelysecured to stand mixer.Electrical Shock HazardPlug into a grounded 3 prongoutlet.Do not remove ground prong.Do not use an adapter.Do not use an extension cord.Failure to follow theseinstructions can result indeath, fire, or electrical shock.6. Plug into a grounded 3 prongoutlet.16
3. Replace attachment hub cover.Tighten attachment knob byturning it clockwise.Crabmeat Dip1 package (8 oz) lightcream cheese1 cup reduced-fatcottage cheese1 4 cup reduced-caloriemayonnaise1 can (61 2 oz)crabmeat, flaked1 tablespoon lemonjuice3 tablespoonschopped greenonions1 2 teaspoon garlic salt3 drops hot peppersaucePlace cream cheese, cottage cheese, andmayonnaise in mixer bowl. Attach bowl and flatbeater to mixer. Turn to Speed 6 and beat about1 minute, or until well blended. Stop and scrapebowl. Add all remaining ingredients. Turn toSpeed 6 and beat about 1 minute, or until allingredients are combined.Refrigerate until well chilled. Serve with assortedcrackers or raw vegetables.Yield: 24 servings (2 tablespoons per serving).Per serving: About 42 cal, 4 g protein, 1 g carb,3 g fat, 12 mg chol, 180 mg sodium.Creamy Pineapple Fruit Dip4 ounces light creamcheese1 2 cup marshmallowcream1 can (8 oz) crushedpineapple, welldrained2 teaspoons gratedorange peelPlace cream cheese in mixer bowl. Attach bowland flat beater to mixer. Turn to Speed 2 and mixabout 30 seconds. Stop and scrape bowl. Addmarshmallow cream, pineapple, and orange peel.Turn to Speed 4 and beat about 30 seconds.Stop and scrape bowl. Turn to Speed 4 and beatabout 30 seconds. Refrigerate at least 2 hours.Serve with sliced fresh fruit, if desired.Yield: 12 servings (2 tablespoons per serving).Per serving: About 61 cal, 1 g protein, 11 g carb,2 g fat, 3 mg chol, 58 mg sodium.17APPETIZERS, ENTREES, AND VEGETABLESTo Remove1. Turn stand mixer off andunplug.2. Loosen attachment knob byturning it counterclockwise.Rotate attachment slightly backand forth while pulling out.
Layered Mexican Dip1 package (8 oz) lightcream cheese1 2 cup shredded hotpepper MontereyJack cheese1 4 cup bean or blackbean dip1 2 cup thick andchunky salsa1 2 cup chopped greenonions1 4 cup sliced pittedripe olivesPlace cream cheese in mixer bowl. Attach bowland flat beater to mixer. Turn to Speed 2 andmix about 30 seconds. Stop and scrape bowl.Add Monterey Jack cheese. Turn to Speed 2 andmix about 30 seconds.Spread cheese mixture on 10" serving plate towithin 1 or 2" of edge. Spread bean dip overcheese. Spread salsa over bean dip. Top withonions and olives. Refrigerate until ready toserve. Serve with tortilla chips, if desired.Yield: 12 servings (1 4 cup per serving).Per serving: About 70 cal, 4 g protein, 3 g carb,5 g fat, 12 mg chol, 265 mg sodium.Fiesta Cheesecake Appetizer2 packages (8 ozeach) light creamcheese, softened1 package (1.25 oz)taco seasoning mix3 eggs2 cups shreddedMarble-Jack cheese1 can (4 oz) greenchilies1 cup light sourcream1 cup salsaPlace cream cheese and taco seasoning mix inmixer bowl. Attach bowl and flat beater tomixer. Turn to Speed 6 and beat about11 2 minutes, or until fluffy. Stop and scrape bowl.Turn to Speed 4 and add eggs, one at a time,beating about 15 seconds after each addition.Stop and scrape bowl. Add cheese and greenchilies. Turn to STIR Speed and mix 15 seconds.Pour mixture into greased 9" springform pan.Bake at 350ºF for 40 minutes, or until knifeinserted near center comes out clean. Removefrom oven and spread with sour cream. Returnto oven and bake 5 minutes longer. Cool15 minutes. Refrigerate 3 to 8 hours. Beforeserving, remove outer ring and spread top ofcheesecake with salsa. Serve with taco chips, ifdesired.Yield: 20 servings (1 wedge per serving).Per serving: About 136 cal, 7 g protein, 5 g carb,9 g fat, 59 mg chol, 421 mg sodium.18
Nutty Cheese Ball1 cup shredded sharpCheddar cheese1 cup shredded Swisscheese1 package (8 oz) lightcream cheese2 tablespoonschopped freshchives2 teaspoonsWorcestershiresauce1 4 teaspoon paprika1 2 teaspoon garlicpowder1 4 cup finely choppedpecansPlace all ingredients, except pecans, in mixerbowl. Attach bowl and flat beater to mixer. Turnto Speed 4 and beat about 1 minute, or untilwell blended.On waxed paper, shape mixture into a ball. Rollball in chopped pecans. Wrap in waxed paper.Refrigerate until serving time. Serve withassorted crackers or raw vegetables.Yield: 24 servings (2 tablespoons per serving).Per serving: About 65 cal, 4 g protein, 1 g carb,5 g fat, 13 mg chol, 109 mg sodium.Spinach and Cheese Crostini1 baguette loaf, cutinto 1 2" slices2 teaspoons butter ormargarine1 2 cup finely choppedonion1 clove garlic, minced1 package (9 oz)frozen choppedspinach, thawedand squeezed dry1 package (8 oz) lightcream cheese1 4 cup roasted redpeppers1 2 cup shreddedCheddar cheesePlace baguette slices on baking sheet. Bake at375 F for 4 to 6 minutes, or until toasted. Setaside.Melt butter in 10" skillet over medium heat. Addonion and garlic. Cook and stir 2 to3 minutes, or until softened. Add spinach. Cookand stir 30 to 60 seconds, or until warm. Coolslightly.Place cream cheese in mixer bowl. A
mixer should fail within the first year of ownership, simply call our toll-free Customer Satisfaction Center at 1-800-541-6390, 8 a.m. to 8 p.m., Monday through Friday, 10 a.m. to 5 p.m., Saturday, Eastern Time. Give the consultant your complete shipping address. (No P.O. Box Numbers, please