Transcription
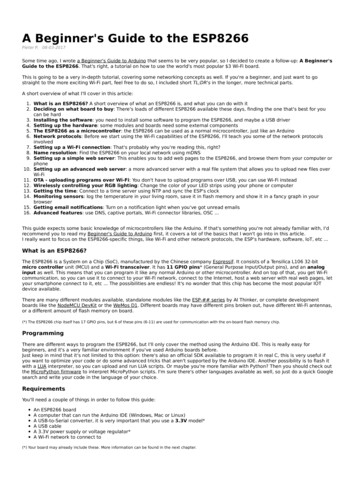
A Beginner's Guide to the ESP8266Pieter P,08-03-2017Some time ago, I wrote a Beginner's Guide to Arduino that seems to be very popular, so I decided to create a follow-up: A Beginner'sGuide to the ESP8266. That's right, a tutorial on how to use the world's most popular 3 Wi-Fi board.This is going to be a very in-depth tutorial, covering some networking concepts as well. If you're a beginner, and just want to gostraight to the more exciting Wi-Fi part, feel free to do so, I included short TL;DR's in the longer, more technical parts.A short overview of what I'll cover in this article:1. What is an ESP8266? A short overview of what an ESP8266 is, and what you can do with it2. Deciding on what board to buy: There's loads of different ESP8266 available these days, finding the one that's best for youcan be hard3. Installing the software: you need to install some software to program the ESP8266, and maybe a USB driver4. Setting up the hardware: some modules and boards need some external components5. The ESP8266 as a microcontroller: the ESP8266 can be used as a normal microcontroller, just like an Arduino6. Network protocols: Before we start using the Wi-Fi capabilities of the ESP8266, I'll teach you some of the network protocolsinvolved7. Setting up a Wi-Fi connection: That's probably why you're reading this, right?8. Name resolution: Find the ESP8266 on your local network using mDNS9. Setting up a simple web server: This enables you to add web pages to the ESP8266, and browse them from your computer orphone10. Setting up an advanced web server: a more advanced server with a real file system that allows you to upload new files overWi-Fi11. OTA - uploading programs over Wi-Fi: You don't have to upload programs over USB, you can use Wi-Fi instead12. Wirelessly controlling your RGB lighting: Change the color of your LED strips using your phone or computer13. Getting the time: Connect to a time server using NTP and sync the ESP's clock14. Monitoring sensors: log the temperature in your living room, save it in flash memory and show it in a fancy graph in yourbrowser15. Getting email notifications: Turn on a notification light when you've got unread emails16. Advanced features: use DNS, captive portals, Wi-Fi connector libraries, OSC .This guide expects some basic knowledge of microcontrollers like the Arduino. If that's something you're not already familiar with, I'drecommend you to read my Beginner's Guide to Arduino first, it covers a lot of the basics that I won't go into in this article.I really want to focus on the ESP8266-specific things, like Wi-Fi and other network protocols, the ESP's hardware, software, IoT, etc .What is an ESP8266?The ESP8266 is a System on a Chip (SoC), manufactured by the Chinese company Espressif. It consists of a Tensilica L106 32-bitmicro controller unit (MCU) and a Wi-Fi transceiver. It has 11 GPIO pins* (General Purpose Input/Output pins), and an analoginput as well. This means that you can program it like any normal Arduino or other microcontroller. And on top of that, you get Wi-Ficommunication, so you can use it to connect to your Wi-Fi network, connect to the Internet, host a web server with real web pages, letyour smartphone connect to it, etc . The possibilities are endless! It's no wonder that this chip has become the most popular IOTdevice available.There are many different modules available, standalone modules like the ESP-## series by AI Thinker, or complete developmentboards like the NodeMCU DevKit or the WeMos D1. Different boards may have different pins broken out, have different Wi-Fi antennas,or a different amount of flash memory on board.(*) The ESP8266 chip itself has 17 GPIO pins, but 6 of these pins (6-11) are used for communication with the on-board flash memory chip.ProgrammingThere are different ways to program the ESP8266, but I'll only cover the method using the Arduino IDE. This is really easy forbeginners, and it's a very familiar environment if you've used Arduino boards before.Just keep in mind that it's not limited to this option: there's also an official SDK available to program it in real C, this is very useful ifyou want to optimize your code or do some advanced tricks that aren't supported by the Arduino IDE. Another possibility is to flash itwith a LUA interpreter, so you can upload and run LUA scripts. Or maybe you're more familiar with Python? Then you should check outthe MicroPython firmware to interpret MicroPython scripts. I'm sure there's other languages available as well, so just do a quick Googlesearch and write your code in the language of your choice.RequirementsYou'll need a couple of things in order to follow this guide:An ESP8266 boardA computer that can run the Arduino IDE (Windows, Mac or Linux)A USB-to-Serial converter, it is very important that you use a 3.3V model*A USB cableA 3.3V power supply or voltage regulator*A Wi-Fi network to connect to(*) Your board may already include these. More information can be found in the next chapter.
HardwareDeciding on what board to buyESP8266 is just the name of the chip, many companies have designed their own boards that use this chip, so there are many differentESP8266 boards on the market. If you don't know the difference between all these different models, you might have a hard timedeciding on what board to buy.The easiest (and fastest) way to get an ESP8266 board is to buy one from a well-known electronics shop like Adafruit or SparkFun, butif you want it cheap, you should check out Ebay or other sites where you can order them directly from China.Development boardsSome boards have all kinds of features on-board to help developing ESP8266 hardware and software: for example, a USB to Serialconverter for programming, a 3.3V regulator for power, on-board LEDs for debugging, a voltage divider to scale the analog input .If you're a beginner, I would definitely recommend a development board. It's easier to get started if you don't have to worry about allthese things.Bare-bones AI Thinker boardsIf you want to add an ESP8266 to a small project, or if you want a cheaper* board, you might want to buy a board that doesn't havethese features. In that case, you can buy one of the many ESP-## modules developed by AI Thinker. They contain just the ESP8266and the necessary components to run it.To program the board, you'll need an external USB-to-Serial converter.With some modules, you get an on-board antenna (PCB or ceramic) and an LED, some boards have just an antenna connector, or noLEDs at all. They also differ in physical size, and flash memory size. An important thing to notice, is that some boards do not breakout all GPIO pins. For example, the ESP-01 only has 2 I/O pins available (apart from the TX and RX pins), while other modules like theESP-07 or ESP-12 break out all available I/O pins.(*) The board itself is cheaper, but you'll have to spend more on external parts.OverviewHere's a table with some of the most popular ESP8266 development boards and their features:BoardGPIO3.3VVregUSB-to- y charger, crypto element,temperature sensor, light sensorSparkFun ESP8266 Thing11 - *512KB (4Mb)0-1VSparkFun ESP8266 Thing- Dev Board11 512KB (4Mb)0-1VNode MCU11 4MB (32Mb)0-3.3VAdafruit Feather HUZZAHwith ESP826611 4MB (32Mb)0-1VBattery chargerAdafruit HUZZAHESP8266 Breakout11 ---4MB (32Mb)0-1V5V-tolerant RX and Reset pinsESP-##411----512KB (4Mb) –4MB (32Mb)0-1VSmall and cheapYou can find the full list of ESP-## modules here.As you can see, both the Node MCU and the Adafruit Feather HUZZAH are solid choices.(*) When auto-program on the SparkFun ESP8266 Thing is enabled, you can't use the Serial Monitor.Getting the hardware readyThere are two main categories of ESP8266 boards: development boards with a USB interface (USB-to-Serial convertor) on-board, andboards without a USB connection.Development boards with a USB interfaceFor example: NodeMCU, SparkFun ESP8266 Thing - Dev Board, SparkFun Blynk Board, Adafruit Feather HUZZAH with ESP8266 Wi-Fi .These boards will show up in Device manager (Windows) or in lsusb (Linux) as soon as you plug them in.They have a 3.3V regulator on-board, and can be programmed over USB directly, so you don't need any external components to get itworking.The only thing you may need to do, is solder on some headers.Bare-bones boards and boards without a USB interfaceThis category has 2 sub-categories: boards with a 3.3V regulator on-board, and boards with just the ESP8266 and a flash memorychip, without 3.3V regulator. If your board doesn't have a 5V to 3.3V regulator, buy one separately. You could use an LM1117-3.3 forexample. The on-board 3.3V regulator of most Arduino boards is not powerful enough to power the ESP.To program the board, you'll need a USB-to-Serial converter. The FTDI FT232RL is quite popular, because it can switch between 5V and3.3V. It is essential that the USB-to-Serial converter you buy operates at 3.3V. If you buy a 5V model, you will damagethe ESP8266.Connecting the USB-to-Serial converter
1. Connect the ground (GND) of the USB-to-Serial converter to the ground of the ESP8266.2. Connect the RX-pin of the USB-to-Serial converter to the TXD pin of the ESP8266. (On some boards, it's labelled TX instead ofTXD, but it's the same pin.)3. Connect the TX-pin of the USB-to-Serial converter to the RXD pin of the ESP8266. (On some boards, it's labelled RX instead ofRXD, but it's the same pin.)4. If your ESP8266 board has a DTR pin, connect it to the DTR pin of the USB-to-Serial converter. This enables auto-reset whenuploading a sketch, more on that later.Enabling the chipIf you're using a bare-bone ESP-## board by AI Thinker, you have to add some resistors to turn on the ESP8266, and to select the rightboot mode.1. Enable the chip by connecting the CH PD (Chip Power Down, sometimes labeled CH EN or chip enable) pin to VCC through a 10KΩresistor.2. Disable SD-card boot by connecting GPIO15 to ground through a 10KΩ resistor.3. Select normal boot mode by connecting GPIO0 to VCC through a 10KΩ resistor.4. Prevent random resets by connecting the RST (reset) pin to VCC through a 10KΩ resistor.5. Make sure you don't have anything connected to GPIO2 (more information in the next chapter).Adding reset and program buttonsIf your ESP8266 board doesn't have a reset button, you could add one by connecting a push button to between the RST pin andground.To put the chip into programming mode, you have to pull GPIO0 low during startup. That's why we also need a program button.Because it's possible to use GPIO0 as an output, we can't directly short it to ground, that could damage the chip. To prevent this,connect 470Ω resistor in series with the switch. It's important that this resistance is low enough, otherwise, it will be pulled high by the10KΩ resistor we added in the previous paragraph.Connecting the power supplyIf the ESP8266 module you have doesn't have a 3.3V voltage regulator on board, you have to add one externally. You could use anLM1117-3.3 for example.1.2.3.4.5.Connect the first pin of the regulator to ground.Place a 10µF capacitor between pin 2 (Vout) and ground. Watch the polarity!Place a 10µF capacitor between pin 3 (Vin) and ground.Connect pin 2 to the 3.3V or VCCof the ESP8266.Connect pin 3 to a 5V power source, a USB port, for example.
Before you begin .There's a few things you have to look out for when using an ESP8266: The most important thing is that it runs at 3.3V, so if youconnect it to a 5V power supply, you'll kill it. Unlike some 3.3V Arduino or Teensy boards, the ESP8266's I/O pins are not 5Vtolerant, so if you use a 5V USB-to-Serial converter, or 5V sensors etc. you'll blow it up.A second thing to keep in mind is that the ESP8266 can only source or sink 12mA per output pin, compared to 20-40mA for mostArduinos.The ESP8266 has one analog to digital converter, but it has a strange voltage range: 0 - 1V, voltages above 1V might damage theboard.One last thing to keep in mind is that the ESP8266 has to share the system resources and CPU time between your sketch and the Wi-Fidriver. Also, features like PWM, interrupts or I²C are emulated in software, most Arduinos on the other hand, have dedicated hardwareparts for these tasks.For most applications however, this is not too much of an issue.
SoftwareInstallation of the required softwareThe first step is to download and install the Arduino IDE. I explained this in A Beginner's Guide to Arduino. (As of February 7th 2017,the latest stable version of the IDE is 1.8.1.)To program the ESP8266, you'll need a plugin for the Arduino IDE, it can be downloaded from GitHub manually, but it is easier to justadd the URL in the Arduino IDE:1. Open the Arduino IDE.2. Go to File Preferences.3. Paste the URL http://arduino.esp8266.com/stable/package esp8266com index.json into the Additional Board Manager URLs field.(You can add multiple URLs, separating them with commas.)4. Go to Tools Board Board Manager and search for 'esp8266'. Select the newest version, and click install. (As of February 7th2017, the latest stable version is 2.3.0.)You can check out the official install guide here.DriversIf you are using a board with the CH340(G) USB-to-Serial chip, like the NodeMCU, you'll probably have to install the USB drivers for it.They can be found on GitHub.If you are using a board with the CP2104 USB-to-Serial chip, like the Adafruit Feather HUZZAH board, you'll probably have to installUSB drivers as well. You can find them on the Silicon Labs website.Boards with an FTDI chip should work right out of the box, without the need of installing any drivers.PythonIf you want to use Over The Air updates on Windows, you have to install Python 2.7. You can download it from python.org. During theinstallation, you have to select the option to add Python to your path. If you don't do this, the Arduino IDE won't be able to find thePython executable.ExamplesYou can find all examples used in this article on my GitHub. Just download it as a .ZIP file, unzip it to a convenient location, and you'regood to go!
The ESP8266 as a microcontroller - HardwareWhile the ESP8266 is often used as a ‘dumb’ Serial-to-WiFi bridge, it’s a very powerful microcontroller on its own. In this chapter, we’lllook at the non-Wi-Fi specific functions of the ESP8266.Digital I/OJust like a normal Arduino, the ESP8266 has digital input/output pins (I/O or GPIO, General Purpose Input/Output pins). As the nameimplies, they can be used as digital inputs to read a digital voltage, or as digital outputs to output either 0V (sink current) or 3.3V(source current).Voltage and current restrictionsThe ESP8266 is a 3.3V microcontroller, so its I/O operates at 3.3V as well. The pins are not 5V tolerant, applying more than 3.6Von any pin will kill the chip.The maximum current that can be drawn from a single GPIO pin is 12mA.Usable pinsThe ESP8266 has 17 GPIO pins (0-16), however, you can only use 11 of them, because 6 pins (GPIO 6 - 11) are used to connect theflash memory chip. This is the small 8-legged chip right next to the ESP8266. If you try to use one of these pins, you might crash yourprogram.GPIO 1 and 3 are used as TX and RX of the hardware Serial port (UART), so in most cases, you can’t use them as normal I/O whilesending/receiving serial data.Boot modesAs mentioned in the previous chapter, some I/O pins have a special function during boot: They select 1 of 3 boot modes:GPIO15GPIO0GPIO2Mode0V0V3.3VUart Bootloader0V3.3V3.3VBoot sketch (SPI flash)3.3VxxSDIO mode (not used for Arduino)Note: you don’t have to add an external pull-up resistor to GPIO2, the internal one is enabled at boot.We made sure that these conditions are met by adding external resistors in the previous chapter, or the board manufacturer of yourboard added them for you. This has some implications, however:GPIO15 is always pulled low, so you can’t use the internal pull-up resistor. You have to keep this in mind when using GPIO15 as aninput to read a switch or connect it to a device with an open-collector (or open-drain) output, like I²C.GPIO0 is pulled high during normal operation, so you can’t use it as a Hi-Z input.GPIO2 can’t be low at boot, so you can’t connect a switch to it.Internal pull-up/-down resistorsGPIO 0-15 all have a built-in pull-up resistor, just like in an Arduino. GPIO16 has a built-in pull-down resistor.PWMUnlike most Atmel chips (Arduino), the ESP8266 doesn’t support hardware PWM, however, software PWM is supported on all digitalpins. The default PWM range is 10-bits @ 1kHz, but this can be changed (up to 14-bit@1kHz).Analog inputThe ESP8266 has a single analog input, with an input range of 0 - 1.0V. If you supply 3.3V, for example, you will damage the chip.Some boards like the NodeMCU have an on-board resistive voltage divider, to get an easier 0 - 3.3V range. You could also just use atrimpot as a voltage divider.The ADC (analog to digital converter) has a resolution of 10 bits.CommunicationSerialThe ESP8266 has two hardware UARTS (Serial ports):UART0 on pins 1 and 3 (TX0 and RX0 resp.), and UART1 on pins 2 and 8 (TX1 and RX1 resp.), however, GPIO8 is used to connect theflash chip. This means that UART1 can only transmit data.UART0 also has hardware flow control on pins 15 and 13 (RTS0 and CTS0 resp.). These two pins can also be used as alternative TX0and RX0 pins.I²CThe ESP doesn’t have a hardware TWI (Two Wire Interface), but it is implemented in software. This means that you can use prettymuch any two digital pins. By default, the I²C library uses pin 4 as SDA and pin 5 as SCL. (The data sheet specifies GPIO2 as SDA andGPIO14 as SCL.) The maximum speed is approximately 450kHz.SPI
The ESP8266 has one SPI connection available to the user, referred to as HSPI. It uses GPIO14 as CLK, 12 as MISO, 13 as MOSI and 15as Slave Select (SS). It can be used in both Slave and Master mode (in software).GPIO overviewGPIOFunctionStateRestrictions0Boot mode select3.3VNo Hi-Z1TX0-Not usable during Serial transmission2Boot mode selectTX13.3V (boot only)Don’t connect to ground at boot timeSends debug data at boot time3RX0-Not usable during Serial transmission4SDA (I²C)--5SCL (I²C)--6 - 11Flash connectionxNot usable, and not broken out12MISO (SPI)--13MOSI (SPI)--14SCK (SPI)--15SS (SPI)0VPull-up resistor not usable16Wake up from sleep-No pull-up resistor, but pull-down insteadShould be connected to RST to wake upThe ESP8266 as a microcontroller - SoftwareMost of the microcontroller functionality of the ESP uses exactly the same syntax as a normal Arduino, making it really easy to getstarted.Digital I/OJust like with a regular Arduino, you can set the function of a pin using pinMode(pin, mode); where pin is the GPIO number*, and mode canbe either INPUT, which is the default, OUTPUT, or INPUT PULLUP to enable the built-in pull-up resistors for GPIO 0-15. To enable the pulldown resistor for GPIO16, you have to use INPUT PULLDOWN 16.(*) NodeMCU uses a different pin mapping, read more here. To address a NodeMCU pin, e.g. pin 5, use D5: for instance: pinMode(D5,OUTPUT);To set an output pin high (3.3V) or low (0V), use digitalWrite(pin, value); where pin is the digital pin, and value either 1 or 0 (or HIGHand LOW).To read an input, use digitalRead(pin);To enable PWM on a certain pin, use analogWrite(pin, value); where pin is the digital pin, and value a number between 0 and 1023.You can change the range (bit depth) of the PWM output by using analogWriteRange(new range);The frequency can be changed by using analogWriteFreq(new frequency);. new frequency should be between 100 and 1000Hz.Analog inputJust like on an Arduino, you can use analogRead(A0) to get the analog voltage on the analog input. (0 0V, 1023 1.0V).The ESP can also use the ADC to measure the supply voltage (VCC). To do this, include ADC MODE(ADC VCC); at the top of your sketch, anduse ESP.getVcc(); to actually get the voltage.If you use it to read the supply voltage, you can’t connect anything else to the analog pin.CommunicationSerial communicationTo use UART0 (TX GPIO1, RX GPIO3), you can use the Serial object, just like on an Arduino: Serial.begin(baud).To use the alternative pins (TX GPIO15, RX GPIO13), use Serial.swap() after Serial.begin.To use UART1 (TX GPIO2), use the Serial1 object.All Arduino Stream functions, like read, write, print, println, . are supported as well.I²C and SPIYou can just use the default Arduino library syntax, like you normally would.Sharing CPU time with the RF partOne thing to keep in mind while writing programs for the ESP8266 is that your sketch has to share resources (CPU time and memory)with the Wi-Fi- and TCP-stacks (the software that runs in the background and handles all Wi-Fi and IP connections).If your code takes too long to execute, and don’t let the TCP stacks do their thing, it might crash, or you could lose data. It’s best tokeep the execution time of you loop under a couple of hundreds of milliseconds.Every time the main loop is repeated, your sketch yields to the Wi-Fi and TCP to handle all Wi-Fi and TCP requests.If your loop takes longer than this, you will have to explicitly give CPU time to the Wi-Fi/TCP stacks, by using including delay(0); oryield();. If you don’t, network communication won’t work as expected, and if it’s longer than 3 seconds, the soft WDT (Watch DogTimer) will reset the ESP. If the soft WDT is disabled, after a little over 8 seconds, the hardware WDT will reset the chip.
From a microcontroller’s perspective however, 3 seconds is a very long time (240 million clockcycles), so unless you do someextremely heavy number crunching, or sending extremely long strings over Serial, you won’t be affected by this. Just keep in mindthat you add the yield(); inside your for or while loops that could take longer than, say 100ms.SourcesThis is where I got most of my information to writ this article, there’s some more details on the GitHub pages, if you’re into some moreadvanced stuff, like EEPROM or deep sleep 66/Arduino/blob/master/doc/boards.md
Wi-FiUsing the ESP8266 as a simple microcontroller is great, but the reason why most people use it, is its Wi-Fi capabilities. In this chapter,we'll dive into the wonderful world of network protocols, like Wi-Fi, TCP, UDP, HTTP, DNS . All these acronyms might intimidate you,but I'll try my best to explain them step-by-step and in an easy way.Some paragraphs are in italic. These provide some extra information, but are not critical to understanding the ESP's Wi-Fi functions, sodon't get frustrated if there are things you don't understand.It's really hard to give a clear explanation, without over-complicating things and while keeping it short enough as well. If you've gotany feedback or remarks, be sure to leave a comment to help improve this article. Thanks!The TCP/IP stackThe system most people refer to as 'The Internet' isn't just one protocol: it's an entire stack of layers of protocols, often referred to asthe TCP/IP stack. We'll go over these different layers, because we need to understand how our ESP8266 communicates with otherdevices on the network.LayerProtocolsApplicationHTTP, FTP, mDNS, WebSocket, OSC .TransportTCP, UDPInternetIPLinkEthernet, Wi-Fi .The Link layerThe link layer contains the physical link between two devices, an Ethernet cable, for example, or a Wi-Fi connection. This is the layerthat is closest to the hardware.To connect an ESP8266 to the network, you have to create a Wi-Fi link. This can happen in two different ways:1. The ESP8266 connects to a wireless access point (WAP or simply AP). The AP can be built-in to your modem or router, forexample.In this configuration, the ESP acts like a wireless station.2. The ESP8266 acts as an access point and wireless stations can connect to it. These stations could be your laptop, asmartphone, or even another ESP in station mode.Once the Wi-Fi link is established, the ESP8266 is part of a local area network (LAN). All devices on a LAN can communicate witheach other.Most of the time, the AP is connected to a physical Ethernet network as well, this means that the ESP8266 can also communicate withdevices that are connected to the AP (modem/router) via a wired Ethernet connection (desktop computers, gaming consoles and settop boxes, for instance).If the ESP8266 is in access point mode, it can communicate with any station that is connected to it, and two stations (e.g. a laptop anda smartphone) can also communicate with each other.The ESP can be used in AP-only, station-only, or AP station mode.TL;DRThe link layer is the physical link between devices: in the case of the ESP8266, this is a WiFi connection. The ESP can act as a stationand connect to an access point, or act as an access point and let other devices connect to it.The Internet or Network layerAlthough the devices are now physically connected (either through actual wires (Ethernet) or through radio waves (Wi-Fi)), they can'tactually talk to each other yet, because they have no way of knowing where to send the message to.That's where the Internet Protocol (IP) comes in. Every device on the network has a personal IP address. The DHCP server (DynamicHost Configuration Protocol Server) makes sure that these addresses are unique.This means that you can now send a message to a specific address.There are two versions of the Internet Protocol: IPv4 and IPv6. IPv6 is an improved version of IPv4 and has much more addresses thanIPv4 (because there are much more devices than available IPv4 addresses). In this article, we'll only talk about IPv4 addresses, sincemost LANs still use them.The IP address consists of 4 numbers, for example 192.168.1.5 is a valid IPv4 address. It actually consists of two parts: the first part is192.168.1, this is the address of the local network. The last digit, 5 in this case, is specific to the device.By using IP addresses, we can find the ESP8266 on the network, and send messages to it. The ESP can also find our computer or ourphone, if it knows their respective IP addresses.Sub-net mask (optional)This subdivision of the IP address is determined by the sub-net mask, often written as 255.255.255.0. You can see that it consists offour numbers, just like the IP address. If a part of the sub-net mask is 255, it means that the corresponding part of the IP address ispart of the network address, if it's 0, the corresponding IP part is part of the address of the specific address. A different notation to "IP:192.168.1.5, sub-net mask: 255.255.255.0" would be "192.168.1.5/24", because the binary representation of the sub-net mask is11111111.11111111.11111111.00000000, and it has 24 ones.If you want to know more about sub-nets, I'd recommend you to read the Wikipedia article.(A quick tip to help you remember: it's called the sub-net mask, because if you perform a bitwise AND operation on the IP address andthe sub-net mask (i.e. use the sub-net mask as a mask for the IP address), you get the address of the sub-net.)
MAC addresses and ARP (optional)It is actually impossible to send packets directly to another machine using only the IP address. To send a packet to a specific device onthe LAN (Wi-Fi or Ethernet), you have to know its MAC-address. The MAC address is a unique number that is unique for every networkdevice, and it never changes, it's hardwired in the network chip. This means that every ESP8266, every network card, everysmartphone . ever made, has a different MAC address.So before the ESP can send a packet to your smartphone for example, it has to know its MAC address. It doesn't know this yet, the ESPonly knows the IP address of the smartphone, say 192.168.1.6. To do this, the ESP sends a broadcast message (i.e. a messageaddressed to all devices on the LAN) saying "I'm looking for the MAC address of the device with the IP address 192.168.1.6". The ESPalso includes its own IP and MAC address with the message. When the smartphone receives this broadcast message, it recognizes itsown IP address, and responds to the ESP by sending its own MAC address. Now the ESP and the phone both know each other's IP andMAC addresses, and they can communicate using IP addresses. This method is called the Addres Resolution Protocol, or ARP.What about the Internet?As you might have noticed, I only talked about the local area network, these are the computers in your own house. So how can theESP8266 communicate with the Internet, you may ask? Well, there's a lot of network infrastructure involved in 'The Internet', and theyall obey the IP rules, to make sure most of your packets arrive at there destination. It's not that simple of course, there's a lot of thingsgoing on, like routing and Network Address Translation (NAT), but that falls outside the scope of this article, and it's not reallysomething most people have to worry about.TL;DRThe Internet layer uses IP addresses in order to know where it should send the data. This means that two devices can now sendpackets of data to each other, even over the Internet.The Transport layerThe different devices in the network do their best to deliver these IP packets to the addressee, however, it's not uncommon for apacket to get lost, so it will never arrive. Or the packet might get corrupted on the way: the data is no longer correct. IP also can'tguarantee that the packets arrive in the same order they were sent in.This means that we can't reliably send messages yet by only using the link and the Internet layer, since we can never know when andwhether a packet will arrive, or know for certain that a received packet is correct.We need a third layer on top of the Internet layer: the Transport layer.There are mainly two protocols that make up
straight to the more exciting Wi-Fi part, feel free to do so, I included short TL;DR's in the longer, more technical parts. A short overview of what I'll cover in this article: 1. What is an ESP8266? A short overv
