Transcription
EnglishAngelo Perrone
1astropanel.it - angeloperrone.it
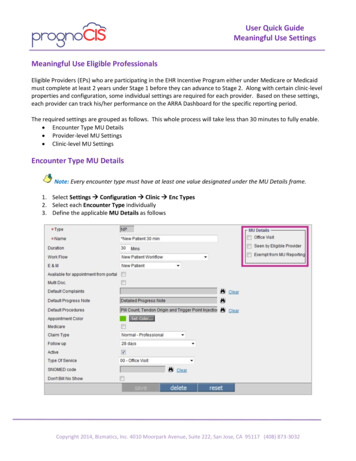
IndexPag. 3 - IntroductionPag. 4 – How to Install?Pag. 8 – The Plug-inPag. 10 – The LANDSCAPE SectionPag. 13 – The ASTRO SectionPag. 20 – The EXPORT – MASKS SectionPag. 22 – The FUSION SectionPag. 29 – Tutorial Merge (Silk, Focus Stacking, HDR e Night HDR)Pag. 31 – Tutorial StartrailPag. 32 – Tutorial Sky Stack – Sky Stack HDRPag. 36 – Tutorial Deep Sky2astropanel.it - angeloperrone.it
IntroductionWelcome to the guide for the Adobe Photoshop CC plug-in “Astro Panel” version 5.0.This plug-in has advanced features to drastically reduce the workflow of the amateurphotographer, the professional photographer and the video maker in a matter ofminutes. The workflow illustrated in this guide together with the description of thefunctions will help you to reach high quality digital processing. The functions integratedinside the panel will guide the user during the digital processing process because theyare arranged in chronological order to instruct him in a correct digital post-productionmethod. Astro Panel now integrates the advanced features of Fusion."Astro Panel" is entirely in HTML5 and was created in collaboration with qualifiedexpert personnel to maximize the experience of use and make the integrated functionsfantastic."Astro Panel" is not compatible with the versions of Photoshop CS, but only from theCC 2015 version up to the current CC 2020. The compatibility with the CC version ofPhotoshop is used to guarantee excellent performance and continuous updates. Totake full advantage of the plug-in's features, I recommend you always update AdobePhotoshop CC to the latest version available.Let's move on to installing the plug-in in our PC / MAC.3astropanel.it - angeloperrone.it
How to Install?To install the Panel on your PC you can use Anastasiy Extension Manager. We need todownload the Anastasiy Extension Manager from the websitehttps://install.anastasiy.com and perform these simple steps:- Select your operating system from the page;- save the Zip ExtensionManager win.zip in a folder;- Extract the files into a folder;- run the ExtensionManager file contained in the compressed package;- from the list of Adobe applications select Photoshop CC and then INSTALL;4astropanel.it - angeloperrone.it
- extract the panel files in a folder on your PC, ropanel.it - angeloperrone.it
Once the package is installed on your PC, from Adobe Photoshop CC open the menu"Window" - "Extensions" and click on "Astro Panel 5".If you are upgrading from old version to 5.0, you will have to uninstall the old versionand install the new one again using the Anastasiy extension manager using the"Remove" command.6astropanel.it - angeloperrone.it
Here is the video installation tutorial:https://www.youtube.com/watch?v 426V8ULLbPA&t 169sIf you have problems installing Astro Panel try to perform a manual installation.Open the file you downloaded from the Astro Panel website and copy only the foldernamed it.angeloperrone.astropanel contained in the "Manual Installation" folder inone of these folders, depending on the operating system:Win: C: Program Files (x86) Common Files CEP extensionsMac: / Library / Application Support / Adobe / CEP / extensionsAfter this, open Adobe Photoshop CC and verify that the panel is present on theWindow - Extensions.7astropanel.it - angeloperrone.it
The Plug-inWith the latest update, many new features have been introduced regarding theexperience of using Astro Panel. Once started in we will find four main sections withthe relative dedicated functions:- The “LANDSCAPE” section dedicated to the post-production of the images has beencompletely renewed. Now the functions integrated in this tab adapt to any type ofphotography. You will be able to process white balance and color tone with one click,remove digital noise and annoying hot pixels, increase image sharpness, recovershadows and highlights, and handle many effects such as Orton and Glow;- The "ASTRO" section is dedicated to the post-production of astronomical images. TheAstro section has been redesigned with the addition of new features and simplified toaccelerate the workflow of astronomical images (milky way, startrail and deep sky);- The "EXPORT" section integrates the tab for resizing images for the web, for savingfiles and for printing;- With the latest update, the “FUSION” section has integrated a new “Deep Sky” tabwith which file sessions by channel and color can be added.The brightness, color and hue masks have been moved down to be available wheneveryou need them during your workflow. This section also integrates the advancedselection of luminosity masks in real time via the eyedropper positioned on the right.There are also sliders for controlling Adobe Photoshop layer masks.8astropanel.it - angeloperrone.it
The image above shows all the sections of the update to version 5.0.Let's illustrate the various functions of "Astro Panel" section by section.9astropanel.it - angeloperrone.it
The LANDSCAPE SectionThe PRO section has been completely revised to contain all the new Astro Panelfunctions. From this section we can modify any type of photography, fromastrophotography to the daytime landscape.We describe the commands of thissection one by one.COLOR CORRECTION, are controls forcolor correction, white balance andcolor saturation, precisely:- COLOR, adjusts the automatic colorcorrections of the image;- TONE, adjusts automatic correctionsof image tones;- BALANCE, find the average neutralcolor of an image and adjust the valuesof the range (half tones) according tothis neutral color;- LAB, increases the vividness of colorsin Color Lab.The IMAGE CORRECTION commandsare for correcting artefacts and defectsthat affect all digital images:- REDUCE NOISE: helps the user toreduce the chromatic noise present inthe photo without losing details andmaintaining the nuclei of the nebulaeand the brightness of the stars;10astropanel.it - angeloperrone.it
- REMOVE HAZE: removes the haze present in the photo and can be adjusted throughthe opacity of the layer;- ABERRATION: analyses chromatic aberrations and with the brush the user can removethe aberrations present in the image;- BANDING: banding or scaling is the phenomenon in which the shades of colours in animage are rendered as bands of colours. This function easily removes these defects.HOT PIXEL is a set of functions to automatically remove "Hot Pixels": those annoyingwhite or coloured pixels that typically appear when taking pictures in low light and withlong exposure times. Click on one of the coloured buttons to increase the intensity ofthe function.SHARPNESS is a group of semi-automatic functions that increase image sharpness.Let's analyze the commands:- BOOST: this very useful function in daytime images increases sharpness by usingbrightness masks (highlights and shadows);- The HIGH PASS filter works on the contrast of the edges of the objects and youcan adjust the ideal radius during post-production. I advise you to use it withcaution in order not to exaggerate with the sharpness;- SUPER SHARP uses the "Advanced Sharpness" filter adjustable during postproduction and exercises greater control over the sharpness of the images;- LAB PRO increases the sharpness of the image on the "Luminosity" channelworking in Color LAB.RECOVERY is a set of automatic functions to recover lights and shadows in a singleclick. Click on 1 or 2 to choose the ideal intensity for your photo.EFFECTS , as the word itself says, adds effects to our images to improve the final resultor give that touch that is missing. We find:- CONTRAST selectively increases micro-contrast in the photo;- VIGNETTE adds vignetting and it is adjustable at will;- EXPOSURE adjusts the final exposure of the photo and it is useful beforepublication on the Web or the printing phase.- FALL COLORS, transform the photo with autumn colors;- DARK MOOD, darkens the image;11astropanel.it - angeloperrone.it
- NIGHT, transform the photo from day to night;GLOW EFFECTS, contains four adjustments to create the final Glow effect on yourphoto. You can choose between:- SOFT: to create a light Glow effect;- - PRO, creates a professional and freely adjustable Glow effect with the channelmixer;- NIGHT: to create a Glow effect suitable for night images.ORTON EFFECTS contains four adjustments to create the final Orton effect on yourphoto. You can choose between:- BASIC: to create a light Orton effect;- PRO, creates a professional and freely adjustable Orton effect with the channelmixer;- MAGIC, creates a fairy tale Orton effect;D&B EFFECTS, the Dodge and Burn, is a photographic technique entirely dedicatedto light management. Through these functions you can "dodge and burn" your image.We have two different functions:- D&B - SIMPLE gives us the possibility to intervene on the dodge and burn usinga black / white brush to obtain the desired effect;- D&B PRO automatically creates an aggressive dodge and burn working on thelight masks and can be adjusted at the end.12astropanel.it - angeloperrone.it
The ASTRO SectionThe Astro section has been completely revised and now contains many more featuresthan the previous version.We list all the functions in detail.AUTOMATIC PROCESS: this group contains twoautomatic functions that transform yourastronomical photo in just one click. Two functionsare available:- UNDEREXPOSURE - Automatic process DarkImages, (for underexposed or dark images);- OVEREXPOSURE - Automatic process BrightImages, (for images with correct exposure).Automatic process example (Automatic process Dark Images).STRECHING IMAGE is a group composed of two commands that serves to extrapolatethe hidden signal of the Milky Way / Deep Sky contained in the photo; there are twomethods of extrapolation based on the exposure of the photo (bright or dark image)UNDER, fir underexposed images, and OVER, for overexposed images. Moreover, wehave the DYNAMIC (Dynamic Strecth) mode, which amplifies the Milky Way signal ordeep sky objects.13astropanel.it - angeloperrone.it
Example of Dynamic StrecthSTARS, there are three groups of functions that do different work on the stars. Theyare used mostly in Deep Sky images to highlight deep sky objects and turn off thebrightness of stars.With the SELECT STARS group we can select stars based on their size.With STAR TOOLS we can make some particular changes such as:- FILTER - Star Filter: with it, you can filter the stars contained in the image and insmall percentage turn them off in order to emphasize the nebulae. You can usethis function as many times as you need to filter as many stars as possible;- FADE - Feather Stars: blurs the sharpest images to bring out the colors of thestars;- VIVID - Saturate Color Stars: it increases the vividness and saturation of stars;- REDUCE - Reduce Stars Diameter: it reduces the diameter and makes the starsin the image point-like;- REMOVE - Remove all Stars eliminates all the stars from the image leaving all thenebulosity of the objects of the deep free sky.14astropanel.it - angeloperrone.it
Example of Remove Stars (Stars have been partially removed to emphasize nebulosity).With the STAR SPIKES group we can create tips to the stars artificially.Esempio di Star Spikes Large (Vengono aggiunti gli spikes solo alle stelle più grandi).15astropanel.it - angeloperrone.it
ENHANCE-SHARPNESS is a set of commands used in astrophotography. Let's analyze:- NEBULA - Enhance NEBULOSITY amplifies the nebulosity of the Milky Way ordeep sky objects, reducing the diameter of the stars;- BOOST - Precision Boost allows to increase the sharpness of the photo in acontrolled way. It is advisable to use the white brush on the black level mask toincrease the effect of the chosen command;- AUTOBOOST - Automatic Precision Boost increases the sharpness of the photoautomatically;- EXTREME – Deconvulation: is a technique used in astrophotography that servesto give a hyper-sharpness to our photos. Adjust the opacity of the layer to yourliking.Example of combining "Nebula" and "Boost"HOT PIXEL STARS, this set of functions automatically removes even the "Hot Pixels",those annoying white or colored pixels that typically appear when taking photos withlittle light and with long exposure times. Click on one of the colored keys to increasethe intensity of the function.16astropanel.it - angeloperrone.it
DEEP SKY, contains three groups of functions designed specifically for deep sky images.The first is COLOR BALANCE, a set of tools for color management. We can adjust thecolor temperature on the fly and correct the chromatic aberrations around the stars:- CAST - Remove Green color Cast, removes the green dominant contained inastronomical photos automatically and you can adjust the opacity to your liking;- LAB, saturated the image by 20% using the LAB colormethod;- RED – Selective Color Red, brush the red color contained in the image;- GREEN – Selective Color Green, brushes the green color contained in theimage;- BLUE – Selective Color Blue, brushes the blue color contained in the image;- PLUS – Saturate and Sharpen, accentuates the saturation and sharpness of theMilky Way or deep sky objects;The second group is DEEP SKY,a set of functions that enhance the image:-RELIEF, highlights the details of the photo;DETAILS, accentuates the detail;BLACK SKY, makes the bottom of the image darker;BOTTOM, improves the bottom of the image;FALSE Ha, create a level He fake;FALSE Oiii, create a fake Oiii level;HALOS, eliminate the bright halos around the stars.FALSE FLAT (REMOVE GRADIENT), the third group, automatically removes, in twosteps, the "unpleasant" gradient that we find in our astronomical photos. There are 3commands that differ from each other based on the amount of gradient we want toremove. We don't need external software to do this because it's all integrated into"Astro Panel".17astropanel.it - angeloperrone.it
Example of False Flat 50% (press "1" and then the 50% button).Example of color and detail correction in lights and shadows18astropanel.it - angeloperrone.it
The last section concerns some functions explicitly designed for images withSTARTRAILs. In this section you can remove the moiré from the images, make yourskis fluid or saturate the color of the images.In the TONALITY section you can adjust at will which shade fits your image.19astropanel.it - angeloperrone.it
The EXPORT SectionThe EXPORT section has also been completely redesigned and now contains manymore features than the previous version.We list all the functions in detail. We have the ability to resize images at will for bothlocal saving, printing or web. Inaddition, we also find a convenientfunction to add the watermark to ourimage before posting on social media.Another new feature of the newupdate is the ability to resize images asdesired either for saving locally, forprinting or for the web. In addition wealso find a convenient function to addthe watermark to our image beforeposting on social media.Other convenient features thatimmediately catch the eye are thequick adjustments. In fact we would nolonger need to adjust the opacity ofthe layer, the nuance and density ofthe mask because we could do itdirectly from the panel below. Underthese adjustments, the quick tools likeForward and Back, the Quick WhiteMask, Curves and Levels, White Brushand Black Brush, Hue / Saturation andColor Balance have been optimizedcompared to the previous version.As for the management of masks Atthe bottom we have luminositymasks, color masks and tonal colormasks divided by Lights, Midtones andShadows.20astropanel.it - angeloperrone.it
On the right we have the dropper that allows us to query any area of the image and inreal time understand which brightness mask to use. In fact, one of the masks will lightup in light blue.Above the masks you will find some commands that will help you finish the masks:-END, to finish the selection of mask with the Curves layer;DESELECT, to clear the selection (Ctrl D);INVERT, to reverse the selection;APPLY, to confirm and paste the mask selection into our Photoshop layer.21astropanel.it - angeloperrone.it
The FUSION SectionThis tab is a concentrate of technology and a novelty for Astro Panel. Indeed, itintegrates all the features of the Fusion plug-in reviewed and updated with newfeatures. The Fusion tab is divided into four main sub-sections with the relativededicated functions:- The "MERGE" section contains the most common types of image fusion developedfrom scratch and with proprietary code to speed up image summing operations;- The "STARTRAIL" section adds up to hundreds of images to obtain beautiful linearStartrails with particular effects on the stars;- The "SKY STACK" section allows you to sum up images of the Milky Way and the deepsky very quickly. You can insert light frames, dark, bias and flat fields;- The "SKY HDR" section is one of the most advanced features of Fusion and blends upto 3 different exposures in one to achieve a dynamic range at night without equal;- The "DEEP SKY" section allows you to add multiple channels to get the final colorimage we want.Let's illustrate the various functions of the "Fusion Section" section by section.22astropanel.it - angeloperrone.it
The MERGE SectionThe Merge section allows us to sum lots of images to create a beautiful "SILK" effectthat can be obtained even without the use of ND filters. Not only that, you can blendimages to achieve Focus Stacking, combine beautiful images in Classic HDR and NIGHTHDR (multi-exposure at night).Here is the list of the description of the commands:LOAD FILES: This button allows you to select the files to be merged to obtain the silkeffect.GENERIC ALIGNMENT: This switch activates the automatic alignment of the levels, theone accessible to all in the section Edit Automatic level alignment, and automaticallyfinds the alignment method. [Tip: when using this alignment method, it isrecommended to also activate the lens correction for a better result]TRIPOD ALIGNMENT: This switch does the exact same thing as the generic alignmentswitch, but as an alignment method it uses ''Reposition'' instead of ''Automatic''.LENS CORRECTION: This function allows you to open files by applying the distortionand vignetting correction available within the Camera Raw plug-in.CHROMATIC ABERRATION: With this function we can also activate the removal ofchromatic aberrations, also available in the Camera Raw plug-in.SILK: Clicking this button starts the fusion to create the desired silk effect.FOCUS STACKING: Clicking this button starts the fusion to create the Focus Stacking.Focus Stacking is a digital photographic technique that involves performing a series ofshots of the same frame, each on a different focusing plane in sequence, in order toobtain a final image with a depth of field greater than that obtainable with traditionaltechniques.HDR and NIGHT HDR: HDR photos are used to capture scenes with a wide dynamicrange. Click on the HDR button to add day images or NIGHT HDR for night images.23astropanel.it - angeloperrone.it
MEAN STACK to sum images of the same subject and obtain a single "clean" finalimage of color and digital noise.The STARTRAIL SectionHere is the description of the commands:LOAD FILES: This button allows you to select the files to be merged to get the startraileffect.TRIPOD ALIGNMENT: This switch activates the automatic alignment of the levels, theone accessible to all in the section Edit Automatic level alignment, and automaticallyfinds the alignment method. [Tip: when using this alignment method, possibly alsoactivate the lens correction for a better result]COMET STAR EFFECT: This switch allows you to activate the fusion with the fallingstar effect.ROTATION DIRECTION: This switch allows you to activate the fusion with the fallingstar effect.LENS CORRECTION: This function allows you to open files by applying the distor
- PRO, creates a professional and freely adjustable Orton effect with the channel mixer; - MAGIC, creates a fairy tale Orton effect; D&B EFFECTS, the Dodge and Burn, is a photographic technique entirely dedicated to light management. Through these functions you can "dod