Transcription
Instructions for creating Silva Cell 2 layoutsusing AutoCADPart 1: Setup, layout information, and constraintsPart 2: Laying out Silva Cells around regular tree openingsPart 3: Laying out Silva Cells around irregular tree openings
How to Create a Silva Cell 2 Layout in AutoCADNote: We are assuming the user has prior CAD knowledge, and won’t be going through the basics of set up. Weare using AutoCAD 2015; please adjust for the version that you’re running.Part 1: Setup, Layout Information, and Constraints1) Open the project CAD base file and define tree location(s)Open the project CAD base plan that you will be using to produce the Silva Cell site design.This example depictsa streetscape, but the Silva Cell System can be used on other sites besides streetscapes, including plazas, parking areas, and more. Be sure that the base plan includes the location of the trees and the extents of the tree rootpackage, if known.FIGURE 1-1. Setting up CAD Base File.
2 Assign drawing units to CAD baseEnsure the correct drawing units are assigned to your base CAD file. This step is essential to ensure that theSilva Cell CAD block comes in to your drawing at the correct scale in Part 2 (see Figure 1-2).Note: The Silva Cell CAD blocks are provided in decimal units - millimeters (mm), meters (m), feet (ft), and inches(in) – as well as architectural inches (in)FIGURE 1-2. Assigning Drawing Units to CAD Base File.
3) Define and locate the edges of all tree openings/plantersLocate and define both the inside and the outside edges of each tree opening on the plan (see Figure 1-3). It iscritical that the tree opening is fully supported by Silva Cells, and by defining the inside and outside edges youwill ensure full support of the entire opening.The inner edge will be the starting point for laying out the Silva Cells in Part 2.FIGURE 1-3. Locating the Inner and Outer Edges of the Tree Opening.
4) Identify all subsurface features located within the layout areaDetermine what information about subsurface features you need to include in your base CAD drawing that couldaffect the location and depth of the Silva Cell layout. Figure 1-4 shows that the example CAD file contains somecritical information about features that will need to be integrated into the layout or worked around when producing the Silva Cell layout.Note: Because they are modular, independent stacks, Silva Cells can be laid out to accommodate many subsurface features.FIGURE 1-4. Common subsurface features notes for Silva Cell consideration on the project site
5) Define areas where Silva Cells cannot be locatedDetermine the location and extents of the site areas or features that cannot accommodate Silva Cells.For example, your site may have accessibility ramps or other common features such as building foundations,catch basins, or utility vaults that need to be avoided when installing Silva Cells — and therefore must be delineated in your layout. Other common site features include required offsets or setback distances from utilities,curbs, pipes, or other features.You will need to provide space between the back of the curb and the face of the Silva Cells for proper soil compaction around the system. As shown in Figure 1-5, DeepRoot recommends a minimum of 12” (300mm) for thecompaction area. The orange lines shown in Figure 1-5 define the “No Silva Cell” locations. Try to integrate all ofthose constraints to delineate the area where we will actually be using Silva Cells.FIGURE 1-5. Delineating the locations of subsurface areas unsuitable for Silva Cells on the project site.
6) Define the areas where Silva Cells can be locatedNow that the “No Work” areas have now been determined, what remains is the area(s) where Silva Cells can belocated. The dashed area shown in Figure 1-6 indicates the areas on the site appropriate for Silva Cells.FIGURE 1-6. Defining the area(s) suitable for Silva Cell layout on the project site.
Part 2: Laying Out the Silva Cell System in Regular Tree Openings1) Bring in the Silva Cell CAD blockThese blocks are provided in a number of standard formats on the DeepRoot website. You assigned the project drawing units to your CAD file in Part 1.2. Using these assigned units as a reference, select and insert thecorrect Silva Cell block into your CAD file. If the assigned CAD drawing units and the selected Silva Cell blockmatch, the Silva Cell block should come in at the correct scale.FIGURE 2-1a. Insert the scaled CAD block in the project drawing.FIGURE 2-1b. Note the reference standard SilvaCells spacing lines on the scaled CAD block.Note: In this example, we have the drawing unitsshown in decimal feet in Figure 2-1. The Silva Celldimensions are shown on each of these blocks, withthe extents of each Silva Cell outlined in red. DeepRoot recommends typical spacing of 1” – 6” (25 mm- 152 mm) between cells as measured at thebase, as indicated in gray in the image to the left.Keep in mind that the blocks should not be right upagainst each other.
2) Start the layout at the edge of the tree openingStart your layout at the inside of the tree opening, and work outward from there. The Silva Cells need to alignwith the inner edge and completely support the entire tree opening.Make sure that the tree opening is completely supported at the edge. The orientation of the Silva Cells doesnot matter, so adjust them as necessary to fit your tree opening and limit of work. If your planters have differentdimensions than the ones depicted here, simply adjust the orientation and/or spacing of the cells to support thatedge. For circular or irregular shaped planters, refer to Part 3.FIGURE 2-2. Layout the Silva Cells defined in Part 1-6, starting with supporting the tree opening inner edge.
3) Complete the Silva Cell layout for all tree openingsIf your tree opening is typical and repeated in your site design, you can grab and copy the Silva Cell layout created for the first tree and apply it to other like tree openings. Fine-tune the layout as necessary to provide continuous support of the tree opening edges and work around the constraints in the Silva Cell layout area that youdefined in Step 1-6.FIGURE 2-3. Complete the layout for all tree openings, working outward from the inner edge.4) Infill Silva Cells between tree openingsOnce the support of tree opening edges is established (Steps 2-2 and 2-3), work outward from the treeopenings to the extents of the limits of work, maintaining the typical 1” - 6” (25 mm - 152 mm) spacing betweenadjacent Silva Cells. Where possible, we recommend connecting tree openings using Silva Cells. If the tree isadjacent to soil volumes such as lawns or parks, use Silva Cells to create an access channel for roots to growfrom the tree opening to those areas.Trees don’t care about the configuration of the Silva Cells; just the overall quantity and access to the availablesoil volume. Adjust the extents, locations, and quantities of Cells as necessary per your individual project designparameters and soil volume/stormwater management goals.FIGURE 2-4. Infill Silva Cells between tree opening areas, making spacing adjustments as necessary.
5) Review the Silva Cell layoutOnce the layout is completed, remove the bounding lines on the block that indicate the spacing, and the internalstructural pieces such as the posts, in order to see how the layout is configured. Since you set up the constraintsin Steps 1-4 and 1-5, you should be able to verify that the layout is located outside of those areas. Edit as necessary. After this review, you should be able to construct the layout as drawn and with minimal field adjustments.FIGURE 2-5. Review and revise the completed Silva Cell layout to meet project goals.
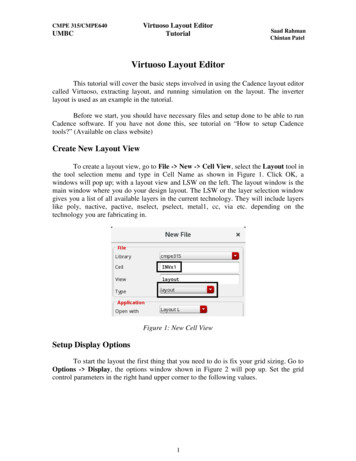
Part 3: Laying Out Silva Cells in Irregular Tree OpeningsWhen working on a layout that uses circular, diamond-shaped, or other irregular tree openings, the same steps inParts 1 and 2 still apply – you will simply need to allow for some extension of the Silva Cells beyond the circularedge and into the planters. The steps to a successful layout for common irregular tree openings are below.A. Circular Tree Openings1) Start the layout at the edge of the tree openingThe Silva Cells will need to extend into the tree opening to completely support the inner edge.Start your Silva Cell layout at the tree opening, rotating and adjusting the spacing of the Silva Cell blocks alongthe inner edge of the tree opening. It is usually easiest to work from this inner edge outwards in a more-orless geometric pattern inscribed in the circular opening. This geometry allows you to maintain the standard1” - 6” (25mm - 152mm) spacing between Silva Cells while minimizing their extensions into the tree opening.Note: There will be some necessary extension of the layout into the tree opening with circular planters. Try tokeep that to a minimum by experimenting with various orientations and configurations. The larger the diameterof the planter, the less extension of the Silva Cells into the tree opening should be necessary. Be sure that thetree opening is completely supported at the edge. Again, the orientation of the Silva Cells do not matter, so adjustthem as necessary to fit your tree opening and limits of work.2) Work Silva Cells outward to connect tree openingsOnce the support of tree opening edges is established (Step 3.1), work outward to the extents of the Limits ofWork while maintaining the typical 1” - 6” (25mm - 152mm) spacing between adjacent Silva Cells. Adjust theextents, locations, and quantities of Silva Cells as necessary per project design parameters.Note: Where possible, we recommend connecting tree openings using Silva Cells. If adjacent to soil volumessuch as lawns or parks, use Silva Cells to create an access channel for roots to grow from the tree opening tothose areas.FIGURE 3-1. Laying out the Silva Cells for a circular tree opening.
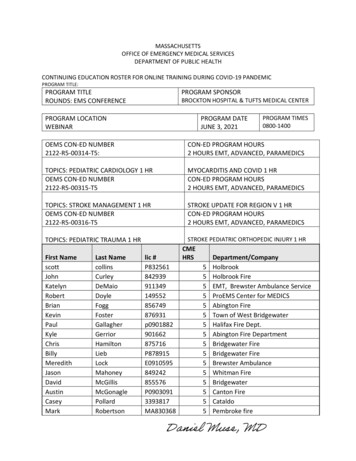
B. Diamond-Shaped Tree Openings1) Start the layout by supporting the edge of the tree openingThe only differenec between rectangular/square and diamond-shaped layouts is the orientation of the tree opening.The Silva Cell layout for a diamond-shaped tree opening will still need to completely support the tree opening edge.Start your Silva Cell layout at the tree opening, rotating and adjusting the spacing of the Silva Cell blocks alongthe inner edge of the tree opening. It is easiest to align the Silva Cell layout geometry with one edge of the treeopening. Work outwards from the inner edge of the tree opening in a more-or-less geometric pattern, sliding theCells along the edge of the tree opening. Keeping a standard geometry will allow you to maintain the standard1” - 6” (25mm - 152mm) spacing between Silva Cells while minimizing any extension into the tree opening.2) Work Silva Cells outward to connect tree openingsNow that the support of tree opening edges has been establish (Step 3-1), you can complete the Silva Cell layout outward, potentially linking adjacent Silva Cell areas per site design, soil volume, and budget goals. Workoutward from the tree openings to the extents of the Limits of Work while maintaining the typical 1” - 6” (25mm - 152 mm) spacing between adjacent Silva Cells. Adjust the extents, locations, and quantities of SilvaCells as necessary per project design parameters.Note: Where possible, we recommend connecting tree openings using Silva Cells. If adjacent to soil volumessuch as lawns or parks, use Silva Cells to create an access channel for roots to grow from the tree opening tothose areas.FIGURE 3-2. Laying out the Silva Cells for a diamond-shaped tree opening.
DeepRoot Green Infrastructure, LLC101 Montgomery Street, Suite 2850San Francisco, CA 94104www.deeproot.cominfo@deeproot.comTel: 415 781 0191Deep Root Canada Corp.Suite 341 – 550 West BroadwayVancouver, BC V5Z 0E9www.deeproot.commjames@deeproot.comTel: 604 687 0899DeepRoot Urban Solutions, Ltd.6 Dorset StreetLondon W1U 6QLwww.deeproot.comsteve@deeproot.comTel: ( 44) 020 3848 4230
Instructions for creating Silva Cell 2 layouts using AutoCAD Part 1: Setup, layout information, and constraints Part 2: Laying out Silva Cells around regular tree openings Part 3: Laying out Silva Cells around irregular tree openings. How to Create a Silva Cell 2 Layout in AutoCAD Note: We are assuming the user has prior CAD knowledge, and won .