Transcription
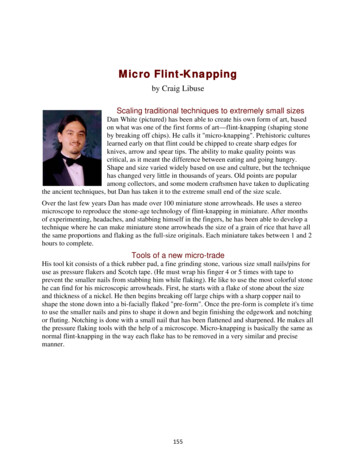
Micro Flint-Knappingby Craig LibuseScaling traditional techniques to extremely small sizesDan White (pictured) has been able to create his own form of art, basedon what was one of the first forms of art—flint-knapping (shaping stoneby breaking off chips). He calls it "micro-knapping". Prehistoric cultureslearned early on that flint could be chipped to create sharp edges forknives, arrow and spear tips. The ability to make quality points wascritical, as it meant the difference between eating and going hungry.Shape and size varied widely based on use and culture, but the techniquehas changed very little in thousands of years. Old points are popularamong collectors, and some modern craftsmen have taken to duplicatingthe ancient techniques, but Dan has taken it to the extreme small end of the size scale.Over the last few years Dan has made over 100 miniature stone arrowheads. He uses a stereomicroscope to reproduce the stone-age technology of flint-knapping in miniature. After monthsof experimenting, headaches, and stabbing himself in the fingers, he has been able to develop atechnique where he can make miniature stone arrowheads the size of a grain of rice that have allthe same proportions and flaking as the full-size originals. Each miniature takes between 1 and 2hours to complete.Tools of a new micro-tradeHis tool kit consists of a thick rubber pad, a fine grinding stone, various size small nails/pins foruse as pressure flakers and Scotch tape. (He must wrap his finger 4 or 5 times with tape toprevent the smaller nails from stabbing him while flaking). He like to use the most colorful stonehe can find for his microscopic arrowheads. First, he starts with a flake of stone about the sizeand thickness of a nickel. He then begins breaking off large chips with a sharp copper nail toshape the stone down into a bi-facially flaked "pre-form". Once the pre-form is complete it's timeto use the smaller nails and pins to shape it down and begin finishing the edgework and notchingor fluting. Notching is done with a small nail that has been flattened and sharpened. He makes allthe pressure flaking tools with the help of a microscope. Micro-knapping is basically the same asnormal flint-knapping in the way each flake has to be removed in a very similar and precisemanner.155
Seen here are some of Dan's favorite micro points, described from left to right: 1- A T-drill stylepoint made of Kaolin flint from Oklahoma. 2- Another T-drill style made of opal from Australia.3- His smallest point- a paleo style fluted point made from Alibates chert from Texas. 4- Anarrowhead made from striped opal from Australia. 5- A Dalton-style made from Kaolin fromOklahoma. 6- A "bolen bevel" style point made from quartz crystal from Maryland. 7- Astemmed point made from Brazilian agate.Scarcity of materials leads to miniature craftDan has been a collector for most of his life and his interest in ancient stone arrowheads is whateventually lead to his pursuit of flint-knapping. When he first started trying to make arrowheadshe had no way to get large pieces of flint to practice with, so he decided to make miniaturearrowheads using tiny pieces of stone that had broken off some damaged arrowheads in hiscollection. As far as he knows, he is the firstperson to ever try flint-knapping under a microscope. Since he had never heard of this before,there was no place to go for guidelines or advice.It took several months to develop his technique and figure out the right tools to make. Aftermuch practice and pain, he was able to make a miniature arrowhead under 2 mm long that hassharp edges and is flaked on both sides just like the full-size ones. His smallest arrowhead wasconsidered for the Guinness Book of World Records, but because there is no category forarrowheads or flint-knapping (and they didn't feel like creating one) he was turned down.However, some of Dan's work is in the Smithsonian collection and his smallest piece has beenphotographed by the Smithsonian's photographer. He has sold some individual miniatures tocollectors in the past but would rather keep most of them and enjoy them himself, especiallysince they are so difficult to make.Early difficulties solved by better tools and techniquesWhen Dan first started, his only tools were the microscope, a pin for the notching, a pocket knifeand some card paper. He would find the thinnest, flattest chip of stone and then shape the edgesdown with the tip of the knife blade while holding the stone between his fingers in a piece ofcard paper. The first 10 or 15 were crude looking and not bifacially flaked (flaked equally onboth sides). He used the pocket knife for a while before realizing he could never get the resultshe wanted (bifacial flaking) with such a hard chipping tool. This is when he started using nailsand placing the stone on a rubber pad to get longer pressure flakes.156
One of Dan's arrowheads is shown here attached to a miniature arrow.When starting out and trying to teach himself how to make these tiny points, Dan would breaktwo or three for every one he finished. After finally getting the tools and technique just right, hesays he can now make two or three (if he's really careful) before he breaks one. According toDan, "The hardest part is doing the notching and the flute flakes for the Clovis style points.Naturally, most of the breaks happen after much of the work is already finished. If I can get thearrowheads to look good under the microscope, they will look really good to the naked eye, butsometimes I break them on purpose if they don't look just right."Dan admits that he has dropped a few of them and lost them in his carpet including a couple ofhis best ones. After spending over an hour looking for one he has to give up in frustration. Evenso, he says working this small is worth it.Here are several examples of Dan White's work:Dan's tool kit includes: A stereo microscope (it's a lot harder to makemicro arrowheads without it but it can be done). A pressure flaker with a sharp copper nail formaking the pre-forms, and some smaller pinsand nails for the finer chipping work. Alsothere's some clear tape used to protect his fingerfrom being poked by the nails while pressureflaking A small grinding stone used to grind the edgeof the pre-form prior to chipping A rubber pad cut from a tire for placing thepoint on while chipping. On the pad is a redpiece of stone typical of the size and shape helikes to start with.The penny is to show size. The small haftedknife in the center has a turtle bone handle withreal sinew keeping the blade on.Some arrowhead samples of various shapes areshown next to the tip of a toothpick for sizereference.157
More small points, all of a similar style areshown next to a penny.This is Dan's smallest arrowhead, a fluted andbi-facially flaked Clovis-style point thatmeasures just over 1 mm. According toarcheologist Dr. Dennis Stanford at theSmithsonian and the people at Guinness Bookof World Records, this is the smallest knappedstone arrowhead they have ever heard of. Thisis the only one he has made this small and sayshe doesn't think he wants to try it again. Hemade it several years ago and had to hold itdown on his pad using a popsicle stick whileflaking it with a special tool he made just forthis point. It took about 1-1/2 hours to finish.These points are all made from Alibates flintfound by Dan's late friend George Chapmannear Alibates Flint Quarries NationalMonument, the famous ancient flint quarry inthe Texas panhandle. George lived near thequarry and he would send Dan a pile of smallflakes he picked up in exchange for a finishedpoint or two. Dan says this is some of hisfavorite material to work.These are some of the first ones Dan made frombroken pieces of arrowheads. All are made froma thin flake and are only chipped on the edges.These three glowing "opals" are all made fromAustralian Opal from Lightning Ridge.He has only one picture of himself at work withhis microscope. It was taken by Val Waldorf inAugust, 2002 at Flint Ridge, Ohio for theOctober, 2002 Chips publication for flintknappers. (Vol.14, #4)158
Dan has created other weapon shapes as well,from spear points to daggers. The handles weremade out of tiny bones found in owl droppings.A knife with an arrowhead-like point madefrom fire opal.A miniature knife of the type chipped fromobsidian.From http://www.craftsmanshipmuseum.com/White.htm, April 7, 2010, copied with permission159
Section 5: Notching & Fluting160
Fluting Instructionsby Gary MerlieThis series of pics are a composite of work on 2 different preforms. After each of the flakeremovals in the first few pics, remember to clean up the little overhangs just like you do whenmaking a biface. There are many critical variables that I could not cover in these few pics.Nipple grinding, cross section of preform, and placement of the lever just to name a few. Youwill just have to experiment. All of the knapping/fluting was done with copper and modern tools.Fluting abo style is a whole different ball game, a game I have never played. I would love to seea similar layout like this one dedicated to abo style fluting by one of the good abo knappers likeBob Patten. (hint hint) RockheadBevel base toward side to be fluted.Remove flakes 1 & 2 on the side to be fluted to define nipple. Remove flakes 3 & 4. These areguide flakes to help flute flare out correctly.Turn point over and remove flakes 5 & 6. These removals isolate nipple.161
Remove flakes 7 & 8 from side to be fluted. These removals act as guides, and further isolatenipple.Turn point over and remove flakes 9 & 10 as needed. These removals regulate the width of thenipple. Remember when making nipples: Define, isolate, regulate, and grind.This nipple is ground and prepared for fluting. The guide flakes could be better, but it is goodmaterial from Harrison Co. Ind. and the flute will probably go.View of overall preform. Note how nipple is isolated and out towards face to be fluted. Ears areback away from face to be fluted. I grind the ears at this point to keep them from snapping duringfluting.Preform in jig ready to be fluted. Note tip of copper lever on top of nipple. Side to be fluted isfacing jig.162
Copper lever. This tool has 4 working faces so you don't have to dress it as much.Close up of copper lever on nipple. Ready to flute.Preform and flute spall immediately after fluting. This flute ran about 4".Here's the finished point after the other side was fluted and much pressure flaking was done togive it the distinctive Cumberland fishtail shape. Length is 4 1/2". I rubbed a little mineral oil onit to give it the nice glossy look. Total time to make this point? A lot less than it took to edit andpost all these pics!Copyright 2000 - Gary L Merlie - All Rights Reserved.From http://www.ssrsi.org/Onsite/fluting.htm, March 31, 2010, copied with permission163
Hand FlutingBy Bob Patten (aka knapperbob)I picked a tough piece of raw Utah agate to make a Folsom. The weathered surface is deceiving.You can see that the stone tears rather than breaking smoothly, but works well otherwise. Theunweathered interior looks quite different from the weathered outside.164
I used antler baton percussion until the thickness was even and relatively thin. Some length waslost due to careless work.After the surface was selectively contoured by antler pressure, I gave the base a bevel.165
A littlemore work and the platform is isolated. I set up a 2 mm gap between the platform and a straightedge to control flute thickness. At this time, I make sure that there are no gaps between thestraight edge and the preform crest.The first platform is ready for fluting.166
You can see my view of the fluting anvil, a moose billet resting on top of my calf muscle.Here, the preform is in place atop the anvil. The blow follows through to land on a heavy leatherpad near to the action I normally use while doing regular percussion. My avatar demonstrates theapproximate positioning for fluting.167
Backlighting shows the translucent nature of this agate.Unfortunately, I held the preform off center and the first flute peeled to one side.168
With just a small adjustment, I have a new platform near the edge of the preform base. Ready foranother try in under a minute.As we say, "the operation was a success, but the patient died." Although the flute went fulllength, an unfortunately-placed crystal pocket caused the point to snap. With a few thousandyears of weathering, this point could have taken on the relatively smooth appearance of thestarting quarry blank.From y-126388, April 4, 2010, copied withpermission169
Notching ArrowheadsF Scott Crawford 2009 All rights reserved170
From http://www.arrowhead-makeyourown.com/, April 6, 2010, copied with permission from“How to Make Your Own Arrowheads”171
The Basics Of Punch Notchingby Mark BrackenIn the early days of flintknapping, I think we all havetried making notches in our flint points with a punch.All to often and with the greatest of ease, simply splitthe point in two or blow the ear off. You only have todo this two or three times to develop quite a rash.Thank goodness for good friends and flintknappers.About three years ago a knapper from Texas namedDan Theus showed me a thing or two on punchnotching. Dan can notch most anything as deep as hewants or needs to with this technique.Using an Ishi stick or the smaller flakers has itslimitations, for example."dog leg" notches, thickpoints or very deep notching. Texas style Andice pointsare a good example of this.In the artifact world, it appears native American Indianspreferred punching their notches. This is based on theflake scars of old points. Successful punching produceslarge aggressive "c" shaped flakes.Now Lets take a look at the basic rules you must followfor risk free notching. There are four basic factors forsuccess. These are: Platform setup, grinding, strikeangle and velocity. Lets look at basic platform setup.Fig.1 shows and view of the margin. Note that themargin is not directly located on the imaginarycenterline, it is for the most part, closer to the lowerface of the preform. This would make any flakeremoval(s) more successful and less risky. The samething applies to the tiny margin located within thenotch, in a much more critical way.Look at fig.2. It shows the margin being closer to thetop face. (It's up-side-down) The flake should beremoved from the "top" of the Bi-face. Having theplatform edge below the imaginary centerline is a mustfor punching! It is the key!172
To begin a notch, I like to use my ishi stick to make a "lead out" flake. Shown in Fig 3. Thisthins the notching area and can be done to "lower" the platform edge, I like to do this on bothfaces of the preform. This is not necessary but it can be a big help. Keep in mind that the notchplatform is basically the same principle as a standard thinning platform.With your platform ready as described above you must now abrade it. This is critical, even if youare doing minor adjustments to relocate the margin (something that you will occasionally have todo after punching a flake) to favor flaking the best face.Take a look at fig.4. It shows the shoulder on the nail resting in the notch ready to punch, notethat the nail shoulder is located at or slightly below the centerline of the point. Screw this up andthe ear is gone! The nail will require file retouch after a few flakes.Make sure you're not biting too much off by having to broad of a shoulder on your nail. If youhave a good low platform, whack the heck out of it. You can use you billet, a chunk of wood,frozen steak or what ever to hit the nail.A few more tips. The "lower" the platform the more you can change the angle to drive into thepreform, and vise versa. Faster hits for bigger flakes and slower for smaller flakes. You can grindwith a small flake. The tricky part is readjusting the margin to favor a face.From http://www.flintknappingtools.com/punch.html, March 31, 2010, copied with permission173
Expanding Type Notching Tutorial- Crump Lake PointBy Jim Winn (aka Paleoknapperjim)I've been planning on doing a notching tutorial for a long time and finally got around to doing ittoday. Normally most of my notched points are on the small side, but trying to take pics ofnotching small points would be a challenge, so I chose a Crump Lake type point which is bigger.Crump Lake points are from the Cump lake area of Oregon and are a type of Great Basin sidenotch point. Many are on display at the Favell Museum in klammath Falls. Most all of them aremade from black Dacite, the same material that I chose to use to make this tutorial point. Specialthanks go to Chad Ring, friend and fellow knapper who took all of these pics today. This first picshows the piece of dacite before any flakes have been removed.174
Initial percussion flaking begins with Moose antler, sandstone and copper. I find the Mooseantler works great in the early stages to rapidly thin the piece, many of the flakes traveling edgeto edge or overshot. This picture shows the biface thinned to the desired thickness.A little more percussion flaking has been done to shape the biface and it is now ready to pressureflake.175
This pic shows the biface after the first pass of pressure flaking using an Ishi stick.This pic shows the biface after the 2nd and final pressure flaking pass. Notice the basal thinningflakes. It is necessary to make the basal area as thin as possible in order to get narrow notches.176
Here the opposite face is shownI normally draw the starting point for my notches on the biface before notching it to be sure toget proper alignment. I use a straight edge at right angles to the long axes of the biface and placea mark on both edges on both faces. Because this point is black, I used white out instead.177
The biface is now marked on both edges of both faces.This is the edge view, showing the thinness near the basal area. This thinness is critical tosuccessful narrow notches.178
This pic shows how I support the biface on a small pad. It is very important to have very rigidcontrol and no wiggle room anywhere. The Optivisors help a lot. If your young you may notneed them, but in any case you need to be able to see real close up.I am using a horseshoe nail for notching. This shows the placement of the tip of the notcher forthe first flake removal. This first flake it taken by pressing the tip straight down, NOT IN. Theidea is to take a very small flake that will set up your platform for the next flake removal on theother face.179
This pic shows the first flake removed. As you can see, it is not much of a flake, but it is astarting point and we can now remove a longer flake from the opposite face.OK, this is the oposite face flake removal, and now we are striving to push a longer flake to thinthe area ahead as we go. It is absolutely essential the the tool tip be narrower than the notch. Icant stress this enough. If it is not it will rub the sides of the notch and blow it out. OK, this timeI push straight in.180
Here is what the 2nd flake removal looks like. It has traveled perhaps 3/16" and thinned the areaahead, looks good.OK, this pic may look confusing, but here is what is happening. The opposite face (not shown) iswhere I just removed the last flake. Before removing another long flake it is necessary to get theedge of the platform as close to the face you are flaking as possible. To do this I push straight invery gently at 90 degrees to the face, just removing tiny flakes to bring the edge up. This willallow the next flake to release with less force and travel further. I NEVER grind my notches.Grinding them will stall them out and so much force will be required to remove the next flakethat it will likely blow out the notch.181
OK, we flip the biface over and push off another long flake on the opposite face. Again, I ampushing straight in to remove a long flake and thin the area ahead.Here is the flake removed, not as long as I wanted but good enough.182
This becomes repititous, but here I am pushing at 90 degrees to the face again to bring theplatform up to the face so that i can remove another long flake.183
The biface is flipped over and we push straight in again to remove another long flake.Here is the flake removed. This one traveled nice and far and really thinned the area ahead verywell. This will make it much easier to continue. It is much easier and less risky to remove a shortflake, but short flakes make it much harder to remove a flake from the opposite face. You pay theprice when you go to remove the next flake. It is better to be aggressive and remove a big flakeor things are sure to go wrong in a hurry.184
Now we switch techniques. As the notch gets further in from the edge, it is too risky to pushstraight in. If the tool tip even touches the edges it will blow them off. So now we come up fromunderneath. Place the tool tip up on the platform and apply the force straight in as before. If thetool tip is too sharp it may bend, so you may need to file the tip a bit duller at this point.However, it still must be narrower than the notch.Here is the flake removed. Again it travelled far and the area ahead is nice and thin and will beeasy to notch.185
OK, now it is time to begin expanding the notch. So now I take 2 flakes side by side on eachface. Here is the first flake removal, again coming up from beneath with the tool tip.Here is the 2nd flake removal. Notice I have moved the tool tip to the other side of the notch end.186
Here are the 2 flakes just removed.We flip the biface over and remove 2 more side by side flakes. here is the first flake removal.187
Here is the 2nd flake removal.We flip the biface over and continue. From hear on, I may remove 1, 2, 3 or more flakes on eachface, whatever is needed to open the notch up to the desired thickness. This part is relativelyeasy.188
Here is the first notch completed. Now I will follow the same procedure for the 2nd notch. Note:Normally I do both notches at the same time. It is much easier to maintain symmetry by havingthem travel along at the same pace, rather than trying to make the 2nd notch match the first.Also, if you stall the notch out but are in far enough you can stop and call it good enough.Here the 2nd notch is completed. Notice that I did manage to blow off a tiny pice of the 2ndopening. This happened when the tool tip accidentally touched the opening, it does not takemuch to blow them off!189
Opposite face shown here.Here are all the tools used to make the point from start to finish190
This is another view of the notching tool unassembled. I shaped and cut a plastic bolt to a bulletshape and then heated up a horseshoe nail repeatedly over the stove and inserted it into the bolttip until it penetrated all the way through. This fits the nail like a mold and nails are easilyreplaced. The handle is steel pipe with the same diameter as the bolt and makes a snug fit. Awooden dowell is glued inside the pipe to act as a stop for the bolt and nailOne final word, this is not necessarily the best way to notch a point, it is just one way of manypossible ways. I tried many different techniques, most ended in failure, and after many attemptsthis is what is working best for me at this time.From http://paleoplanet69529.yuku.com/topic/4139, April 1, 2010, copied with permission191
Photo courtesy of F. Scott CrawfordSection 6: Finding & TreatingKnappable Stone192
Where Can I find Flint?by Mark BrackenHunting flint is one of my favorite things to do. It's an adventure every time I go on a rock hunt!Over the years I have searched far and wide for the finest and most colorful materials forknapping. Many times I have come up empty handed and an empty gas tank. I always wonderedwhere the "Mother Lode" was or if such a thing existed. In my quest, over the years, I havefound some fantastic flint sources. It is a lot of hard work yet very satisfying experience.Here are some tips for your next rock hunt!The best advise I can give to the "flint hunter" is this: familiarize yourself with geological mapsof the areas you plan to hunt. Look everywhere, in plowed fields, look in the gravel of creek andriver bottoms, construction sites, under bridges and eroded roadside ditches. Be sure to getpermission from land owners first! I assure you it is not worth the risk. The rewards are greaterwhen material is gathered with a blessing from the land owner. Beware of "freeze fractured"flint. This is flint that has been exposed to freezing and literally frozen. The problem starts withthis. Flint and all other stones contain moisture deep within the stone, when the temperature fallswell below 32 f. the result of the expanding freezing moisture is fractures the flint. This is a badthing for knappers. This material is useless unless the pieces are large enough to knap. You wantpure crack free stone. It can be a serious challenge to find high grade stone. If you plan ongetting material from construction sites, get them before it freezes. These stones have never beenexposed to freezing temperatures and when they do, they will likely suffer. Searching creek andriver bottoms can be a lot of fun. Take a big copper billet and start testing the gravel to see whatis inside. You never know what you might find!In summary, do a lot of research. Talk to artifact hunters, they know what the flints look likefrom their area. Don't waist your time in areas where there is no flint to be found. Don't expectother knappers to reveal their sources. Many a knapper has spent years to find their "honeyholes". Remember, always get the land owners permission to hunt rocks on their property! Try tohunt areas that have not been exposed to freezing. Use common sense, have safety equipmentalong. Take Band-Aids, gloves, safety glasses and long pants. Just take a day off work and get atank full of gas and have fun exploring the country side. It's great fun! you never know what youmight find!If you don't have much luck or just don't have the time you can get good material from reputablerock dealers. You want to learn more about modern knapping? Simply search this site or viewthe Links page.From http://www.flintknappingtools.com/where flint.html, March 31, 2010, copied withpermission193
Flintknapping Buyer's Tipsby Wilkie CollinsThese tips could save you hundreds of dollars1) Many people who sell knapping stone do not know how to grade it very well forflintknapping.Silica is available at about 3 cents per pound in the form of gravel and up to 1500 dollars perpound in the form of semiprecious stones. Knappable silica is somewhere between these twofigures in value, and the skill of the vendor at stone grading and his familiarity with the specificstone he sells are your only reliable access to value. Someone who offers you graded stone forless than a dollar a pound is probably offering you what most flintknappers would call "gravel".2) For best value, purchase your supplies and tools from one dealer, especially while youare learning the basics.Knapping materials vary, and purchasing your tools from the dealer that offers the stone can helpto ensure success. Some billets don't work well with everything.3) Learn to flintknap with the best material you can acquire, then move on toexperimenting with all of the lower grade materials that may look more like the stone yourown local Indians had to use 'cause they couldn't get the good stuff.Heated Arkansas novaculite is a near perfect stone for the beginning flintknapper. Novaculite isless brittle than obsidian and is much safer to use. It is far more consistent than chert, can bereliably heated to knappability, and is consistently available in larger high grade pieces thanother forms of silica.Students typically learn faster with heated novaculite and experienced knappers who demonstratelook extremely competent when using novaculite as opposed to less consistent materials.We do not recommend obsidian for beginnning flintknapping because:a) It behaves too much like glass, and one is generally better trained by using a material morelike natural stone, andb) It is very dangerous to chip and will leave you bleeding.194
5) Whenever possible, obtain your stone from the people who mined it, and who mined itFOR FLINTKNAPPING.If the person who supplies your knapping stone has purchased it second or third hand, thelikelihood is great that you are getting second or third rate materials. While many dealers mayprotest that their stone is "#1 quality", if they did not do the mining and are not experiencedflintknappers they might not even know what the best material looks like.Questions to ask your knapping stone dealer:a) Is this stone heated?If it is not, it will probably be very difficult to work especially for a beginner. The exception isobsidian.There is a tremendous difference in material that CAN be worked raw and material that canEASILY be worked raw. After teaching hundreds of students our advice is that your first 50 lbs ofmaterial be graded and heated.b) Is this material spalled and bifaced?If it is not, it CANNOT be graded as well as processed material, and is a risky buy. Mostbeginners ruin more material than they successfully spall (strike into large flakes) from blocks.Don't be snookered into "comparing apples to oranges". Knapping material sold as a ten pound,six inch block for a dollar a pound might not make even a single 4 inch spall. But if you buy #1graded spalled material with the size listed you will know what you are getting and might getseveral four inch spalls PER POUND. Two pounds of 5.00 per pound material could very easilyyield you more usable stone than 10 or 12 pounds of blocks or poorly graded stone.The rule of thumb for knapping stone value goes basically as
Micro Flint-Knapping by Craig Libuse Scaling traditional techniques to extremely small sizes Dan White (pictured) has been able to create his own form of art, based on what was one of the first forms of art—flint-knapping (shaping stone by breaking off chips). He calls it "micro-knapping". Prehistoric cultures