Transcription
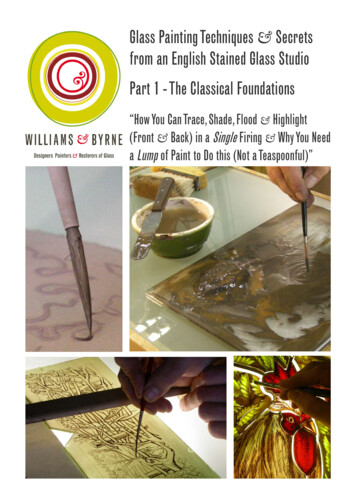
Glass Painting Techniques & Secretsfrom an English Stained Glass StudioPart 1 - The Classical Foundations“How You Can Trace, Shade, Flood & Highlight(Front & Back) in a Single Firing & Why You Needa Lump of Paint to Do this (Not a Teaspoonful)”
How You Can Trace, Shade, Flood & Highlight in a Single Firing & Why You Absolutely Need a Lump of Paint to do ThisContentsWhat you’ll learn from Part 13How to mix you paint and manage your palette10Silhouettes and what they teach you about glass painting 22Softened Lines or “How to shade before you trace”35It’s that Pike again51How to put traced lines exactly where you want them55What you’ll learn from Part 271Case study #1 – Dog roses73Case Study #2 – Lion77How to mix glass paint and oil83Moth84Phoenix and other beasts88Duck103Gargoyle118King’s head120Saint Martha123Part 3 — 20 quick points about silver stain136Media137The method137Firing schedules139Discovering the best schedule for your kiln140Different brands of oil and where to get them141Green man – step-by-step project142Green man – design150Afterword151Glass Painting Part 1 — The Foundations What You’ll Learn from Part 1
How You Can Trace, Shade, Flood & Highlight in a Single Firing & Why You Absolutely Need a Lump of Paint to do This1: What you’ll learn from Part 1Rather than starting with a long-winded introduction, let’s beginkinds of questions in your head. It doesn’t matter what thesequestions are; it just matters you get them answered.with a demonstration. This way you can see for yourself thetechniques you’ll discover in this first section.(In part 2, you’ll learn all about oil; in part 3, silver stain.)So right now, over the next five pages, you’ll find a whirlwindoverview of how to change this bare piece of orange-pink glass (it’shand-made, hence the slight variation in colour from left to right)into the medieval pike below. And this is the really interestingpoint: it’s all done in just one firing.Now no one’s saying this “one-step-firing” approach is the onlyway to paint stained glass, or that it’s the “best” or what-haveyou.Far from it.It’s just that anyone who masters this one-step-firing techniquewill develop the confidence and skill to tackle most other glasspainting techniques. Quite a bonus, that. Hence the importanceof your decision to invest in yourself by studying this guide andworking through the various projects.And especially by your decision to practice and repeat all thetechniques you discover here.The whole point about the following overview is to raise allGlass Painting Part 1 — The Foundations What You’ll Learn from Part 1
How You Can Trace, Shade, Flood & Highlight in a Single Firing & Why You Absolutely Need a Lump of Paint to do This1. The best way to clean your glass2. How to use an undercoat to prime your glass3. How to use the blender - think about the grip,rhythm and speed of blending4. The huge benefit of starting with an undercoat like this - it’s often so much better than bare glass5. A useful tip to help stop tiredness in your eyes7. How to “copy-trace” a line - it’s not the sameas “tracing”8. Discover which lines you should copy-trace(not all of them if you also want to shade)6. Good ways to use the painting bridge (look atthe left hand)9. The advantages of copy-tracing, and the general benefits of painting layer upon layer, rather thandoing it all at once. Clue: it allows the image to emerge because nothing’s fixed until the very endGlass Painting Part 1 — The Classical Foundations 10. How to strengthen your copy-traced linesWhat You’ll Learn from Part 1
How You Can Trace, Shade, Flood & Highlight in a Single Firing & Why You Absolutely Need a Lump of Paint to do This11. The advantages of copy-tracing first and strengthening afterwards13. How to test your paint12. How to gain complete control of your palette14. How to paint a wash on top of unfired tracedlines15. Plus much more about how to use yourblender16. You’ll also find out everything about how to turn traced lines into gentle shadows .17. — then how to reinstate your traced lines .18. — whilst also preserving your gentle shadows19. Adding further details. And remember,nothing has been fired yet! (How many layers sofar?)Glass Painting Part 1 — The Classical Foundations What You’ll Learn from Part 1
How You Can Trace, Shade, Flood & Highlight in a Single Firing & Why You Absolutely Need a Lump of Paint to do This20. Now the fish is starting to look smart, but you won’t stop here —21. You’ll also learn how to build a “wall” of glasspaint22. A wall like this23. How to fill the walled area with thick paint24. Maybe you imagine this paint will blister inthe kiln? (How many layers so far?)25. But no, it won’t blister when you know you to do it properly26. How to add highlights .27. Like thisGlass Painting Part 1 — The Classical Foundations What You’ll Learn from Part 1
How You Can Trace, Shade, Flood & Highlight in a Single Firing & Why You Absolutely Need a Lump of Paint to do This28. But you won’t even stop there - you’ll also learn to soften your highlights like this29. And then how to use scrubs .30. — to build a border31. And sticks and needles to pick out finedetails32. How to paint on the back of the glass35. — some gentle rubbing to create these lovelytextures34. All that’s needed now is .Glass Painting Part 1 — The Classical Foundations33. Then how to use a toothbrush . What You’ll Learn from Part 1
How You Can Trace, Shade, Flood & Highlight in a Single Firing & Why You Absolutely Need a Lump of Paint to do This36. And there you are - ready to fire if you wish. So, to summarize . How to clean glass And how and why to prime the glass How to copy-trace And how to strengthen How to turn traced lines into gentleshadows How to reinstate the traced lines and keepthe shadows - this is very important! Plus how to add fine extra details How to flood and silhouette All about highlighting Plus adding texture, shadows and highlightson the back . all in just one firingGlass Painting Part 1 — The Classical Foundations What You’ll Learn from Part 1
How You Can Trace, Shade, Flood & Highlight in a Single Firing & Why You Absolutely Need a Lump of Paint to do ThisDifferent approaches to painting on glassThe traditional approach is to paint the trace lines onto bare glass,then fire the glass. Once fired for the first time, you would thenshade and highlight, then fire the glass a second time. Perhaps youwould also shade, highlight and fire the glass a third time. Andso on. Now the traditional approach to teaching follows the samesequence: learn to trace, and then learn to shade. Fine! Except forthe inconvenient truth that people are actually far better servedby doing things very, very differently. Yes, that does pose quite aproblem. Which is why the sequence in this guide is the way it is.Very, very different.First up, yes, you do begin with how to mix your glass paint.But the quantities will definitely be most unlike the ones you’reused to. A lump of glass paint is what you need, not a thin andpathetic teaspoonful which is forever drying up on you. (You’ll seewhy in just a few minutes.)Second, you’ll start work with silhouettes. Why silhouettes? Theshort answer is, silhouettes are the best ever means of improvinganyone’s technique with the tracing brush. Thus silhouettes assistboth the complete beginner and also (as a warm-up exercise)the improver or professional. (Full reasons will follow in theirappropriate place.) And it’s this selfsame silhouetting techniqueyou’ll use to flood around the pike in steps 23 and 24.Third, you’ll then move onto shading in the way you’ve justseen: namely, applying one or more layers of paint, then, whenthey’re dry, applying a wash, seizing your blender and using it topush about the underlying layers. See steps 14 - 16 in the precedingoverview. (All will be explained and demonstrated in due course.)By this time, you’ll have had many hours’ experience of usingyour tracing brush: silhouettes require the tracing brush to builda wall within which to “flood” (see steps 21 - 22 in the precedingoverview), and shading (as done here) requires the tracing brushto build up several layers of line which can then be “softened” andturned into gentle shadows (see steps 14 - 16 again).All these accumulated “flying hours” mean you’ll now have theconfidence and skill to place and shape your traced lines exactly asyou want them (see steps 19 -20).Along the way, you’ll also get to grips with highlighting andusing the back of the glass as well as the front.Thus, when you want to, you’ll know how to trace, shade, floodand highlight in a single firing. Just as the title says (we keep ourpromises). At which point you can return to the pike and paintone for yourself. He’s great fun to do. He takes a good amountof concentration and perhaps an hour of your time, and by nowyou’ll be ready for this challenge. (As you’ll see, everyone’s pike isalways different: the eye and teeth in particular are responsible fora whole lot of character .)Glass Painting Part 1 — The Foundations What You’ll Learn from Part 1
Glass Painting Part 1 — The Classical Foundations 1. The best way to clean your glass . How to use an undercoat to prime your glass 3. How to use the blender - think about the grip, rhythm and speed of blending 4. The huge benefit of starting with an undercoat like this - it's often so much better than bare glass 5. A useful tip to help .


