Transcription
Deployment GuideDeploying Microsoft Exchange Server/OutlookWeb Access and F5 s FirePass Controller
Introducing the FirePass and Microsoft ExchangeServer configurationWelcome to the FirePass Exchange Server Deployment Guide. This guideshows you how to configure the F5 FirePass controller for secure remoteaccess to Microsoft Exchange Server, including Outlook Web Access(OWA).Microsoft Exchange Server helps increase knowledge worker productivitywhile helping organizations reduce their total cost of ownership (TCO) inareas such as server and site consolidation.F5’s FirePass controller is the industry leading SSL VPN solution thatenables organizations of any size to provide ubiquitous secure access foremployees, partners and customers to applications such as MicrosoftExchange Server, while significantly lowering support costs associated withlegacy client-based VPN solutions.For more information on the Microsoft Exchange Server, rerequisites and configuration notesThe following are prerequisites for this deployment:1-1 The FirePass controller should be running version 5.4.2 or later. This deployment was tested using Microsoft Exchange Server 2003. All of the configuration procedures in this document are performed onthe FirePass controller. For information on how to deploy or configurethe Exchange Server 2003 or Outlook Web Access, consult theappropriate Microsoft documentation. This configuration uses previously defined Active Directory groups toprovide authentication and simple user maintenance. For information onhow to configure Active Directory groups, consult the properdocumentation. Briefly review the basic configuration tasks and the few pieces ofinformation, such as IP addresses, that you should gather in preparationfor completing this configuration.
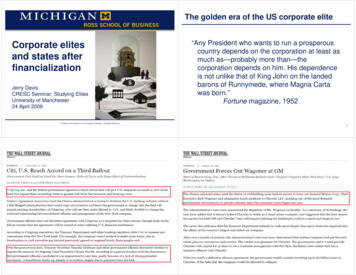
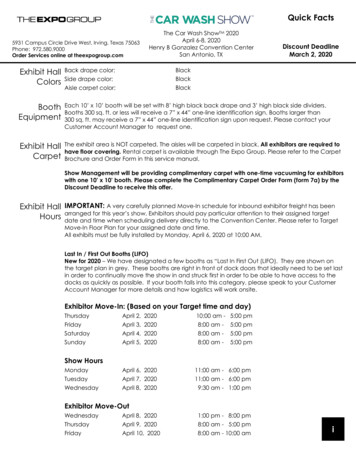
Deploying Microsoft Exchange Server/Outlook Web Access and F5’s FirePass controller This Deployment Guide is written to the scenario outlined in thefollowing section. It is meant as a template; modify the configuration asnecessary for your deployment.NoteThis document is written with the assumption that you are familiar with boththe FirePass controller and Microsoft Exchange Server. For more detailedinformation on these products, consult the appropriate documentation.Configuration scenarioFor the scenario used in this Deployment Guide, the Microsoft Exchangedeployment, along with an Active Directory instance, resides behind aBIG-IP system. A group on the FirePass controller is given three accessmethods for reading Microsoft Exchange/Outlook Web Access email: Through an Outlook Web Access Portal Favorite on the FirePassdevice. Through the Network Access adapter, with a locally installedMicrosoft Outlook client. Through the Mobile Email feature, which provides lightweight, pureHTML access to Exchange mailboxes using IMAP/POP3 and SMTP.This Deployment Guide describes how to configure the FirePass controllerto allow secure remote access to the Exchange device(s), using ActiveDirectory for authentication. In our deployment, the FirePass device and theExchange deployment use a common Active Directory Domain Controller.This guide also contains procedures on configuring some endpoint securityfeatures, including antivirus checks.The following figure is a logical representation of our deployment.FirePass Deployment Guide1-2
Figure 1.1 FirePass Exchange Server logical configurationConfiguring the FirePass controller for deploymentwith Microsoft Exchange ServersTo configure the FirePass controller for allowing secure remote access to theMicrosoft Exchange Servers deployment, use the following procedures: Connecting to the FirePass controller Creating groups on the FirePass controller Configuring auto-logon Configuring Outlook Web Access through the FirePass device Configuring Mobile Email for HTML-based access to email1-3
Deploying Microsoft Exchange Server/Outlook Web Access and F5’s FirePass controller Configuring Network Access to the Exchange server Configuring Endpoint securityConnecting to the FirePass controllerTo perform the procedures in this Deployment Guide you must haveadministrative access to the FirePass controller.To access the Administrative console, in a browser, type the URL of theFirePass controller followed by /admin/, and log in with the administrator’suser name and password.Once you are logged on as an administrator, the Device Management screenof the Configuration utility opens. From here, you can configure andmonitor the FirePass controllerCreating groups on the FirePass controllerIn this configuration, we configure two types of groups on the FirePasscontroller, Resource and Master groups. Master groups contain userinformation, including details about authentication methods. Resourcegroups contain information about applications (resources) that are availableto FirePass controller users.Creating a Resource groupResource groups allow you to preconfigure specific applications and accessby group, and assign the group to a master group or an individual user. Forthis configuration, we create a single resource group for employees.TipIf you already have a resource group configured on the FirePass controllerfor employees, you can use that group and this procedure.To configure a resource group1. From the navigation pane, click Users, expand Groups, and thenclick Resource Groups.2. Click the Create new group button.The Group Management - Create New Group screen opens.3. In the New group name box, type a name for your group and clickthe Create button. In our example we type employees email. Thenew group appears in the Resource Groups table.FirePass Deployment Guide1-4
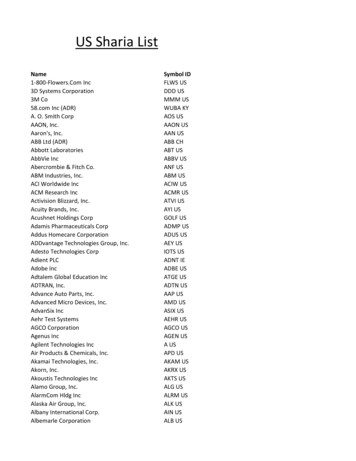
Creating the Master GroupFirePass controller master groups are composed of users, authenticationmethods, and security and policy information. The next task is to create aMaster group that will use the resource group we just created.To create a new Master Group1. From the Administrative Console navigation pane, click Users,expand Groups, and click the Create new group button.The Group Management Create New Group screen opens.2. In the New group name box, type the name of your group. In ourexample we type exchangeAD.3. In the Users in group box, select External.4. From the Authentication method list, select Active Directory.5. In the Copy settings from list, make sure Do not copy is selected(see Figure 1.2).6. Click the Create button.The General tab of the new Master Group displays.Figure 1.2 Creating a new Master Group7. Click the Resource Groups tab.The Resource Groups screen opens.8. From the Available box, select the name of the Resource group youcreated in the Creating a Resource group section. In our example,we select employees email.9. Click the Add button to move the group to the Selected box, andclick the Update button. The Resource group is now associated withthe Master group.1-5
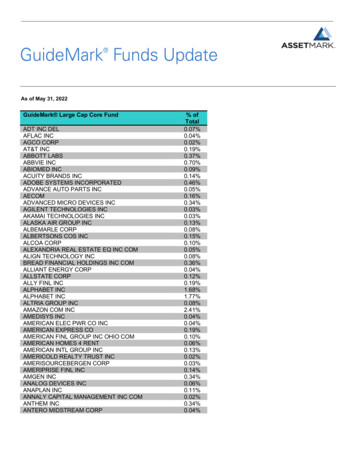
Deploying Microsoft Exchange Server/Outlook Web Access and F5’s FirePass controllerConfiguring the Master group for Active Directory authenticationThe next step is to configure the Master group to use Active Directoryauthentication.To configure the FirePass Master group to use ActiveDirectory authentication1. From the navigation pane, click Users, expand Groups, and thenclick Master Groups.2. Click the name of the Master group you created in the Creating theMaster Group section. In our example, we select exchangeAD.3. Click the Authentication tab.4. In the Configure Active Directory Settings section, configure theappropriate settings for your Active Directory deployment. Type thefully qualified domain name in the Domain name box, and IPaddresses or DNS names for the Kerberos (Domain Controller) andWINS servers in their respective boxes (see Figure 1.3).5. Click the Save Settings button.Figure 1.3 Active Directory Authentication settingsFirePass Deployment Guide1-6
6. Click Select Domain Group.The Active Directory Authentication screen opens.Important: Be sure you have entered the Domain admin name andpassword and saved the settings before clicking Select DomainGroup.7. From the list, select the Active Directory Domain group the usermust belong to in order to authenticate, and click the Select Groupbutton (see Figure 1.4).8. Click the Save Settings button again. You can also click the TestSaved Settings button to test the configuration.Figure 1.4 Selecting the Active Directory Domain GroupConfiguring auto-logonThe FirePass allows auto-logon (single sign-on) to sites supporting basic orNTLM authentication with user's FirePass credentials. In our scenario, weconfigure this option to allow single sign-on (SSO).To configure SSO/NTLM for auto-login1. From the navigation pane, click Portal Access.2. Under Web Applications, click Master Group Settings.3. From the Master Group list at the top of the page, select the MasterGroup you created in the Creating the Master Group section. In ourexample, we select exchangeAD.The configuration settings for the Master group open.1-7
Deploying Microsoft Exchange Server/Outlook Web Access and F5’s FirePass controller4. To ensure members of the group only have access to theadministrator-configured Favorites, make sure that the check boxunder Access limitation is checked.5. In the NTLM and Basic Auth Proxy section, click a check in theAuto-login to Basic and NTLM auth protected sites usingFirePass user credentials box.The NTLM and Basic Auth domain boxes display.6. In the NTLM Auth Domain (optional) box, you can type thedefault Domain to be used in conjunction with the auto-loginsupport.7. In the Basic Auth Domain (optional) box, you can type the defaultDomain to be used in conjunction with the auto-login support.When specified, this value is prepended to the user name in theduring Basic authentication (for example MYDOMAIN\username).8. Click the Update button.Figure 1.5 Configuring NTLM Master Group SettingsConfiguring Outlook Web Access through the FirePass deviceFor organizations who want an added layer of security for their OutlookWeb Access deployment, want to require antivirus or other pre-logonchecks, or do not want to make Outlook Web Access directly accessiblefrom the Internet, the FirePass can be configured to render Outlook WebAccess inside the FirePass user window.FirePass Deployment Guide1-8
To configure Outlook Web Access through the FirePass1. From the navigation pane, click Users, expand Groups, and thenclick Resource Groups.2. From the Resource Groups table, find the row with the name of theResource group you created in the Creating a Resource groupsection (employee email in our example). In this row, from thePortal access column, click Edit (see Figure 1.6). The WebApplications section of the Resource Group page opens.Figure 1.6 The Resource groups table3. Under Web Application Favorites, click Add New Favorite. TheFavorite options display.4. Type a name for the Favorite. In our example, we type OutlookWeb Access. This Favorite link only displays for members of theemployee email group.5. From the Web Application Type box, select Microsoft OutlookWeb Access.6. In the URL box, type the URL used to access the Outlook WebAccess. If you are using a BIG-IP system in front of thedeployment, this URL should point to the virtual server address. Inour example, we type http://webmail.company.com/.7. Configure the rest of the settings as applicable to your deployment(see Figure1.7).8. Click the Add New button.The new Favorite is added to the list, and will appear in the PortalAccess Favorite section when the end user’s logs onto the FirePassdevice.1-9
Deploying Microsoft Exchange Server/Outlook Web Access and F5’s FirePass controllerFigure 1.7 Adding a Web Application Favorite to the Resource groupConfiguring Mobile Email for HTML-based access to emailAs an alternative (or in addition to) using Outlook Web Access, you can usethe FirePass controller’s Mobile Email feature as a lightweight andextremely secure way of viewing Microsoft Exchange email.To configure mobile access1. From the navigation pane, click Portal Access and then clickMobile E-Mail.2. Under Corporate mail account, click a check in the Enablecorporate mail account box.3. In the Account Name box, type a name for this email account. Inour example, we type Exchange Server.4. In the Mail Server box, type the name or IP address of theExchange server. In our example, we type exchange1.5. In the Type box, select IMAP.6. In the IMAP Folders box, type the folders that should be displayed.A user can add to this list independently. Adding the folders is doneto avoid the common confusion created by Exchange servers thatFirePass Deployment Guide1 - 10
display non-email items such as contacts, calendar, etc, as emptyfolders. In our example, we type Inbox,Drafts,Notes,Sent Items. Inthe Sent Folder box, type Sent Items.7. From the Login Information box, choose the setting appropriate foryour configuration. In our example, we select User supplies displayand login information during the first logon.8. Click the Update button.9. Configure the rest of the options as applicable for your deployment,making sure to click the appropriate Update button if you makechanges.Configuring Network Access to the Exchange serverFor remote users with an Outlook client on their PC, the FirePass can beconfigured to grant access to the corporate network to communicate directlywith the Exchange server.To configure Network access to the Exchange Server1. From the navigation pane, click Network Access, and then clickGlobal Settings.2. From the Add new IP Address Pool section, in the Name box, typea name for this pool of IP addresses.3. In the IP Address box, type the Network address for this pool. Inour example, we type 10.10.101.0.Important: Using Network Access requires you have one internal IPaddress for each concurrent user, so make sure this Networkaddress can handle all possible concurrent users.Warning: To prevent routing problems, ensure the Network addresspool does not contain the FirePass device’s IP address.4. In the Mask box, type the appropriate subnet mask. In our example,we type 255.255.255.0.5. Click the Add button. In our example, this creates enough addressesfor 254 users.6. Leave the Use NAPT to Access LAN box checked.7. Click the Apply these rules now button.The IP address pool is now configured.8. From the navigation pane, click Resources.The Network Access Resource screen opens.9. In the Connection Name box, type a name for the connection. Thisis the name the end user sees in the Favorites list. In our example,we type internal exchange.1 - 11
Deploying Microsoft Exchange Server/Outlook Web Access and F5’s FirePass controller10. In the DNS and WINS server boxes, type the appropriate IPaddresses.11. You can optionally configure split tunneling. To configure splittunneling, click a check in the Use split tunneling box. The LANand DNS address space boxes display. Configure these options asapplicable for your deployment.12. If you want the FirePass device to perform GZIP compression, clicka check in the Use gzip compression box.13. Click the Update button.14. In the Configure IP Address Assignment section, make sure there isa check in the Assign IP address dynamically using IP addresspool (lowest priority: Enabled by default) box.15. From the Select IP Address Pool list, select the pool you created instep 2, and click the Update button.Configuring Endpoint securityOne of the new security features in the 5.4.2 release of the FirePasscontroller is the ability to set endpoint security on a extremely granularlevel. For this Deployment Guide, we illustrate how to configure a pre-logonsequence for inspections before a user logs on. For more information onendpoint security, see the online help.Pre-logon sequenceThe pre-logon sequence allows administrators to create one or moresequences of inspections for items such as installed antivirus programs orOS patch levels. For this Deployment Guide, we configure a WindowsAntivirus Checker.To configure a pre-logon sequence1. From the navigation pane, click Users, expand Endpoint Security,and click Pre-Logon Sequence.2. In the New Sequence section at the bottom of the page, type a namefor the sequence in the Create New Sequence box. In our example,we type exchangeBasic.3. From the Based on list, select template: Collect information withno pre-logon actions.4. Click the Create button.The new sequence appears in the Select Sequence to Use table.FirePass Deployment Guide1 - 12
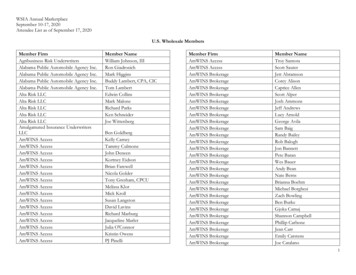
5. In the row of the sequence you just created, click the Edit button.Important - Do not click the radio button next to the sequence yet. Ifyou click the radio button, the Edit link will be replaced with theView link, and you are not able to edit the sequence.The Pre-Logon Sequence Editor opens.6. Move the curser between Sequence Start and Logon AllowedPage. An add [ ] link appears on the arrow (see the circle marked 1in Figure 1.8). Click the add link.The Change Sequence panel appears on the right.7. Click the Check for Antiviruses option button, and click the ApplyChanges button.The Edit Action panel opens.Note: The Check for Antiviruses is an optional feature on theFirePass controller. If your device does not have this license, youwill not see this option.8. Under Inspectors, click Windows Antivirus Checker.The Endpoint Inspector Details page opens in a new window.9. Configure these options as applicable for your deployment. Formore information, click Help.10. Click the Update button.11. In the Sequence pane, find AV installed, and click the associatedLogon Denied Page link (see the circle marked 2 in Figure 1.8).The End Page Properties pane appears on the right.12. From the Type box, select Logon Allowed Page. This allows a userto logon if they have an antivirus checker installed. You canoptionally type a message for failed logons.13. Optional: You can click the Logon Allowed Page or Logon DeniedPage links for the other options to produce a custom message whena user is denied access. You can also change the actions taken as aresult of the virus checker’s findings. For example, you might stillwant to allow a user to login if there is virus checking softwareinstalled, but not currently running.In our example, we click Logon Denied Page next to VirusDetected, and type a message informing the user there is a virus ontheir computer, and they cannot log in.14. When you are finished, click Back to Console in the upper rightcorner of the screen (see the circle marked 3 in the followingfigure).You return to the Pre-Logon Sequence main page.15. From the Select Sequence to Use section, click the option buttonnext to the sequence you just created. In our example, we clickexchangeBasic.16. Click the Apply button.1 - 13
Deploying Microsoft Exchange Server/Outlook Web Access and F5’s FirePass controller312Figure 1.8 The Pre-Logon Sequence EditorConclusionThe FirePass controller is now configured to allow secure remote access toExchange-based email. Remember that the procedures in this DeploymentGuide are specific to the scenario described in Configuration scenario, onpage 1-2. Use this guide as a template, and modify the configuration asapplicable to your deployment.FirePass Deployment Guide1 - 14
access to Microsoft Exchange Server, including Outlook Web Access (OWA). Microsoft Exchange Server helps increase knowledge worker productivity while helping organizations reduce their total cost of ownership (TCO) in areas such as server and site consolidation. F5's FirePass controller is the industry leading SSL VPN solution that