Transcription
All rights reserved. Under the copyright laws, this manual may not be copied, in whole or in part, without the written consent of Garmin. Garmin reserves theright to change or improve its products and to make changes in the content of this manual without obligation to notify any person or organization of suchchanges or improvements. Go to www.garmin.com for current updates and supplemental information concerning the use of this product.Garmin , the Garmin logo, Fusion , and the Fusion logo are trademarks of Garmin Ltd. or its subsidiaries, registered in the USA and other countries. Thesetrademarks may not be used without the express permission of Garmin. Apple , the Apple logo, iPod touch , and iPhone are trademarks of Apple Inc., registered in the U.S. and other countries. Android is a trademark of GoogleInc. Bluetooth word mark and logos are owned by the Bluetooth SIG, Inc. and any use of such marks by Garmin is under license. NMEA , NMEA 2000 , andthe NMEA 2000 logo are registered trademarks of the National Marine Electronics Association. Other trademarks and trade names are those of theirrespective owners. Made for iPhone 6s Plus, iPhone 6s, iPhone 6 Plus, iPhone 6, iPhone 5s, iPhone 5c, iPhone 5, and iPod touch (5th and 6th generation)."Made for iPod and iPhone" means that an electronic accessory has been designed to connect specifically to an iPod or an iPhone respectively, and has beencertified by the developer to meet Apple performance standards. Apple is not responsible for the operation of this device or its compliance with safety andregulatory standards. Please note that the use of this accessory with an iPhone may affect wireless performance.
Table of ContentsGetting Started. 1Stereo Controls . 1Using the Dial to Select Items . 1Selecting a Source . 1Entering Text . 1Adjusting the Backlight Brightness and Contrast . 1Stereo Screen . 1Media Player Connection . 1USB Device Compatibility . 1Connecting a USB Device . 2Connecting an Auxiliary Device . 2Adjusting the Volume . 2Adjusting the Tones . 2Speaker Zones . 2Bluetooth Device Playback . 2Connecting a Compatible Bluetooth Device . 2Bluetooth Range Information . 3Selecting a Different Bluetooth Source . 3Bluetooth Source Settings . 3Fusion-Link Application . 3USB Device Playback . 3Controlling Music Playback on an Apple or Android Device . 3Controlling Music Playback on a USB Flash Drive . 3Shuffling Songs . 3Setting a Song to Repeat . 3Radio. 3Setting the Tuner Region . 3Changing the Radio Station . 3Presets . 4Saving a Channel as a Preset . 4Removing Presets . 4General Settings. 4Additional Stereo Control Options. 4Optional Wired Remote Controls . 4FUSION-Link . 4Audio Control with NMEA 2000 . 4Appendix. 4Registering Your Fusion MS-RA70/MS-RA70N . 4Troubleshooting . 4The stereo does not respond to key presses . 4The stereo keeps locking up when connected to an Appledevice . 4The stereo is not finding my connected Apple device . 5My Bluetooth audio is interrupted by short breaks . 5The stereo does not display all song information from myBluetooth source . 5Specifications . 5Stereo Dimension Drawings . 5Front Dimensions . 5Side Dimensions . 5Top Dimensions . 5Index. 6Table of Contentsi
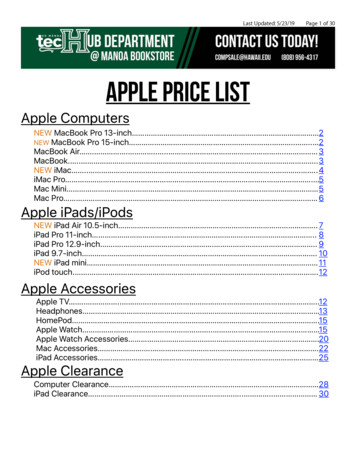
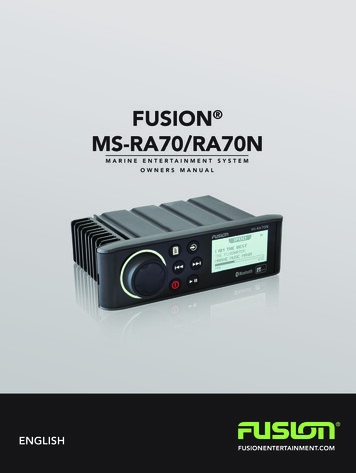
Getting StartedThis manual covers the features of both the Fusion MS-RA70and the Fusion MS-RA70N. Only the Fusion MS-RA70N iscompatible with NMEA 2000 , and all topics that refer to NMEA2000 functionality apply to the Fusion MS-RA70N only. Stereo Controls4 Selectto save the new text.Adjusting the Backlight Brightness and Contrast1 Select SETTINGS LCD.2 Press the dial to select brightness or contrast.3 Adjust the brightness or contrast.4 Select to exit the menu.Stereo ScreenThe information displayed on the stereo screen variesdepending on the source selected. This example shows thestereo playing a track on an iPhone mobile digital device. Dial À Turn to adjust the volume.Press to switch between zones.Hold for at least one second to adjust the subwoofer levels.Turn to move through the menus or adjust a setting.Press to select the highlighted option. Select to open a menu. Select to return to the previous screen or menu.Select to change the source (Selecting a Source, page 1). Select to skip to the previous track, when using an applicablesource. AM or FM source: Select to tune to the previous station. Hold for faster tuning (manual mode only). AUX source: Select to decrease the gain for the connectedsource. Select to skip to the next track, when using an applicablesource. AM or FM source: Select to tune to the next station. Hold for faster tuning (manual mode only). AUX source: Select to increase the gain for the connectedsource. Select to turn on the stereo. When the stereo is on, select to mute the stereo. Hold to turn off the stereo. Select to pause or resume. AM or FM source: Select to cycle through the tuning modes (auto or manual)and presets (when two or more presets are saved). Hold to save this station as a preset.ÀÁÂÃÄÅÆRepeat status iconÇTrack durationShuffle status iconSourcePlay status iconTrack details (if available)Elapsed timeCurrent track number out of total number of tracks in the playlist (ifavailable)Media Player ConnectionCAUTIONAlways disconnect your media player from the stereo when notin use and do not leave it in your vessel. This helps reduce therisk of theft and damage from extreme temperatures.Do not remove the media player or use your stereo in adistracting manner while operating the vessel. Check and obeyall marine laws in association with use.The stereo accepts a variety of media players, includingsmartphones and other mobile devices. You can connect acompatible media player using a Bluetooth wireless connectionor a USB connection to the USB port.NOTE: If you connect a supported media player to the USB port,you must either disable Bluetooth on the media player, or unpairthe Bluetooth connection from the stereo to avoid possiblemedia-playback issues. Using the Dial to Select ItemsYou can use the dial to highlight and select items on the screen. Turn the dial to select an item on the screen. Press the dial to select the highlighted option.Selecting a Source1 Select .2 Select an option: Turn the dial to highlight a source. Selectrepeatedly to highlight a source.3 Press the dial to select the source.Entering TextYou can enter text to change some settings field values on thisdevice.1 In a settings field that allows you to enter text, select toerase the existing characters.2 Use the dial to choose a letter, and press the dial to select it.3 Add additional letters to finish entering the text.Getting StartedUSB Device CompatibilityYou can use a USB flash drive or the USB cable included withyour media player to connect a media player or mobile device tothe USB port.The stereo is compatible with iAP2 Apple devices such as theiPhone 6s Plus, iPhone 6s, iPhone 6 Plus, iPhone 6, iPhone 5s,iPhone 5c, iPhone 5, and iPod touch (5th and 6th generation).The stereo is compatible with Android devices that support theAndroid Open Accessory (AOA) protocol.NOTE: The stereo is not compatible with Android devices inMTP or PTP mode. See the instructions for your Android deviceto connect using AOA, if necessary.The stereo is compatible with media players and other USBmass storage devices, including USB flash drives. Music onUSB drives must meet these conditions: 1
The USB mass storage device must be formatted using theFAT32 file system. The music files must be formatted as MP3 files. Each folder on the storage device can contain a maximum of250 MP3 files.Connecting a USB DeviceYou can connect a USB device to the USB port on the stereo.1 Locate the USB port on the back of the stereo.2 Connect the USB device to the USB port.3 Select the USB source.Connecting an Auxiliary DeviceYou can connect various auxiliary devices to the stereo, such asTVs, DVD players, game consoles, and media players. Thesedevices have either RCA connectors, a line output, or aheadphone output jack.1 Locate the auxiliary connectors on the wiring harness.2 If necessary, connect an RCA-to-3.5 mm adapter cable to theauxiliary device.3 Connect the auxiliary device to the RCA connectors on thewiring harness.Adjusting the Gain for the Auxiliary DeviceYou can adjust the gain for the connected auxiliary device toachieve a volume level similar to that of other media sources.You can adjust the gain in 1 dB increments.1 Select an auxiliary source.2 Select an option: To increase the gain, select . To decrease the gain, select .Auxiliary DeviceRecommended GainSetting(dB)Portable media player with headphone from -9 dB to -6 dBoutputCD/DVD player with line output-6 dBPortable media player with line output0 dBGame console with line output0 dBOlder audio/visual equipment with lineoutput (for example, VHS or cassettedeck)from 6 dB to 9 dBNOTE: To achieve the best audio quality when using aportable media player with headphone output, it may benecessary to adjust the volume control on the media player,instead of adjusting the gain.Adjusting the Volume1 Use the dial to adjust the volume.2 If necessary, press the dial to switch between zones.TIP: To control all zones at the same time, press the dial untilall zones are highlighted.Adjusting the Tones1 Select SETTINGS TONE.2 Use the dial to adjust the level.3 Press the dial to switch to a different tone.Speaker ZonesYou can group speakers in one area into speaker zones. Thisenables you to control the audio level of the zones individually.For example, you could make the audio quieter in the cabin andlouder on deck.Zones 1 and 2 are powered by the on-board, Class AB amplifier.To use the two line outputs and the two subwoofer outputs, youmust connect external amplifiers.2You can set the balance, volume limit, and name for each zone.You can set the subwoofer level for zone 1.Setting up Speaker Zones1 Select SETTINGS ZONE.2 Select a zone.3 Select one or more options:NOTE: Not all options are available for all zones. To link zones 1 and 2, select LINK TO ZONE 1 to fill theoption button (zone 2 only). To adjust the right and left speaker balance of this zone,select BALANCE, and use the dial to set the balance. To limit the maximum volume output of this zone, selectVOLUME LIMIT, and use the dial to set the limit. To set the subwoofer filter, select SUB FILTER, and usethe dial to set the filter (zone 1 only). To set the subwoofer level, select SUB LEVEL, and usethe dial to set the level (zone 1 only).TIP: To open the subwoofer level from any screen, pressand hold the dial for three seconds. To give the zone a specific name, select SET ZONENAME (Entering Text, page 1).Linking Zones1 Select SETTINGS ZONE ZONE 2.2 Select LINK TO ZONE 1 to fill the button.When zones 1 and 2 are linked, appears between zones 1and 2 on the volume screen.Adjusting the Subwoofer FilterYou can use the subwoofer filter setting to control the subwoofercutoff frequency, which can enhance the blend of the soundproduced by the speakers and the subwoofer. Audio signalsabove the selected frequency are not passed to the subwoofer.The setting applies to both subwoofer outputs.1 Select SETTINGS ZONE ZONE 1 SUB FILTER.2 Select a frequency.3 Press the dial to save the selection.Bluetooth Device PlaybackYou can pair the stereo to up to eight Bluetooth media devices.You can control the playback using the keys, but you cannotbrowse the music collection. You should select the song orplaylist on the media device.The availability of song information such as song title, artistname, and track duration depends on the capability of the mediaplayer and music application. Album cover artwork and theshuffle and repeat status icons are not supported over Bluetoothwireless technology.Connecting a Compatible Bluetooth DeviceYou can play media from a compatible Bluetooth device usingthe Bluetooth wireless connection.1 Select the Bluetooth source.2 Select DISCOVERABLE to make the stereo visible toyour compatible Bluetooth device.NOTE: The stereo is discoverable for only two minutes toprevent interruption to audio streaming over Bluetoothwireless. If more than two minutes pass before you connect acompatible device, you must repeat this step.3 Enable Bluetooth on your compatible Bluetooth device.4 Bring the compatible Bluetooth device within 10 m (33 ft.) ofthe stereo.Bluetooth Device Playback
5 On your compatible Bluetooth device, search for Bluetoothdevices.6 Select the stereo from the list of detected devices.7 Follow the on-screen instructions to pair and connect to thediscovered stereo.When pairing, your compatible Bluetooth device may ask youto confirm a code on the stereo. The stereo does not displaya code, but it does connect correctly when you confirm themessage on the Bluetooth device.If8 your compatible Bluetooth device does not immediatelyconnect to the stereo, repeat steps 1 through 7.Bluetooth Range InformationThe stereo and Bluetooth wireless devices have a range of 10 m(33 ft.). For optimal performance, the Bluetooth wireless deviceshould also have a clear line of sight to the stereo.Selecting a Different Bluetooth SourceWhen you have more than one Bluetooth device paired to thestereo, you can select a different source when needed. You canconnect the stereo to up to eight Bluetooth devices.1 With the BLUETOOTH source selected, select .2 Select a Bluetooth device.Bluetooth Source SettingsWith the BLUETOOTH source selected, select .DISCOVERABLE: Allows the stereo to be visible to Bluetoothdevices. This setting turns off automatically after two minutesto prevent possible interruption to audio after pairing aBluetooth device to the stereo.REMOVE DEVICE: Removes the Bluetooth device from thestereo. To listen to audio from this Bluetooth device again,you must pair the device again.You can use the Fusion-Link application on your compatibleApple or Android device to adjust the stereo volume, change thesource, control playback, and adjust some stereo settings.The application communicates with the stereo using theBluetooth connection for the mobile device. You must connectyour compatible device to the stereo using Bluetooth to use theapplication.For information about the Fusion-Link application for compatibleApple or Android devices , go to the Apple App Store or theGoogle Play store.SMUSB Device PlaybackYou can connect various USB media players and smartphonesto the stereo. For example, you can connect an Androidsmartphone, a USB flash drive, or a compatible Apple device.How you access the USB source depends on which type ofmedia player is connected. The stereo is designed for use withone USB connection at a time. You must disconnect one USBdevice before connecting another.NOTE: If you connect an Apple media player to the USB port onthe stereo, you must either disable Bluetooth on the mediaplayer, or unpair the Bluetooth connection from the stereo toavoid possible media-playback issues.Source SelectionsAndroid deviceANDROIDApple deviceIPODSource SelectionsUSB flash driveUSBMP3 media player (as a massstorage device)USBNOTE: If your MP3 media playerdoes not support mass-storagewhen connected using USB, youmust connect it to the stereo as anauxiliary device (Connecting anAuxiliary Device, page 2).The availability of song information such as song title, artistname, and track duration depends on the capability of the mediaplayer and music application.Controlling Music Playback on an Apple orAndroid Device1 Connect a compatible Apple or Android device to the stereousing USB or Bluetooth.2 Select the appropriate source.3 Launch a music application on the connected Apple orAndroid device and begin playback.You can use the stereo controls to play, pause, and skip tracks.Controlling Music Playback on a USB FlashDrive1 Connect a compatible USB flash drive or media player to thestereo.Selectthe USB source.23 Select Name of USB Drive to view the file structure ofthe USB flash drive or media player.Selecta song to begin music playback.4Shuffling SongsFusion-Link ApplicationMedia PlayerMedia PlayerThe shuffle feature is available on the USB source only.NOTE: The shuffle feature is controlled by the music applicationon connected Apple and Android devices, if supported by theapplication.1 From the USB source, select .2 Select SHUFFLE.Setting a Song to RepeatThe repeat feature is available on the USB source only.NOTE: The repeat feature is controlled by the music applicationon connected Apple and Android devices, if supported by theapplication.1 From the USB source, select .2 Select REPEAT.RadioTo listen to AM or FM radio, you must have a suitable marineAM/FM antenna properly connected to the stereo and be withinrange of a broadcasting station. For instructions on connectingan AM/FM antenna, see the stereo installation instructions.Setting the Tuner RegionYou must select the region you are in to receive AM and FMstations properly.1 Select SETTINGS TUNER REGION.2 Select the region you are in presently.Changing the Radio Station1 Select an applicable source, such as FM.USB Device Playback3
2 Selectrepeatedly to move through the tuning modes: Select AUTO to scan and stop on the next availablestation. Select MANUAL to select a station manually. Select PRESETS to select a saved station preset.3 Select or to tune to the station.PresetsYou can save your favorite AM or FM stations as presets foreasy access. You can save up to 15 presets for each radioband.Saving a Channel as a Preset1 With an applicable source selected, tune the stereo to achannel.2 Select PRESETS.3 Select SAVE CURRENT or ADD PRESET.TIP: You can quickly save the selected channel as a preset byholding .Removing Presets1 With an applicable source selected, select PRESETS REMOVE PRESET.2 Select an option: To remove one preset, select the preset. To remote all presets, select REMOVE ALL PRESETS.General SettingsSelect SETTINGS.NOTE: When an option button is filled, the option is on. Whenthe option button is clear, the option is off.ZONE: Enables you to configure the speaker zones.ZONE TONE: Adjusts the bass, middle, and treble tones.LCD: Adjusts the backlight brightness and contrast settings(Adjusting the Backlight Brightness and Contrast, page 1).POWER SAVE: Disables the LCD backlight after one minute ofinactivity to save battery power.LANGUAGE: Sets the language on the device.TUNER REGION: Sets the region used by the FM and AM tunersources.TEL MUTE: Sets the behavior of the mute function when thedevice is connected to a hands-free mobile phone. When acall is received, the device can either mute the audio orbroadcast the call through the AUX input. See your handsfree kit instructions.SET DEVICE NAME: Sets a name for this stereo (Entering Text,page 1).UPDATE UPDATE SOFTWARE: Updates the stereo using avalid software update file on a connected USB flash drive.UPDATE MS-NRX200: ( Fusion MS-RA70N only) Updatescompatible remote controls on the same NMEA 2000 networkusing a valid software update file on a connected USB flashdrive.UPDATE FACTORY RESET: Resets all settings to the factorydefault values.ABOUT: Shows the software versions for the stereo, FUSIONLink , and connected remote.Additional Stereo Control OptionsWhen connected to an optional NMEA 2000 network, FusionMS-RA70N models can be controlled by compatible devices,4such as a Fusion NRX200 remote control or a compatible multifunction display on the same NMEA 2000 network.Optional Wired Remote ControlsThe stereo can be controlled by compatible Fusion wired remotecontrols installed in the audio zones throughout the vessel.Operating the entertainment system from the remote control issimilar to operating it from the main stereo.The wired remote controls operate over an existing NMEA 2000network. All remote controls connected to the same NMEA 2000network as the stereo can control the stereo.The remote control can also serve as an NMEA displayshowing NMEA navigation data or vessel performance data fromother NMEA devices on an existing NMEA 2000 network. FUSION-LinkFUSION-Link technology allows you to fully control compatibleFusion entertainment systems on compatible multi-functiondisplays installed at the helm, flybridge, or navigation station ofthe vessel. This provides you with integrated entertainmentcontrol and a less cluttered console.The partnered multi-function display becomes the portal onwhich all audio on the vessel is controlled, no matter where onthe vessel the stereo is installed. The FUSION-Link equippedstereo can be installed out of sight if space is an issue and usersneed to access the stereo only to replace removable media.FUSION-Link technology offered on this device operates overexisting industry-standard NMEA 2000 networks.For a list of FUSION-Link capable products from companies thatare partnering with Fusion, go to www.fusionentertainment.com.Audio Control with NMEA 2000NMEA 2000 is the most popular marine standard for datacommunication within vessels. It has become the standard forsending navigation and engine management data withinvessels. Fusion introduces an industry-first product byincorporating NMEA 2000 functionality in its audio remotecontrol devices. This enables the user to monitor a series ofavailable NMEA sentences.Go to www.fusionentertainment.com for a full list of supportedNMEA sentences.AppendixRegistering Your Fusion MS-RA70/MSRA70NHelp us better support you by completing our online registrationtoday. Go to www.fusionentertainment.com. Keep the original sales receipt, or a photocopy, in a safeplace.TroubleshootingThe stereo does not respond to key presses Turn off power to the stereo for two minutes to reset thestereo.The stereo keeps locking up when connected to anApple device Press and hold the power button to reset the stereo. Reset the Apple device. Go to www.apple.com for moreinformation. Make sure you have the latest version of iTunes and thelatest operating software on your Apple device. General Settings
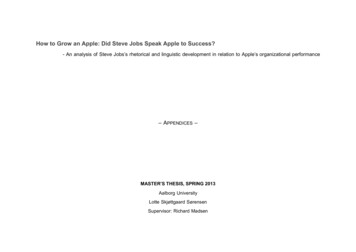
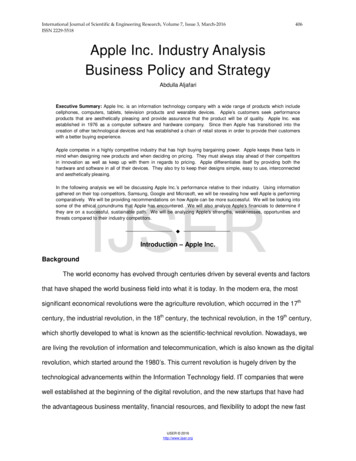
The stereo is not finding my connected Apple device Make sure you have the latest version of iTunes and thelatest operating software on your Apple device. Make sure you have the latest version of the Fusion-Linkapplication on your Apple device. Reset the Apple device.Go to www.apple.com for more information. Contact your Fusion dealer or send an email to Fusion fromwww.fusionentertainment.com.Stereo Dimension DrawingsFront DimensionsMy Bluetooth audio is interrupted by short breaks Ensure the media player is not covered or obstructed.Bluetooth technology performs best with line-of-sightoperation. Bring the media player within 10 m (33 ft.) of the stereo. Turn off the DISCOVERABLE setting after pairing aBluetooth device to the stereo.ÀÁ188 mm (7.40 in.)60 mm (2.36 in.)Side DimensionsThe stereo does not display all song information frommy Bluetooth sourceThe availability of song information such as song title, artistname, track duration, and album cover artwork depends on thecapability of the media player and music application.Album cover artwork and shuffle and repeat status icons are notsupported by Bluetooth technology.SpecificationsGeneralWeight556 g (19.6 oz.)Water resistanceIEC 60529 IPX6 (front), IEC 60529 IPX3(rear)Operating temperature range From 0 to 55 C (from 32 to 131 F)Storage temperature rangeFrom -20 to 70 C (from -4 to 158 F)Input voltageFrom 10.8 to 16 VdcNMEA 2000 LEN1 (50 mA)Compass-safe distance15 cm (5.9 in.)ÀÁÂ23.5 mm (0.93 in.)100 mm (3.94 in.)50 mm (1.97 in.)Top DimensionsOn-board, Class AB AmplifierOutput music power per channel 50 W max. x 4 channels at 4 Ohmsper channelTotal output music power200 W max.Current (standby)less than 10 mACurrent (max.)15 ACurrent (muted)less than 900 mATunerEurope andAustralasiaUSAJapanFM radiofrequencyrange87.5 to108 MHz87.5 to107.9 MHz70 to 90 MHzFM Frequency 50 kHzstep200 kHz50 kHzAM radiofrequencyrange530 to1710 kHz522 to 1620 kHz10 kHz9 kHz522 to1620 kHzAM Frequency 9 kHzstepAppendixÀÁÂ161 mm (6.34 in.)23.5 mm (0.93 in.)12 mm (0.47 in.)5
IndexAAM 3, 4Android device 3Apple device 1, 3–5auxiliary input 2Bbacklight 1bass 2Bluetooth 3Bluetooth devices 2, 3Ddevice 1keys 1registration 4FFM 3, 4FUSION-Link 4Ggain 2Kkeys 1, 4Llanguage 4Mmedia player 1menu key 1NNMEA 2000 4Ppower key 1presets 4product registration 4RradioAM 3FM 3registering the device 4remote control 4repeat 3Ssmartphone 3source 1speaker zones 2subwoofer 2Ttimeformat 4setting 4tone 2, 4treble 2UUSB 1–3flash drive 3Vvolume 2adjusting 26Index
The stereo is compatible with Android devices that support the Android Open Accessory (AOA) protocol. NOTE: The stereo is not compatible with Android devices in MTP or PTP mode. See the instructions for your Android device to connect using AOA, if necessary. The stereo is compatible with media players and other USB