Transcription
Customer RelationshipManagementTraining GuideC100 Customer Relationship Management
Contents 2ContentsIntroduction. 4How to Use This Course.5Course Prerequisites. 6Company Story.8Customer Relationship Management in Acumatica ERP. 10Lesson 1: Initial Configuration.12Step 1.1: Defining Attributes and Classes. 13Step 1.2: Configuring the System Email Account. 19Additional Information. 25Lesson Summary.26Lesson 2: Lead Registration. 27Step 2.1: Importing a Purchased List. 28Step 2.2: Importing Lists Generated by a Marketing Automation Tool. 29Step 2.3: Registering Leads Manually. 31Additional Information. 32Lesson Summary.33Lesson 3: Lead Qualification. 34Step 3.1: Assigning Leads to Owners. 38Step 3.2: Qualifying Leads. 43Step 3.3: Monitoring the Qualification Process. 49Additional Information. 50Lesson Summary.51Lesson 4: Contact Nurturing. 52Step 4.1: Creating a Marketing List. 54Step 4.2: Preparing a Marketing Campaign. 57Step 4.3: Setting Up Mail Replies Processing. 61Step 4.4: Sending a Mass Email. 62Lesson Summary.64Lesson 5: Work with Opportunities.65Step 5.1: Assigning Opportunities to Owners.69Step 5.2: Processing Opportunities.71Step 5.3: Controlling the Processing Results.76Additional Information. 77Lesson Summary.78
Contents 3Lesson 6: Support Cases. 79Step 6.1: Defining a Case Class. 81Step 6.2: Registering a Case.83Step 6.3: Assigning the Case to an Owner.84Step 6.4: Processing the Case.85Step 6.5: Releasing the Case. 87Step 6.6: Monitoring Support Efficiency. 88Additional Information. 89Lesson Summary.90
Introduction 4IntroductionThis course introduces the basic functionality of the Customer Management module of Acumatica ERP.The course is based on a set of examples intended for different groups of users, such as marketingpersonnel, salespersons, and support specialists. The course consists of lessons that guide you stepby step through the basics of the configuration and use of the Customer Management module. Youwill start from the very basis of registering new leads in the system, and then move to managingthe qualification process, running marketing campaigns, nurturing contacts, and tracking salesopportunities. Finally, you will learn to manage service issues, which includes creating cases andtracking related activities.After you complete the course, you will have an understanding of how to manage your customerrelationships by using Acumatica ERP.
How to Use This Course 5How to Use This CourseYou will start learning how to use the Customer Management module of Acumatica ERP with very simplebusiness processes. To complete the course:1.Complete the Course Prerequisites.2.Complete the lessons in the order in which they are presented.The course begins with the Company Story topic that explains the business scenario in whichyou are going to use Acumatica ERP in the lessons. Each lesson consists of steps that outline theprocedures you are completing and describe the related concepts you are learning. At the endof each step, under the Related Links section, you can find links to detailed information aboutthe concepts and forms used in this step. At the end of each lesson, the Additional Informationarticle provides links to additional concepts that you might be interested in but that are outsideof the scope of the course.All the links refer to the documentation available on our Partner Portal http://partner.acumatica.com/ (login required). The same documentation is included in the Acumatica ERPinstance and can be found under the Help menu.3.Complete the course assessment on Acumatica University.
Course Prerequisites 6Course PrerequisitesTo complete this course, you need an understanding of the general principles of customer relationshipmanagement (CRM), including leads and opportunities, marketing campaigns and mailing lists, supportservice cases, and financial documents, such as invoices and sales orders.You need to have an active Gmail account (either personal or created specifically for training purposes)that you will set up as the system email account.To go through this course, you need to perform the following actions:1.Deploy an out-of-the-box instance of Acumatica ERP that will be used by a single company (seethe deployment parameters below).2.Restore a snapshot into the deployed instance.Setting the Parameters to Deploy an Acumatica ERP Instance for the Training CourseThe course requires an Acumatica ERP 4.20.0723 instance. On the Company Setup screen of theAcumatica Framework Configuration Wizard, specify only one company with no data inserted into thedatabase by setting the following parameters: Login Company Name: MyCompany New: Selected Insert Data: Empty Parent Company ID: 1 Visible: SelectedRestoring a SnapshotBefore you begin the restore procedure, make sure that you have downloaded the snapshot packagefile. To restore the snapshot, proceed as follows:1.On the Enable/Disable Features (CS.10.00.00; Configuration Common Settings Licensing) form, click Enable on the toolbar to activate the default set of features. (You do nothave to first select any additional features.)2.On the Snapshots tab of the Companies (SM.20.35.20; System Management Manage Companies) form, click Import Snapshot on the table toolbar.The Upload Snapshot Package dialog box opens.3.Click Browse, find and select the MyCompanyCRMBasic.zip file, and then click Upload.A row with the snapshot data appears in the table.4.Select the snapshot, and click Restore Snapshot on the form toolbar.5.In the Restore Snapshot dialog box, click OK.6.Log off, and then log back in to make user that the site map has been updated.It takes a moment for the company snapshot to be restored. After the snapshot has been restored, thecompany has the following configuration: The following features are enabled: Organization, Customer Management, Finance, Misc, andNotification Module. One branch is created: MYCOMPANY. One actual ledger is created: ACTUAL.
Course Prerequisites 7 In the chart of accounts, the minimum required accounts are configured. All financial periods for year 2014 are active. The General Ledger module is configured and ready for use. The Cash Management module is configured and ready for use with the following cash accountsavailable: Cash on Hand, whose payment method is CASH Regular Checking Account, whose payment method is CHECK The Accounts Payable module is configured and four vendors are added. The Accounts Receivable module is configured and four customers are added. Non-stock items defining various services can be used; they all have a base price of 60 USD perhour. Also, the LABOREXP non-stock item can be used for labor expenses. The following credit terms are defined: Net 30 days and 3/7, n/30. One lead assignment map and two import scenarios are added. Required dashboards and generic inquiries are configured. The company tree is configured. The minimum required number of employees are added.
Company Story 8Company StoryIn this course, you will simulate the process of customer relationship management used by a smallconsulting company, MyCompany. This company is a single business entity that has no branches orsubsidiaries and is located in one city in the United States.MyCompany provides organizations with consulting services in such areas as the following: budgeting,financial analysis, financial strategies, forecasting, performance improvement, pre-audit support, riskmanagement, and turnaround management.MyCompany needs to handle a large number of customers, both current and potential, to maximizesales opportunities. All MyCompany customers can be divided into the following two types: End customers: Organizations that use MyCompany’s services. Referral partners: Partner organizations that endorse MyCompany’s services.Potential customers of each type should be analyzed and processed differently, in accordance with thequalification process adopted by the company.In pursuit of new potential customers, the marketing department of MyCompany generates a hostof leads from various sources: It uses a marketing automation tool that yields lists of uncategorizedleads; it purchases lists of leads from third parties; it receives direct phone calls and emails from leadsattracted by marketing campaigns or referrals; finally, the company’s web site invites any user whois interested in the offered services to fill in a form, which results in yet more leads. Thus, organizinginformation in a meaningful manner is among the company’s highest priorities.Furthermore, MyCompany needs to facilitate the process of assigning leads to telemarketing stafffor qualification. Because telemarketing employees exhibit various degrees of competence, and eachemployee is responsible for just a particular area of business, at first all leads get sorted by specificcriteria, and after that an appointed employee processes only those leads that can be related to his orher area of knowledge.During qualification, some leads may show interest in the offered services—this will make themqualified prospects; others may express their readiness to buy immediately—such leads will becomequalified opportunities; yet others might appear to be unprepared for any conversation at the momentor not quite interested in the current range of MyCompany’s services—such leads will be put aside forthe time being, and marketing employees will contact them again in a few days (or when the range ofservices is sufficiently expanded). In the latter case, it might be a challenge to keep track of all theseleads and to contact them again in time.To increase repeated sales and to nurture the leads who are not yet ready to buy, MyCompany needs tobe able to mass-email regular newsletters and special offers. Also, MyCompany runs frequent marketingcampaigns to promote its services, and it is important that the company could estimate the efficiency ofthese campaigns—for instance, it needs to know how many new leads have been generated as a resultof a particular campaign.By and large, MyCompany aims to create as many opportunities as possible, and then bring theseopportunities to actual sales. On its way to becoming a closed deal, an opportunity goes throughdifferent stages, and each stage can be characterized by a certain probability that the opportunity willresult in sales. The company wants to improve traceability of opportunities so that the chief sales officercould easily collect all relative data from sales representatives and estimate future revenue based onsales probabilities for a particular financial period.Finally, MyCompany has a support team that needs to handle customer requests without delays andon a high professional level. Support specialists want to be able to quickly access any registered case,route it to the person that can best address the issue, and keep customers informed of the progress oftheir service request.
Company Story 9In this course, you will use the Customer Management module of Acumatica ERP to help MyCompanyperform all these tasks with considerable ease and efficiency.
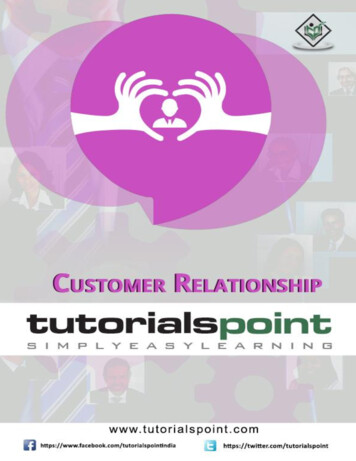
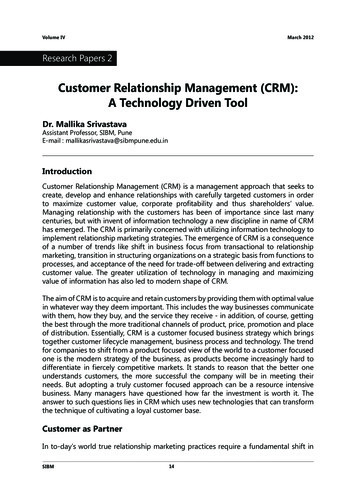
Customer Relationship Management in Acumatica ERP 10Customer Relationship Management inAcumatica ERPCustomer relationship management (CRM) systems help business owners organize information tomaximize new leads, repeat sales, improve customer service, cut costs, and integrate information fromexternal sources.In Acumatica ERP, the Customer Management module plays the role of a full-featured CRM system.With the Customer Management module, your marketers can perform the following tasks (see Lessons2 to 4): Import lists of leads of any origin by using import scenarios Automatically assign leads for qualification to appropriate employees by using assignment maps Keep track of important tasks and activities by using automatic notifications Classify leads and contacts in a most meaningful manner by using classes and attributes Monitor the progress that leads make throught the qualification process by using customizeddashboards and inquiries Quickly convert leads to confirmed contacts, prospects, or opportunities Nurture leads by running marketing campaigns and sending personalized emails in bulk Estimate the efficiency of your marketing campaigns by processing email responsesBy using the Customer Management module, the Sales Department can perform the following tasks(see Lesson 5): Classify opportunities by using classes and attributes Assign opportunities to appropriate sales persons Prepare initial proposals Update proposals while negotiating prices and discounts Convert contacts to prospect business accounts that can be converted to customers Create sales orders and invoices based on opportunities Monitor performance of opportunity owners Estimate future revenue for each financial periodFinally, the Customer Management module enables support specialists to complete the following tasks(see Lesson 6): Register new cases in the system, which includes manual entry and automatic creation of cases asa result of incoming mail processing Assign cases to most appropriate specialists Process and resolve cases Register associated activities Release cases, which results in invoicing related customers Monitor support efficiencyThe Customer Management module is tightly integrated with the General Ledger, Accounts Receivable,Email, and Communication modules. You can also configure its interaction with other modules, such asDistribution, Project Management, Time & Expenses, or Contract Management (see the diagram below).
Customer Relationship Management in Acumatica ERP 11Figure: Customer Management in Acumatica ERP
Lesson 1: Initial Configuration 12Lesson 1: Initial ConfigurationIn Acumatica ERP, a company represents a business unit of an organization that uses certain featuresof the Acumatica ERP instance. Normally, if you want to start using the Customer Managementmodule, you have to activate the Customer Management feature on the Enable/Disable Features(CS.10.00.00) form. However, the snapshot that you have restored for MyCompany has been preconfigured so that you could start using the Customer Management module immediately.Still, you need to adjust the company's configuration so that it best fits MyCompany's needs. In thislesson, you will perform the following tasks:1.Prepare for meaningful classification of your records by creating classes and attributes (see Step1.1: Defining Attributes and Classes).In Acumatica ERP, a class is a group of records—such as leads, opportunities, business account,or cases—that share at least one common characteristic. In this course, you will create twolead classes: one for potential end customers (that is, organizations that are interestedin MyCompany's services), and the other for potential referral partners (that is, partnerorganizations that endorse MyCompany’s services). Then, you will create similar classes forbusiness accounts. Finally, you will create two opportunity classes: one for direct sales, and theother for partner sales.For each class, you can specify a number of attributes. An attribute is a quality or characteristic(for instance, age or industry) that gives your company specific information that will help itpromote its services to potential customers. The attributes that you will define in this lessonwill be used in all classes to distinguish between organizations of various sizes and the kinds ofservices that your company can provide.2.Configure the system email account (see Step 1.2: Configuring the System Email Account).In order to use the automatic notification functionality, as well as to be able to send and receiveemails when you work with the Customer Management module (for example, as a part of thelead nurturing process), you need to configure the outgoing and incoming email servers; thisinvolves knowing the names of the servers and their server ports.Lesson ObjectivesIn this lesson, you will learn the basic configuration steps required for work with the CustomerManagement module. You will do the following: Define classes and attributes for effective classification of your records Configure the system email account
Lesson 1: Initial Configuration 13Step 1.1: Defining Attributes and ClassesIn this step, you will perform the following tasks, each of which is described in detail in the followingsections:1.Define attributes that will be used in classes.2.Define two lead classes.3.Define two business account classes.4.Define two opportunity classes.1. Define Attributes for Lead ClassesTo define the attributes that you will use in lead classes, open the Attributes (CS.20.50.00;Configuration Common Settings Common Settings Attributes) form and do the following:1.Click Add New Record on the form toolbar, and in the Attribute ID box, type ORGSIZE tocreate an attribute that will describe an organization's size.2.For the ORGSIZE attribute, specify the respective values from the table below.3.Click Save on the form toolbar to save the attribute to the database.Similarly, create the INTERESTED attribute, whose values are also shown in the following table.AttributeIDAttributeDescriptionControl TypeValue IDValueDescriptionSort es1MEDIUM100-500employees2LARGEOver naroundmanagement7OTHERTo follow up9INTERESTEDInterested inMulti SelectCombo
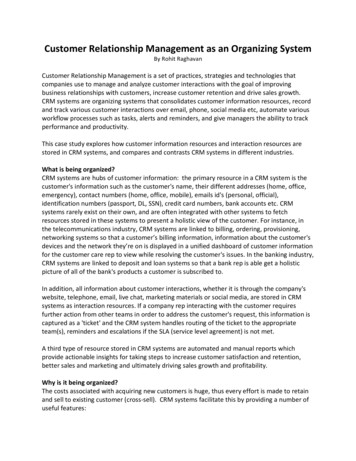
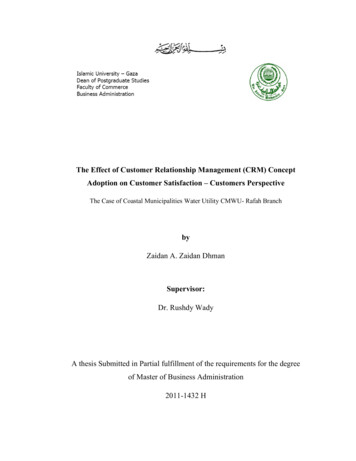
Lesson 1: Initial Configuration 14The Combo control type indicates that you will select an attribute value in a drop-down combo box.With the Multi Select Combo control type, you can select multiple values in a drop-down box byselecting check boxes. In the Sort Order column, you type the numbers that define the order in whichattribute values will be listed in the drop-down combo box. If you do not want to define your own order,leave this column empty—the Value ID values will then be displayed in alphabetical order.2. Define Lead ClassesTo create a lead class for potential end customers, do the following:1.Open the Contact & Lead Classes (CR.20.70.00; Organization Customer Management Configuration Setup Contact & Lead Classes) form.2.On the form toolbar, click Add New Record, and then, in the Summary area, specify thefollowing information (refer to the screenshot below): Class ID: ENDCUST Description: End customers Active: Selected Internal: SelectedThe Internal check box indicates, when selected, that the class is hidden from Self-ServicePortal users, and only internal users can use it.3.On the Details tab, specify the following information (as shown in the screenshot below): Default Workgroup: Marketing 1 Copy Ownership from Lead to Business Account: Selected Copy Ownership from Lead to Opportunity: SelectedAll new leads of the class will have the workgroup specified by default.The selected check boxes indicate that business accounts and opportunities converted from alead of this class will inherit the lead's owner, if an owner has been specified for the lead.
Lesson 1: Initial Configuration 15Figure: ENDCUST lead class4.5.On the Attributes tab, do the following:a.Click Add Row on the table toolbar, and then, in the Attribute ID column, select theORGSIZE attribute.b.Similarly, click Add Row, and select the INTERESTED attribute in the Attribute IDcolumn.Click Save on the form toolbar to save the class information to the database.On the same form, create another class, for potential referral partners, as follows:1.2.On the form toolbar, click Add New Record and then, in the Summary area, specify thefollowing information (as shown in the screenshot below): Class ID: REFPART Description: Referral partners Active: Selected Internal: SelectedOn the Details tab, select the following check boxes (see the screenshot below): Default Workgroup: Marketing 2 Copy Ownership from Lead to Business Account Copy Ownership from Lead to Opportunity
Lesson 1: Initial Configuration 16Figure: REFPART lead class3.4.On the Attributes tab, do the following:a.Click Add Row on the table toolbar, and then, in the Attribute ID column, select theORGSIZE attribute.b.Similarly, click Add Row, and select the INTERESTED attribute in the Attribute IDcolumn.On the form toolbar, click Save to save the class information to the database.When specifying an attribute, you can mark the attribute as required by selecting the Required checkbox. If you do so, the user must specify a value for this attribute for each new lead of the class in orderto save the lead record.3. Define Business Account ClassesTo create a business account class for end customers, do the following:1.Open the Business Account Classes (CR.20.80.00; Organization CustomerManagement Configuration Setup Business Account Classes) form.2.On the form toolbar, click Add New Record, and then, in the Summary area, specify thefollowing information: Business Account Class ID: ENDCUST
Lesson 1: Initial Configuration 17 Description: End customers Internal: SelectedThe Internal check box indicates, when selected, that the class is hidden from Self-ServicePortal users, and only internal users can use it.3.In the grid, add the following attributes: ORGSIZE and INTERESTED.4.On the form toolbar, click Save to save the class information to the database.On the same form, create another class, for potential referral partners, as follows:1.On the form toolbar, click Add New Record, and then, in the Summary area, specify thefollowing information: Business Account Class ID: REFPART Description: Referral partners Internal: Selected2.In the grid, add the following attributes: ORGSIZE and INTERESTED.3.On the form toolbar, click Save to save the class information to the database.When specifying an attribute, you can mark the attribute as required by selecting the Required checkbox. If you do so, the user must specify a value for this attribute for each new business account of theclass in order to save the record.4. Define Opportunity ClassesTo create an opportunity class for direct sales, do the following:1.Open the Opportunity Classes (CR.20.90.00; Organization Customer Management Configuration Setup Opportunity Classes) form.2.On the form toolbar, click Add New Record, and then, in the Summary area, specify thefollowing information: Opportunity Class ID: DIRECT Description: Direct sales Internal: SelectedThe Internal check box indicates, when selected, that the class is hidden from Self-ServicePortal users, and only internal users can use it.3.On the Attributes tab, add the following attributes: ORGSIZE and INTERESTED.4.On the form toolbar, click Save to save the class information to the database.On the same form, create another class, for partner sales, as follows:1.On the form toolbar, click Add New Record, and then, in the Summary area, specify thefollowing information: Opportunity Class ID: PARTNER Description: Partner sales Internal: Selected2.On the Attributes tab, add the following attributes: ORGSIZE and INTERESTED.3.On the form toolbar, click Save to save the class information to the database.
Lesson 1: Initial Configuration 18When specifying an attribute, you can mark the attribute as required by selecting the Required checkbox. If you do so, the user must specify a value for this attribute for each new opportunity of the classin order to save the record.Related LinksClasses and AttributesAttributes (CS.20.50.00)Contact & Lead Classes (CR.20.70.00)Business Account Classes (CR.20.80.00)Opportunity Classes (CR.20.90.00)
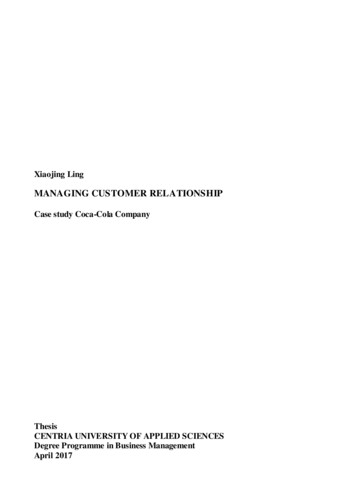
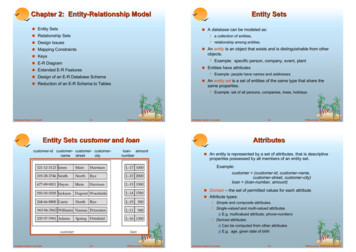
Lesson 1: Initial Configuration 19Step 1.2: Configuring the System Email AccountIn this step, you will use a Gmail account (either personal or created specifically for training purposes)to be set up as the system email account in Acumatica ERP. You will perform the following tasks, whichare described in detail in the following sections:1.Create a new email account2.Set up the default email account3.Create the Send and Receive Email schedule1. Create a New Email AccountTo create a new email account that will be used as the default system account in Acumatica ERP, onthe System Email Accounts (SM.20.40.02; Configuration Email Manage System EmailAccounts) form, create a new record and do the following:1.In the Account Name box, type Admin to create an administrative email account.2.In the Email Address and Reply Address boxes, type the name of your personal Gmailaccount (for example, sample.name@gmail.com).3.On the Servers tab, specify the following settings (see the screenshot below): Incoming Mail Protocol: Pop3 Outgoing Mail Server: smtp.gmail.com Group Mails: 0 Username: The name of your personal Gmail account (for example, sample.name) Password: The password to your Gmail account
Lesson 1: Initial Configuration 20Figure: Server settings of the system email account4.On the Advanced Settings tab, specify the settings (as shown in the screenshot below): My outgoing server requires authentication: Selected Log on using: Selected Username: The name of your personal Gmail account Password: The password to your Gmail account My outgoing server validates From field: Selected Incoming server port (POP3/IMAP): 995 Incoming server requires encrypted connection (SSL): Selected
Lesson 1: Initial Configuration 21 Outgoing server port (SMTP): 587 Outgoing server encrypted connection: TLSFigure: Advanced settings of the system email account5.On the form toolbar, click Save, and then click Test to test your email account settings.When the process completes successfully, a green check mark appears next to the Actionsmenu.2. Set Up the Default Email AccountTo make the email account you have just created the default system account in Acumatica ERP, do thefollowing:1.Open the Email Preferences (SM.20.40.01; Configuration Email Configure EmailPreferences) form.2.In the Default Email Account box, select your Gmail address.3.Click Save on the form toolbar to save the changes.Now your email account will be used as the default system account. All emails sent on behalf ofAcumatica ERP will be sent from this address.
Lesson 1: Initial Configuration 223. Create the Send and Receive Email ScheduleIn Acumatica ERP, you can schedule the process of sending and receiving emails to run every 5minutes. On the Send and Receive Email (SM.50.70.10; Configu
Customer relationship management (CRM) systems help business owners organize information to maximize new leads, repeat sales, improve customer service, cut costs, and integrate information from external sources. In Acumatica ERP, the Customer Management