Transcription
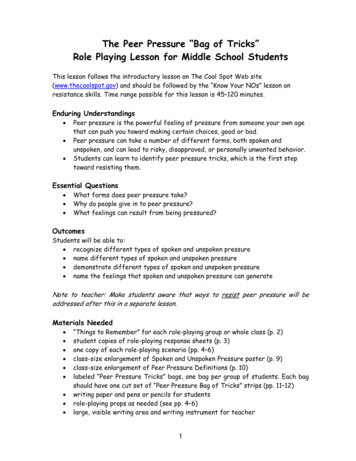
Lesson8Pattern Layout, Pinningand CuttingObjectivesThis lesson will help you to identify the various ways fabric may be folded in preparation for layout, pinning, andcutting. correctly lay out a pattern. give reasons for various layout, pinning, and cutting procedures. interpret layout, pinning, and cutting information found on the pattern instruction sheet.Words to Knowlengthwise foldpartial foldcrosswise folddouble foldrepeateven plaiduneven plaidGathering InformationFollowing the correct pattern layout will help ensure that your garment is cut out ongrain. Pinning and cutting your garment carefully will avoid wasting fabric. This lesson willprovide the information you need to lay out, pin, and cut out your pattern pieces.You will first need to make sure the cut ends of your fabric are on-grain. If they are offgrain, follow the directions in Lesson 4, “Fabric Preparation,” to straighten the grain beforepreparing the fabric for pattern layout.Foldingthe FabricFabric can be folded in a variety of waysbefore pattern pieces are positioned for cutting.The type of fold used depends on the number of pattern pieces that must beplaced on a folded edge the fold that results in the most economic useof the fabric the width of the fabric the pattern sizePattern companies have already taken thesefactors into consideration for you. Therefore, youshould fold your fabric as shown in the diagramfound on your pattern instruction sheet.(Continued)101L5-8.indd 1018/8/2012 8:59:57 AM
102Successful SewingLengthwise fold. Most fabric is folded lengthwise on the bolt. Pattern instructions generallyshow a lengthwise fold with fabric folded in halflengthwise so that selvages match. However,lengthwise folds can also be partial folds leavingsome of the fabric extended as a single layer.Crosswise fold. For a crosswise fold,fabric is usually folded so the cut ends match.However, a crosswise fold can also be a partialfold. A crosswise fold is often used when patternpieces are too wide to fit on fabric folded lengthwise.selvagefolded edgecutendsoriginal foldline asfabric comes fromthe boltselvageDouble fold. When making a double fold,be sure the full length of each folded side is thesame width. Measure as shown. This will ensurethat the folded edges are straight with the grain.You may use a double fold when you cannotpress the original foldline out of the fabric. Youmay also use it when several pattern pieces areto be cut on a fold.measuring tapefoldselvagecut endselvageoriginalfoldlinefold Goodheart-Willcox PublisherL5-8.indd 1028/8/2012 8:59:58 AM
Lesson 8103FoldingKnit FabricsTry to press out the lengthwise crease onknit fabrics before laying out pattern pieces.Often this crease is permanent in knit fabricsand, if used on the garment, may be unsightly. Ifyou cannot press out the crease, you can avoidusing it by folding your fabric with a double fold.Another possibility is to position the crease towork with the pattern design. For instance, placepattern pieces so that the crease will fall downthe center of sleeves or pant legs.Guidelinesfor PatternLayoutUse the following guidelines when laying outyour pattern pieces on your fabric. Circle the correct layout diagram on yourpattern instruction sheet. Choose the correctdiagram according to the pattern view, size,and fabric width. Make any desired fit or design alterations toyour pattern before laying it out. (Refer toLesson 7, “Pattern Adjustments,” for moreinformation on alterations.) Lay all pattern pieces on the fabric beforepinning any of them in place. This will allowyou to make sure that all pieces will fit on thefabric. Follow the shading key shown on yourinstruction sheet. Solidly-shaded areasdenote fabric. Unshaded areas denotepattern pieces to be placed with the printedside up. Lines denote pattern pieces to beplaced with the printed side down. Sometimes a layout diagram will show apattern piece that is placed halfway off thefabric. This piece will usually be accompaniedwith an asterisk (*). Find the symbol on yourinstruction sheet and follow the directionsgiven. This symbol generally means there isnot enough room to place the pattern pieceon the folded fabric. The instructions will tellyou to cut out all other pattern pieces. Thenyou should open the fabric to accommodatethe piece that was placed partially off thefabric.fabricpattern, print side uppattern, print side down(Continued)L5-8.indd 1038/8/2012 8:59:58 AM
104Successful Sewing Placing Pieceson the FoldSometimes a layout diagram will show twopattern pieces with the same number. Thisindicates that the pattern piece will have tobe cut out twice, such as when you need fourcuff pieces. The pattern will only include onepattern piece. Therefore, simply relocate thepattern piece and cut it out a second time.Avoid placing pattern pieces on the selvageedges of the fabric. Selvages do not giveand can cause seams to pucker. If you mustplace a piece on the selvage, clip the selvageabout every ½ inch to create more give.When you are cutting two layers of fabric,the pattern pieces do not have to be placedprinted side up. If you are cutting one layer,however, the pattern pieces must be placedprinted side up. They must also be placed onthe right side of the fabric. Otherwise, youmay find that pattern pieces fit the wrong sideof your body.Be sure to use the “with nap” layout whenworking with napped fabrics. (Refer toLesson 2, “The Pattern Envelope,” for moreinformation on napped fabrics.) Also use thislayout when working with knits, as most knitstend to have shading in one direction. If thislayout is not followed, differences in colormay appear on the finished garment. Youcan also use this layout when working withfabrics that do not have nap. However, “withnap” layouts usually require more yardage.Check for pattern pieces that must be placedon the fabric fold. When cutting out these pieces,never cut along the folded edge. Goodheart-Willcox PublisherL5-8.indd 1048/8/2012 8:59:58 AM
Lesson 8Placing PiecesOn-Grain Goodheart-Willcox PublisherL5-8.indd 105105Accurate measuring will help you make sureyour pattern pieces are cut out on-grain. Followthese steps:1. Place each pattern piece so the grainlinearrow runs lengthwise on the fabric. Grainlinearrows should run parallel to the selvageedges regardless of the way the fabric hasbeen folded.2. Pin one end of the grainline arrow to hold itin place.3. Measure from the pinned end of the arrow tothe fabric selvage edge.4. Now measure from the other end of the grainline arrow to the fabric selvage edge. Makesure it is the same distance from the selvageas the end you have already pinned in place.Adjust the distance if necessary and then pinthe arrow in place.5. Pin the edges of the pattern piece in place.The lengthwise grain on knits is seen as arib. Use this rib to place pattern pieces on thestraight of grain.Special techniques are used when placingpattern pieces on off-grain fabrics that cannotbe straightened. For solid color fabrics or fabricswith an all-over design, lay the fabric so that theselvages are together. Make sure the lengthwisefold lies smoothly. (You will not be able to line upthe cut ends of the fabric.) Then measure fromthe grainline arrows to the selvages as describedabove. For off-grain fabrics with a stripe, plaid, orobvious horizontal design, ignore the lengthwisegrain. Instead, follow the print as much as possible. Cut the pattern pieces out of a single layerof fabric. Match the design of the second piecewith the first.8/8/2012 8:59:58 AM
106Successful SewingPinningPattern PiecesUse the following guidelines when pinningyour pattern pieces to your fabric: Pin with care to prevent inaccurate cutting.A cutting error of ⅛ inch on each side of apattern piece can result in a ½ inch differencein the final garment. Use only enough pins to hold down thepattern securely. Depending on the fabricand the size of the pattern piece, placing pinsabout six inches apart is usually enough. Place pins completely inside the cutting line. Place pins diagonally in corners. Use pattern weights instead of pins to holdthe pattern in position, if desired. However,be sure to pin grainlines in place first.Position weights, inside the cutting lines, onone pattern piece at a time. Goodheart-Willcox PublisherCutting OutPattern PiecesUse the following guidelines, when cuttingout pattern pieces: Use sharp shears or a rotary cutter to cutout your pattern pieces. Never use pinkingshears. Pattern pieces cannot be cut outaccurately with pinking shears. Do not allow the fabric to hang over theedge of the table when you are cutting. Thisis especially true when working with knitsand other stretchy fabrics. The weight of thefabric hanging over the table edge will pullthe fabric and result in inaccurate cutting.Also, be careful to leave the fabric restingon the table as you cut. Lifting the fabric willresult in inaccurate cutting. Cut notches out away from the seamallowance. Cutting notches into the seamallowance will weaken the seam. This willalso prevent you from letting the seam out ifa looser fit is needed.(Continued)L5-8.indd 1068/8/2012 8:59:58 AM
Lesson 8 Working withStriped Fabrics107When using a rotary cutter, always be sure toplace a protective plastic cutting mat beneaththe fabric. Shift the cutting mat under yourwork as you proceed around the pattern.A metal ruler can be used as a guide forcutting straight edges. When cutting complexshapes, a small rotary wheel is easier tomaneuver than larger ones. You will not beable to cut out the notches with a rotarycutter. Instead, cut off the notches and markthem using another technique, such as chalkor washable marking pen.Before cutting pattern pieces from amultisize pattern, determine which lines youneed to follow. To do this, compare yourmeasurements with those on the envelopesize chart. Identify which size you shoulduse for different areas of your body. Use acolored pen to trace along the lines you planto follow before placing the pattern on thefabric. Taper from the cutting line for onesize into the cutting line for another size,as needed. You might also wish to cut outthe pattern on the desired size lines beforeplacing it on the fabric.Keep the following suggestions in mind whenworking with striped fabrics: Stripes should be matched at seamlinesto form a continuous line around the body.You may have to purchase extra fabric formatching. Avoid using patterns that are labeled “notsuitable for stripes.” Matching stripes onthese patterns will be difficult. Interesting patterns may be created withstripes by cutting small pattern pieces on thebias. When using stripes vertically, place thedominant stripe at the center of major garmentpieces. Make certain that stripes are on-grain beforepurchasing the fabric.(Continued)L5-8.indd 1078/8/2012 8:59:58 AM
108Successful Sewing even stripeuneven stripeYou need to determine whether a stripe is evenor uneven. To do this, fold the fabric lengthwisealong the center of a main stripe. Then fold backone corner. Compare the stripe pattern on thebottom layer of fabric with the stripe pattern onthe top layer. If it lines up perfectly, the stripe iseven. If the stripe patterns do not line up, thestripe is uneven.When cutting uneven stripes, use a “withnap” layout. Cut each pattern piece from asingle layer of fabric. When cutting a patternpiece for the second time, be sure to turnit over. This will give you a left and rightgarment side. Also, place notches at the samepoint in the stripe pattern as you placed them forthe first cutting. Goodheart-Willcox PublisherWorking withPlaid Fabricseven plaidKeep the following suggestions in mind whenworking with plaid fabrics: You need to determine whether a plaid iseven or uneven. To do this, fold the plaiddiagonally through the center of a repeat. Arepeat is one complete, four-sided designin the fabric. An even plaid has coloredlines and spaces that are the same in boththe lengthwise and crosswise directions. Anuneven plaid has lines and spaces that willnot match in either one or both directions. Plaids should be matched at seamlines toform a continuous design around the body.To match plaids, pattern pieces need to bealigned on the fabric. The important thing toremember when matching plaids is to matchstitching lines rather than cutting lines. Sincemultisized patterns are printed without thestitching lines, begin by marking stitchinglines on your pattern tissue in a few keyplaces. Simply measure in from the cuttingline ⅝ inch and draw a stitching line. Thenline up corresponding pieces on the samecolor bars of the plaid.(Continued)uneven plaid Goodheart-Willcox PublisherL5-8.indd 1088/8/2012 8:59:58 AM
Lesson 8 Goodheart-Willcox PublisherL5-8.indd 109109Some areas of a garment are difficult orimpossible to match. For instance, darts,diagonal shoulder seams, side seams abovea bust dart. Sleeves cannot be matched atboth the front and back armhole. Match thefront because that is what people will noticemost. Also, try to make fitting adjustmentsbefore cutting out the pattern. Adjustinga garment once it has been cut out maymismatch the plaid.For even plaids, align the plaid in one layerwith the plaid in the other layer of the foldedfabric. Do this before laying any patternpieces in place. To align the plaids, inserta pin in the plaid. Bring the pin through thebottom layer of fabric at the same point inthe plaid. Repeat pinning in this manner atintervals that will hold the plaid in position.Leave the pins in place until the patternpieces have been cut out.When cutting uneven plaids, use the sametechniques you use to cut uneven stripes.8/8/2012 8:59:59 AM
110Successful SewingName Date PeriodActivity 8-1: Practicing Folding and Laying Out the PatternSupplies needed:paperscissorspattern pieces 8A through 8K (pages 115 and 117)glue or tapeThis activity is made up of three problems. For each problem, cut out the specifiedpattern pieces found at the end of the lesson. Also cut a piece of paper the size of thedimensions given to represent fabric from which the garment is to be cut. Try various fabricfolds—lengthwise, crosswise, partial, and double—and ways of placing the pattern pieceson the fabric. Decide on the best way to fold the fabric and lay out the pattern pieces. Thenglue or tape the pieces in place. Attach your results to a sheet of paper. Be prepared todiscuss your work.Garment 1 — Knit TopUse pattern pieces 8A and 8B.Cut a sheet of paper 4½ by 8¾ inches for the fabric.Consider the lengthwise grain to run parallel to the 4½-inch edge. A permanentlengthwise crease runs through the center of the fabric.Garment 2 — SkirtUse pattern pieces 8C, 8D, and 8E.Cut a sheet of paper 6¼ by 11 inches for the fabric. Consider the lengthwise grainto run parallel to the 11-inch edge.Garment 3 — ShirtUse pattern pieces 8F, 8G, 8H, 8I, 8J, and 8K.Use a single 8½ by 11-inch sheet of paper for the fabric.Consider the lengthwise grain to run parallel to the 11-inch edge.L5-8.indd 1108/8/2012 8:59:59 AM
Lesson 8111Name Date PeriodActivity 8-2: Using the Instruction SheetYou will be given a pattern instruction sheet. The instruction sheet and the information in this lesson will be your sources of information. Look over the instruction sheet andanswer the questions below. Be prepared to discuss your answers.1. Your instruction sheet shows a variety of pattern layout diagrams. Explain how to selectthe pattern layout to follow. What information do you need to know in order to makea decision about which layout to use?2. What do the following shadings indicate?Solid:Unshaded:Lined:3. When using a crosswise fold, on which grain are the pattern pieces placed?4. When using a lengthwise fold, on which grain are the pattern pieces placed?5. The layout diagram shows two pattern pieces with the same number. However, youhave only one pattern piece in your envelope. What should you do?6. Why is a crosswise fold sometimes used instead of a lengthwise fold?7. What is meant when you see a layout diagram that has one pattern piece placedhalfway off the fabric?8. Some layout diagrams may be labeled “with nap” or “without nap.” What do these wordsmean?9. Can you use a “with nap” layout even if you do not have napped fabric? Explain.(Continued)L5-8.indd 1118/8/2012 8:59:59 AM
112Successful SewingName10. Can you use a “without nap” layout with napped fabric? Explain.11. In your own words, explain why following the layout diagram on the instruction sheet isimportant.12. How do you determine if pattern pieces are placed on the straight of grain?13. What layout diagrams, other than for the main garment pieces, may be included on theinstruction sheet?14. Explain the reasons for the following guidelines:A. Never cut out pattern pieces with pinking shears.B. Cut all notches out, away from the seam allowance.C. Do not use the selvage edges of the fabric. If it is necessary to do so, be sure to clipthe selvage about every ½ inch.D. Pin all pattern pieces on the fabric before cutting them out.E. When cutting a single thickness of fabric, place the pattern printed side up on theright side of the fabric. Make an exception to this guideline when working withuneven stripes and plaids.15. Why should you follow the napped layout when sewing on knit fabric?16. The crease line on knit fabric may not always disappear when pressed or washed. Whatmust you do when cutting out pattern pieces if this is a problem?L5-8.indd 1128/8/2012 8:59:59 AM
Lesson 8113Name Date PeriodActivity 8-3: Evaluating LearningAssess your understanding of layout, pinning, and cutting by completing the directionsbelow.1. Sketch the three ways of folding fabric. On each sketch, draw lines indicating thelengthwise, crosswise, and bias grainlines. Be sure to label the sketches and thegrainlines.2. Briefly, explain how to select the correct pattern layout from those given on theinstruction sheet.4. What is the meaning of the word napped and why is it important when laying patternpieces on fabric?5. Give three important suggestions for pinning pattern pieces to fabric.6. Give three important suggestions for cutting out pattern pieces.L5-8.indd 1138/8/2012 8:59:59 AM
114Successful SewingnL5-8.indd 114otes8/8/2012 8:59:59 AM
Lesson 8115Pattern pieces for Activity 8-1Garment 1 – Knit TopGarment 2 – Skirt Goodheart-Willcox Publisher(Continued)L5-8.indd 1158/8/2012 8:59:59 AM
116L5-8.indd 116Successful Sewing8/8/2012 8:59:59 AM
Lesson 8117Pattern pieces for Activity 8-1Garment 3 – Shirt Goodheart-Willcox PublisherL5-8.indd 1178/8/2012 8:59:59 AM
118L5-8.indd 118Successful Sewing8/8/2012 8:59:59 AM
Special techniques are used when placing pattern pieces on off-grain fabrics that cannot be straightened. For solid color fabrics or fabrics with an all-over design, lay the fabric so that the selvages are together. Make sure the length