Transcription
IBM Maximo MRO Inventory OptimizationReports User GuideCopyright IBM Corporation 2017, 2019Copyright IBM Corporation 2017, 2019
ContentsWhat are IBM Maximo MRO Inventory Optimization Reports .4Navigate the Analytics page .5Customize your View .6View Report .7Share Report .8Export Report .9Copy Report .10Delete Report .11Edit Workbook Properties .12Explore Data .13Select Multiple Data Points .14Quickly Filter and Sort Data .15Use Legends to Highlight Data.16Live Export Details .17Live Inventory Details .19Live Inventory Details All Fields .21Live System Usage .22Live Workqueue History .23Snapshot Audit Log History .24Snapshot Equipment BOM Details .25Snapshot Equipment Issue Details .26Snapshot Inventory Bridge .28Snapshot Inventory History .30Snapshot Issue History .33Snapshot Item Equipment Details .35Snapshot Receipt History .37Snapshot Review History .38Snapshot Turnover .40Snapshot Work Order History .41Equipment via BOM Template.42Equipment via Issues Template .43Export Details Template .44Inventory Details Template .45Inventory Details (All Fields) Template .46
Inventory History Template .47Issues History Template .48Movements History Template .49Supplier Performance Template .50Receipts History Template .51Item to Equipment Template .52Accepted System Recommendations .53Audit Log .54Criticality Breakdown .55Executive Dashboard .56Inactive Items.57Inventory Stockout .58Item Results .59Potential Write Offs .60Returns Analysis .61Returns Overview .62Reviews and Exports .63Stock Movement .64Surplus Analysis .65System Usage History .66Turnover.67Varying Unit Prices .68Workqueues .69Create a Custom Report .70Edit Custom Reports .71Edit Worksheets in Dashboards .72Overview of the Data Pane .73Columns and Rows Shelves .74Marks Card .76Filters Shelf .78Pages Shelf .79Create a Calculated Field .80Create a New Dashboard .82
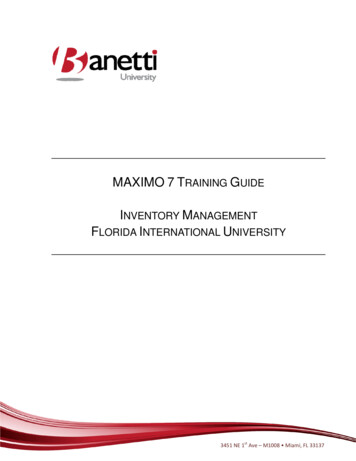
What are IBM Maximo MRO Inventory Optimization ReportsIBM Maximo MRO Inventory Optimization has a reporting platform that offers rich data visualizationtools to help you analyze your MRO data in a matter of seconds.IBM Maximo MRO Inventory Optimization provides each client with a number of standard reportswhich offer a high-level overview of your organization’s latest key metrics.Using Tableau's visualization tools you can explore and compare different data sets in a report togain more insight into specific events and make data-driven business decisions quickly.You can also create custom reports and new visualizations using the platform’s standard templateswhich can be easily modified using the Tableau Web Editor.
Navigate the Analytics page Reports are organized into different Categories seen on the left navigation pane.The number displayed next to each category indicates how many reports it contains, which alsoincludes reports that have been hidden from view.You can further sort and filter through the reports listed in each category by choosing one of theoptions across the top of the screen:Reports by Category - Lists reports in alphabetical order.Recently Viewed - Lists reports according to when they were last viewed.Favorites - Displays all reports marked as favorite.Custom - Displays only user-created custom reports.Note: Standard categories associated with IBM Maximo MRO Inventory Optimization’s standardreports cannot be modified or deleted. You can create new categories for custom reports or savethem in any of the existing categories.
Customize your ViewYou can change the way reports appear on the Analytics page a few different ways.Use Personalize ViewClick Personalise View next to the name of the category.Remove the check mark from reports you wish to hide from view. You can also use Select All toshow or hide all the reports in a category.3. Click Save View to accept the changes.Note: Hidden reports will still be reflected in the total number of reports shown next to eachcategory name on the left navigation pane.1.2.Mark a Report as a Favorite1.Click thenext to the name of report you want to mark as a favorite.A yellow favorite starindicates that a report has been marked as a favorite. Clicking on it againremoves the report from the favorites list.3. Click Favorites on the top of the page to quickly display your most used reports in the selectedcategory.2.Toggle Between Thumbnail and List viewClick the toggle buttonon the upper right of the Analytics page to switch between thumbnailand list view.2. List view only shows the report name and a short description. Thumbnail view includes a preview ofthe visualization.1.
View ReportIBM reports allow you to quickly visualize your organization’s latest key metrics.Hover the thumbnail preview of the report you want to view and click Run Report.You can also click the report name itself to run the report.A report can contain multiple tables, charts or graphs. These types of reports are calleddashboards, and allow you to view several worksheets in a single layout.If a report contains more than one worksheet tab exposed, you can switch between differentsheet pages by clicking on one of the worksheet names listed below the name of the report.
Share ReportYou can share any report with other IBM Maximo MRO Inventory Optimization Suite users, as well asnon-registered guest users.To share a report, follow these steps:Click Run Report on the report that you want to share .Click Share on the upper left of the report window.In the Share With field, enter the email addresses of the people you want to share the report with.Use a semicolon to separate individual recepients.Type in a message, then click Share Report. Each recipient will receive an email containing a uniquelink to the report.Guest UsersLinks to reports shared with guest users who aren’t registered users of IBM Maximo MRO InventoryOptimization are valid for up to 30 days.Once a guest user views a shared report, they will have another 24 hours to re-open the report.Otherwise, their guest access tokens will expire. The 24-hour grace period resets every time thereport is viewed.Guest users can view the report, as well as highlight or remove selected data points for furtheranalysis.Guest users only have access to the shared report and are only allowed to use basic report features,namely Export, Reset and Refresh.Only registered users can navigate away from the report window and view other reports, as wellas Share and Edit reports.
Export Report You can save a copy of the current report in view or download the data it is based on by usingthe Export function.In the report window, click Export on the upper left.On the drop-down menu that appears, you can select one of two export options:PDF – to save a copy of a report to PDF format. Choose this option if you need to make aprintout of the report in view.You can customize how data is displayed on the PDF page/s in the Download PDF window bychanging Paper Size and Scaling options.If there are multiple reports on the Dashboard, you can select which to save by clickingon Sheets in Dashboard. To export all the reports in view to PDF, click on Sheets in Workbook.Data – to download or extract the underlying data in the report to CSV format. Choose this optionif you need to open the data in Excel or any other spreadsheet software.
Copy ReportUsers can make a duplicate of any report listed in any category.Copies of standard reports can be edited to suit your exact needs and preferences.To make a copy of a report, follow these steps:Hover over theicon right next to a report name and select Copy.On the Workbook Properties window, fill in the following required fields:Name – enter a new unique name for the report.Category – enter the name of category you want to save the report in.Description (optional) – enter a short description to help you identify the report in the reportslist.3. Click Copy to save the new report.Note: You can edit the Workbook Properties of any custom report at any time moving your cursor1.2.oooover theicon next to the report name and selecting Edit.
Delete ReportYou can permanently delete any custom report from the system. Standard reports provided byIBM do not have this option.To permanently delete a report, follow these steps:1.2.3.Move your cursor over theicon next to the report name and select Delete.On the dialog box that appears, click on Delete to confirm the action.A confirmation message should appear after the report has been successfully deleted.Note: Any user can delete any custom report created by other users. Once a report has beendeleted from the system it can no longer be accessed or viewed by anyone.
Edit Workbook PropertiesUsers can change the Workbook Properties of any custom report at any time.Move your cursor over theicon next to the report name and click on Edit.In the Workbook Properties window you can change the following:Name – enter a new unique name for the report.Category – enter the name of an existing category to save the report there, or create a newcustom category.o Description – enter a short description to help you identify the report.3. Click Save to accept the changes.1.2.ooNote: Any changes made to a report’s Workbook Properties will be seen by all users who haveaccess to the report.
Explore Data Hover over a data point to bring up a tooltip that provides additional information.Click a data point to highlight it and bring up additional options.Keep Only - display only the selected data point.Exclude - remove the highlighted data from view.View Data- open a new window to display the actual data used.After exploring or interacting with the data, you can click on Reset to return to the report's originalview.View Data Click View Data to see the underlying data used in your selected data points in more detail.Click on the Summary tab to see the aggregated data used in your selection.Click the Full data tab to see the values in each row of the selected data.Select Show all columns to display all the underlying data used in the selected data points.Click Download all rows as a text file to save the displayed data in CSV format.
Select Multiple Data Points Click and drag your cursor to select several data points at once.You can also press and hold Ctrl while selecting items to create a custom group. This is particularlyuseful when you need to select nonadjacent data points.Hover your cursor over the highlighted data points and you’ll see an expanded tooltip.Move your cursor over a highlighted data point to display additional details via a tooltip.The expanded tooltip contains the following options:Keep Only - Limits the view to show only the selected data points.Exclude - Removes the highlighted data from view.View Data - Opens a new window that displays the actual data used.Sort- Rearranges the selected data in ascending or descending order.View Data- Opens a window showing the highlighted data in more detail.To return to a report’s full view, click Reset on top of the report window.Click on Refresh to reload the report using the latest data available.
Quickly Filter and Sort DataYou can quickly filter and sort the data in a visualization using different control options.Filter OptionsReports can feature different types of filters which let you narrow down the visualizations to showonly the data that you want to see.The common types of filter controls featured in IBM Maximo MRO Inventory Optimization reportsinclude: Sliders Drop-down menus and checklists Radio buttonsQuick SortYou can quickly change the sort order of the items in view using the Sortwhen you hover over an axis, field label or header.buttons that appearDate Drill DownReports that feature dates can have a Drill Downcursor near the left-most corners of a chart.or Drill Upoption when you hover your
Use Legends to Highlight DataClick on any legend description to quickly select and interact with all the corresponding datapoints that belong to the same category.On the t
IBM Maximo MRO Inventory Optimization provides each client with a number of standard reports which offer a high-level overview of your organization’s latest key metrics. Using Tableau's visualization tools you c