Transcription
Email Documents User ManualDocument Revision: 1User ManualEmail Documents v1.xFor Retail Pro 8-Series v8.52 and AboveOverviewThe Email Docs plugin allows you to email Purchase Orders and Sales Orders.It also allows you to email Receipts as well as print normal and EFT receipts. The plugin is designed to replacethe normal Print/Update behavior of Retail Pro. As such, it will probably require a change in procedure for theCashier.With this version, Receipt emailing and printing must be done after the receipt is saved. So you should decidehow you want to best handle this. There are several possibilities:Set up Retail Pro to return to the Former Receipt list after a receipt is saved. Remove the Print/Updatebutton from the Tender screen and make the Update Only button available. In this case, the Cashier willsave the receipt, Retail Pro will display the Former Receipt List and the Cashier will select the EmailReceipt button from the side menu.Set up Retail Pro to print receipts as it normally would do, but enable the Print dialog so that the Cashiercan cancel the printing of the normal or EFT receipt.A future version will enable the Email Receipt functionality when a receipt is updated. In this case, theseprocedures will not be necessary.No special procedures are needed to email Purchase Orders and Sales Orders.SetupBefore you can email any documents, the plugin must be set up. Go to POS Receipts and click the Email DocsSetup button from the side menu. The Email Documents setup screen will be displayed.This screen has four sections for General, Receipts, Sales Orders and Purchase Orders.General TabPage 1 of 10
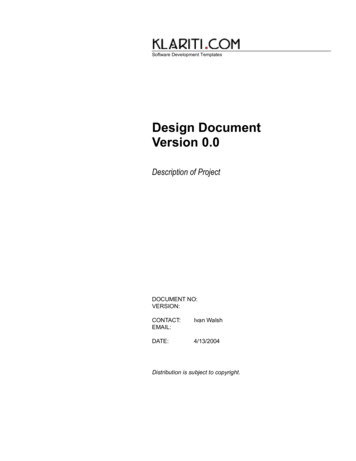
Email Documents User ManualDocument Revision: 1Enter the name of the SMTP server. (This is your outgoing email server).If your server uses authentication, enter the User ID and Password here.In the Local Directory for PDF Files box, enter or browse for the local directory where PDF files are created. THISMUST MATCH THE DIRECTORY ENTERED IN THE NOVAPDF PRINTER SETUP.Page 2 of 10
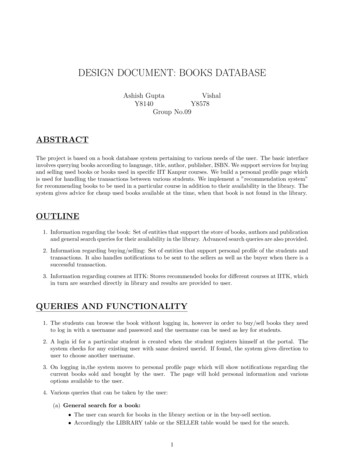
Email Documents User ManualDocument Revision: 1Receipts TabThis section is used for the default settings for Receipts:Create Customer Records for New Email AddressesIn the case where there is no Bill To Customer on a receipt and an email address is entered so the receipt can beemailed, the plugin can generate a new Customer record in Retail Pro. Check this checkbox if you want a newrecord created. The Cashier does have an opportunity to enter additional information (such as a name). See thesection below on Email/Print Receipts for more information.Email DefaultsFrom (Email): The email “From” Address. This is required.From (Name): The name for the address. This is optional.BCC To (Opt): If you want a blind CC sent to an address, enter it here.Reply To (Opt): A Reply To email address. Also optional.These settings (From Email, From Name, BCC and Reply To cannot be changed by the Cashier at run-time.Page 3 of 10
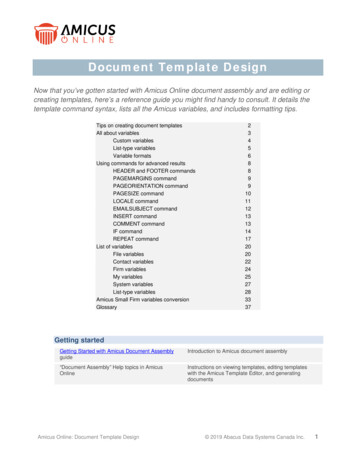
Email Documents User ManualDocument Revision: 1Subject: The default subject line for the email.Body: The default message that is sent.Subject and Body can be changed at run-time by the Cashier.The Receipt itself is always sent as a PDF attachment.Receipt SettingsEmail Design and Printer: Select the receipt design that should be used when generating the PDF file. The Printershould be set to the novaPDF printer. (If, for some reason, the novaPDF printer was installed with a differentname, select that name).The plugin can also print the normal and EFT receipts. Select the document designs and printers for the normaland EFT receipts.Sales Order TabThis section is used for the default settings for Sales Order:The meanings of the settings are the same as for Receipts. However, only a design and printer for emailing theSales Order are required.Page 4 of 10
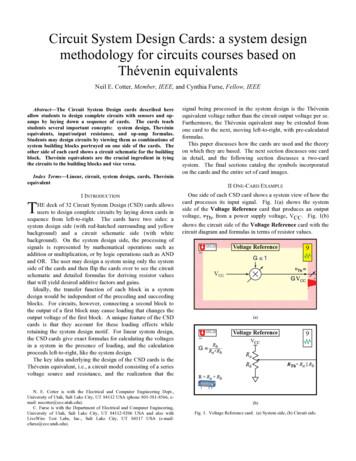
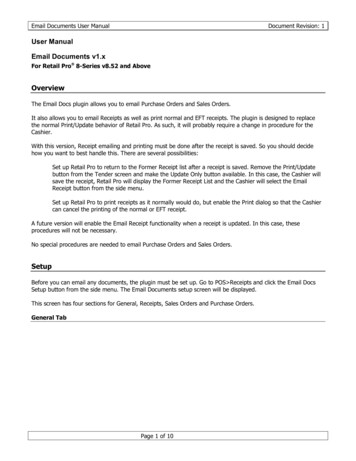
Email Documents User ManualDocument Revision: 1Purchase Order TabThis section is used for the default settings for Purchase Order:Again, the settings are basically the same as the settings for Receipt and Sales Order.However, when emailing a Purchase Order, it is possible to change the From Email, From Name and PODocument Design at runtime.Page 5 of 10
Email Documents User ManualDocument Revision: 1Emailing and Printing ReceiptsTo print and/or email a receipt, select the Email Receipt button from the Receipt List or Form View screen. Thisbutton is only active when the receipt has been saved.The Print/Email Receipt screen is displayed:If the receipt has a Bill to Customer and the Bill To Customer has an email address, it is shown in the Sent To(Email Address) text box. Otherwise, the Send To box is blank.If you are emailing the receipt and there is no Send To address, enter it.To send a copy of the email to another address, enter it in the CC box.The default Subject and Message from the setup screen are shown.From this screen you can control all printing and emailing.Click the Print Normal Rcpt button to change the setting between Yes and No. The default is no.Click the Print EFT Rcpt button to change the setting between Yes and No. This button only appears if there is acredit card tender on the receipt.Page 6 of 10
Email Documents User ManualDocument Revision: 1Click the Send Email button to change the setting between Yes and No.The default settings are designed so that the Cashier has a minimum of data entry.When Done is clicked:If Print Normal Receipt is Yes, a normal receipt is printed.If Print EFT Receipt is Yes, an EFT receipt is printed.If Send Email is Yes, an email is sent. Receipts are sent as PDF attachments to the email.If there is no Bill To Customer on the screen and Create Customer Records for New Email Addresses wasselected in setup, then the Add Customer dialog is displayed:None of the information on this screen is required. The Cashier can click the Done button and continue.In any case, a new Customer record is created and the email address is saved.Use the Cancel button to exit without printing or emailing anything.Emailing a Sales OrderFrom the Sales Order Form View screen, click the Email Sales Order button:The Email Sales Order screen is displayed:Page 7 of 10
Email Documents User ManualDocument Revision: 1If the Bill To Customer on the Sales Order has an email address, it is shown in the Send To box. Otherwise, enterthe Send To email address.To send a copy, enter a CC address.The Subject and Message default to the entries from the Setup screen.Click the Send button to send the email.Emailing a Purchase OrderFrom the Purchase Order List or Form View screen, click the Email PO button:The Email PO screen is displayed:Page 8 of 10
Email Documents User ManualDocument Revision: 1The Email Purchase Order screen is slightly different than the other screens.First, if the vendors on the PO have email addresses, they are added to the Send to and CC drop down boxes.However, you can also enter a new address in either one of these boxes. If a new address is entered, it is savedin a database linked to that vendor. So the next time you send a PO to that vendor, the email address will appearin the drop down.Second, the From Email and Name from the setup screen are shown on this screen and can be changed.Third, the PO Doc Design drop down is set to the setting from the setup screen, but any other PO design can beselected.The Subject and Message default to the entries from the Setup screen.Click Send to send the email.Page 9 of 10
Email Documents User ManualDocument Revision: 1Page 10 of 10
For Retail Pro 8-Series v8.52 and Above Overview The Email Docs plugin allows you to email Purchase Orders and Sales Orders. It also allows you to email Receipts as well as print normal and EFT receipts. The plugin is designed to replace the normal Print/Update behavior of Retail Pro. As suc