Transcription
4 -GSA/FASVendor Support CenterSchedules Input Program (SIP)Version 8.x DocumentationSeptember 2019VSC-SIP-VER 8.5xTable of ContentsSchedules Input Program Version 8.x Documentationiv
Table of Contents1GENERAL INFORMATION . 1-11.11.21.31.41.51.62GETTING STARTED . 2-12.133.43.53.6Adding Photos Using Product Information Screen . 4-2122Adding Photos in the Photo Screen . 4-2223IMPORTING PRODUCTS . 5-23245.15.25.35.45.56Contractor Information Screen . 3-5Primary Contract Information Screen . 3-6Product Information Screen . 3-133.3.1 Quantity Volume Discount Breaks . 3-143.3.2 Dollar Volume Discount Breaks . 3-15Accessories Information Screen . 3-16Options Information Screen . 3-17How to update products 3-19ADDING PRODUCT PHOTOS . 4-21214.14.25SIP Registration . 2-1SIP DATA ENTRY . 3-53.13.23.34Introduction . 1-1GSA Advantage! Overview. 1-1Schedules Input Program (SIP) . 1-1Vendor Support Center (VSC) . 1-1GSA Contract Award . 1-1GSA Advantage! Catalog Upload Process . 1-1Import Program Overview . 5-2324Building Import Files . 5-234Shortcut for Building Import Files . 5-234Adding Photos Using Spreadsheets . 5-245Importing Files into SIP . 5-245ENTERING SERVICE CATALOG INFORMATION . 5-256.16.2Creating Text Files . 5-266Attaching Text Files to SIP . 5-266Table of ContentsSchedules Input Program Version 8.x Documentationv
7UPLOADING CATALOG INFORMATION . 6-17.17.27.37.47.58DOWNLOADING AND PROCESSING RESPONSE FILES . 7-28.18.29SIP Upload File Types . 6-1Firewall Settings . 6-1SIP Upload Instructions . 6-1Uploading/Using VSC Website. 6-1Website Upload Conditions . 6-2Downloading and Processing Files . 7-3Connectivity Errors . 7-3BACKING UP AND RESTORING SIP DATA . 8-49.19.2Backing up SIP Data . 8-4Restoring SIP Data . 8-510 UPGRADING SIP VERSION . 9-510.1 Upgrading SIP Version 8.x with Firewall . 9-610.2 Upgrading From SIP Version 7.x . 9-611 VENDOR SUPPORT CENTER CONTACT INFORMATION . 10-6Table of ContentsSchedules Input Program Version 8.x Documentationvi
11.1GENERAL INFORMATIONIntroductionThe Schedules Input Program (SIP) Version 8.x Users Guide defines the process, procedures andtools used to maintain and support the SIP software by the General ServicesAdministration/Federal Acquisition Services (GSA/FAS) Vendor Support Center (VSC).1.2GSA Advantage! OverviewGSA Advantage! is the online shopping and ordering system used by vendors to provide theirproducts and/or services to government buyers. GSA Advantage allows vendors to sell to thegovernment without obtaining agency specific contracts.1.3Schedules Input Program (SIP)SIP is a proprietary software program provided by GSA to assist contract holders with uploadingtheir electronic catalog to GSA Advantage.1.4Vendor Support Center (VSC)The VSC supports GSA contract holders that use SIP to upload their data. The VSC alsosupports password related issues concerning eBuy and 72A Quarterly Reporting System.1.5GSA Contract AwardAny contractor interested in providing products and/or services to the government may benefitfrom obtaining a GSA contract. Most government buyers use GSA Advantage! to search andshop for products and/or services. Companies that wish to acquire a GSA contract must contact aGSA Procurement Contracting Officer (PCO) to obtain the necessary documentation. GSA eOffers is another tool used to obtain a GSA contract.1.6GSA Advantage! Catalog Upload ProcessAfter a contract is awarded, the contract must be registered with the VSC. Following registration,a unique password will be assigned to the contract. This password will be used for electroniccatalog submission via SIP. Catalog information is then entered into SIP and uploaded. The PCOwill receive the file and check for consistency between the electronic file and the writtencontract. After verification and approval in CORS (Contract Officer Review System) the file isposted in GSA Advantage.General InformationSchedules Input Program Version 8.x Documentation1-1
Acronyms and AbbreviationsThe acronyms and abbreviations used in this document are listed and defined in the table below.AcronymDefinitionATSM/EPA Acute Traumatic Stress Management/EnvironmentalProtection AgencyCPGComprehensive Procurement GuidelinesEDIElectronic Data InterchangeFOBFreight On BoardFASFederal Acquisition ServiceFTPFile Transfer ProtocolGBLGovernment Bills of LadingGSAGeneral Services AdministrationMBMegabyteNSNNational Stock NumberPCOProcurement Contracting OfficerQTY/VOLQuantity VolumeSINSpecial Items NumbersSIPSchedules Input ProgramVERVersionVSCVendor Support CenterGeneral InformationSchedules Input Program Version 8.x Documentation1-2
22.1GETTING STARTEDSIP RegistrationYou must register your contract before you can upload your catalog. To register, visit the VSCwebsite at (https://vsc.gsa.gov).Entering Service CatalogInformationSchedules Input ProgramVersion 8.x Documentation2-1
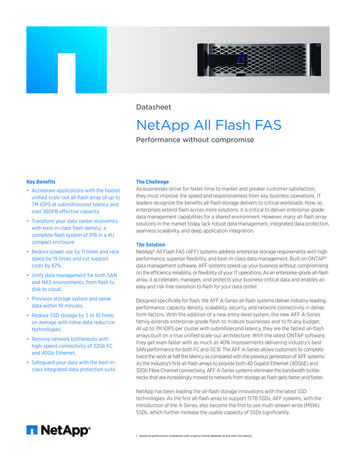
Select “Register” Then select your contract type in the drop down box and enter in your contractnumber.The SIP registration form is shown below. All required information is indicated byan asterisk (*):Entering Service CatalogInformationSchedules Input ProgramVersion 8.x Documentation2-2
After registration is complete, a confirmation will be sent to the email address provided. Theconfirmation will include a unique password used for SIP uploads and GSA eBuy*Before you can access eBuy, you must upload a catalog using the SIP software or EDI. The filemust then be approved by your GSA Contracting Officer. If your products or services are notposted on www.gsaadvantage.gov, you will not have access to eBuy.SIP Download and InstallationSIP can be downloaded from the VSC website (https://vsc.gsa.gov/sipuser/sip download.cfm).System requirements: Windows XP/VISTA/Windows 7, Windows 8, Windows 10 OperatingSystem, Pentium II processor, 32 MB of RAM, internet capabilities and 12 MB of hard diskspace.* Note – Depending on the amount of product data, more disk space may be required.The SIP program is available in two formats (.exe and .zip). The download files areapproximately 9.6 MB is size. Vendors with firewalls that will not allow the download of .exefile will want to download the .zip format.Note: You must have full administrative rights on your computer to install the SIP software. Ifyou do not or encounter an error during installation, please contact your IT department. Theymay need to install the software for you.Entering Service CatalogInformationSchedules Input ProgramVersion 8.x Documentation2-3
Step 1: Download and install the .exe or .zip format.Step 2: Select ”Next” on each of the dialog boxes to accept the default settings.Step 3: Select “Finish” to complete the installation.Entering Service CatalogInformationSchedules Input ProgramVersion 8.x Documentation2-4
3SIP DATA ENTRYIf you have a newly installed SIP program you will receive the following dialog box when youopen the software. If you have used SIP before, you will not see the below dialog box.If your company has already registered using the steps in section 2, select “Already Registered”.If your company is brand new and have not registered, select “Register”. If you selected“Already Registered” proceed to section 3.1 “Contractor Information”. If you have notregistered, select “Register” and go back to section 23.1Contractor Information ScreenIn the Contractor Information screen you will enter information such as DUNs number,password provided by GSA (Password you received after you registered your contract insection 2) and company address.Step 1: Select “File” “Open” “Contractor” or select the “Contractor” icon shown below.This icon is located in the top left corner of the SIP software.Entering Service CatalogInformationSchedules Input ProgramVersion 8.x Documentation3-5
Step 2: Select “Edit” on the top tool bar Shown with the arrow below. This will highlight thefields and allow you to edit the fields. If the fields are all gray, it will not allow you to edit thedata.Step 3: Enter contractor information and click “Save” at the top of the program.Please see the Index for field descriptionsStep 4: Close the Contractor Information Screen.3.2Primary Contract Information ScreenStep 1: Select “File” ”Open” “Contracts” or select the “Contracts” icon shown below.Entering Service CatalogInformationSchedules Input ProgramVersion 8.x Documentation3-6
Step 2: Select “Add”.Step 3: Enter all required and applicable contract information.Please see the index for field descriptionsStep 4: Select “Save” when finished.If this is the first time you are using SIP, it will automatically take you to the SIN MaximumOrder screen (Step 5).Entering Service CatalogInformationSchedules Input ProgramVersion 8.x Documentation3-7
Step 5: The SIN/Maximum Order screen will appear. Enter Special Item Numbers (SIN's) andMaximum Order Limit(s).Some SIN may require “Sub SIN’s” or sub-categories. Not all SIN have sub SIN’s. At least oneof these sub SIN’s must be selected (checked) in order for the selected SIN to be saved.NOTE: For each sub SIN selected, it must be attached to at least 1 product. For a list of SIN’sthat require sub SIN’s please see the index.Step 5: Select “Save” and close the SIN/Maximum Order screen.Step 6: The Dealer/Sales Office Addresses screen will appear. If the address for receiving ordersand/or payments is the same as the address entered in the “Contractor Screen”, select No and donot complete this screen. Select Yes if you have Dealer/sales offices and then fill out theinformation and then select “Save”Note: Dealers/Sales offices are other locations or authorized entities to make transactions on yourbehalf. If you not have dealers DO NOT complete this screen.Entering Service CatalogInformationSchedules Input ProgramVersion 8.x Documentation3-8
Step 7: Close Dealer/Sales Office Addresses.Entering Service CatalogInformationSchedules Input ProgramVersion 8.x Documentation3-9
ZONESIf your pricing varies depending on what part of the country the buyer is located, use thisscreen.Ex 1: Prices in VA, MD, DC, NC, PA are different from anywhere else in the country. In thisexample VA, MD, DC, NC, PA would be Zone 1. All other states would be Zone 2. If you usethis table each state must have a zone.EX 2: Prices in FL, GA, SC are 100. These would be Zone 1. Prices in CA, AZ, WA are 150.These would be Zone 2. All other states are 125. The rest of the states would be Zone 3. Allstares must have a zone number if this table is used.Note: Do not complete this table if your prices are the same across the country. Leave the entiretable blankCOLORS/FABRICSEntering Service CatalogInformationSchedules Input ProgramVersion 8.x Documentation3-10
If your items have color or fabric options, enter the information here.Entering Service CatalogInformationSchedules Input ProgramVersion 8.x Documentation3-11
SPECIAL CHARGESIf your items have additional charges enter that information here.Step 9: Close the Special Charges screen.Entering Service CatalogInformationSchedules Input ProgramVersion 8.x Documentation3-12
3.3Product Information Screen(Do not enter services in this screen. See section 6.1 on how to enter a text file.)Step 1: Select “File” “Open” ”Products” or select the “Products” icon shown below.Step 2: Select “Add”.Step 3: Enter product information and select “Save”Please see the index for field descriptionsEntering Service CatalogInformationSchedules Input ProgramVersion 8.x Documentation3-13
Step 4: The Price Information screen will appear. Enter your pricing information and select“Save” when finished.Please see the index for field descriptionsIf you have quantity discounts/dollar volume discounts, select the “Qty/Vole” button shownbelow and select “Edit”.CLICK HERE TO ENTER QUANTITY/DOLLARVOLUME DISCOUNTS3.3.1 Quantity Volume Discount BreaksEntering Service CatalogInformationSchedules Input ProgramVersion 8.x Documentation3-14
3.3.2 Dollar Volume Discount BreaksSave and close this screen. You will be redirected back to the “Price” screen.Step 5: Close the Price Information screen.Step 6: The Environmental/Special Features screen will appear as shown below. Complete thisscreen various product features apply.Step 7: Repeat steps 2 - 7 to add additional items.Entering Service CatalogInformationSchedules Input ProgramVersion 8.x Documentation3-15
Step 8: Close Product Information screen.3.4Accessories Information ScreenStep 1: Select “File” “Open” “Accessories” or select the Accessories icon.Step 2: Select “Add”.Step 3: Enter Accessory information and select “Save”.The Accessory screen is identical to the Product screen, with the exception of the “AttachProduct” buttonEntering Service CatalogInformationSchedules Input ProgramVersion 8.x Documentation3-16
Step 4: The Accessory Price Information screen will appear. Enter price information and select“Save” when finished.Step 5: Repeat steps 2 - 7 to add additional accessories.Step 6: Close Accessory Information screen.3.5Options Information ScreenStep 1: Select “File” “Open” “Options” or select the Options icon.Step 2: Select “Add”.Step 3: Enter option information and select “Save”.Entering Service CatalogInformationSchedules Input ProgramVersion 8.x Documentation3-17
Step 4: Close Options Information Screen.3.6:How to update productsStep 1: In the SIP program click on productEntering Service CatalogInformationSchedules Input ProgramVersion 8.x Documentation3-18
Step 3: Then click on the edit button in the toolbar:Entering Service CatalogInformationSchedules Input ProgramVersion 8.x Documentation3-19
Step 4: Now the screen will not be grayed out and you can make whatever changes need to bemade. Once you do that click on the save button next to the edit button in the tool bar. If youneed to change the price click on the sign in the tool bar after you have selected the productand then click on edit just like you did for the product and make the price changes here or doyour temp pricing too. Once you are done click on Save and then go to the next product that youwant to make the changes and repeat till you are done.4Entering Service CatalogInformationSchedules Input ProgramVersion 8.x Documentation3-20
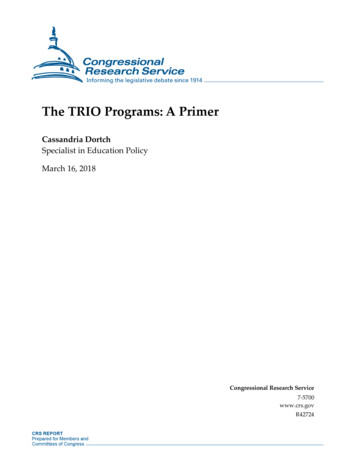
4ADDING PRODUCT PHOTOSPhotos can be added using the Product Information Screen or the Photo Screen.4.1Adding Photos Using Product Information ScreenStep 1: Photo requirements:- jpg format or gif format- no larger than 1 MB- file name can be no longer that 30 characters- file name should not contain special characters (i.e. space, symbols, etc.)Step 2: Place the images into the C:\SIPV8\Photo folder.Step 3: You can attach the photo in the Product Information screen by selecting a product,selecting “Edit” on the top tool bar, and then select the photo name drop down menu, andchoosing appropriate photo file.NOTE: Image of photo will appear in Product Information Screen once selected. Some imagesmay seem distorted in the Product Information Screen; this is just a thumbnail image. This doesnot indicate how the file will view on Advantage!. Images will show correctly on Advantage!.CLICK HERE TO SELECTPHOTO FILE NAMENOTE: Follow steps 1, 2, and 3 from above to add photos in the Accessory Screen.Entering Service CatalogInformationSchedules Input ProgramVersion 8.x Documentation4-21
4.2Adding Photos in the Photo ScreenStep 1: Follow steps 1 and 2 from above.Step 2: Select File Open Photos. When Photo Screen appears, select “Continue”.Step 3: Select the appropriate photo from the photo drop down menu.Step 4: Double click in the last column of the table to attach/detach a photo.Note: You can add a single photo to multiple products.Entering Service CatalogInformationSchedules Input ProgramVersion 8.x Documentation4-22
55.1IMPORTING PRODUCTSImport Program OverviewThe import program is used to enter a large number of products into the SIP program at once. Itis suggested that vendors with 100 or more products, use the import program to enter theirproduct data into SIP.5.2Building Import FilesThe import program accepts three file types, ASCII text (.txt), Excel spreadsheets (.xls), andDatabase files (.dbf). Import Templates are located in the C:\SIPV8\import\template folder.Also refer to the SIP Import Excel document located at the VSC website for detailed informationon
SIP is a proprietary software program provided by GSA to assist contract holders with uploading their electronic catalog to GSA Advantage. 1.4 Vendor Support Center (VSC) The VSC supports GSA contract holders that use SIP to upload their data. The VSC also supports password related i
![McAfee SIEM Vendor Device Support[1]](/img/8/ds-siem-device-support-matrix.jpg)