Transcription
Cisco ISE integration with Microsoft SCCMServerAuthor: Imran Bashir
Table of ContentsIntroduction. 3What Is the Cisco TrustSec System? . 3About the TrustSec How-To Guides . 3Overview4SCCM Policies. 4ISE Communication with SCCM Server. 5Workaround (Tested and Verified) . 6Workaround (Proposed, Not Tested or Verified) . 7Things to change in ISE . 7Changes on Microsoft SCCM Server . 9Troubleshooting ISE Integration with SCCM. 31Situation 1 – Problem with User Account or Security Group Membership . 31Situation 2 – Problem with DCOM Permissions . 32
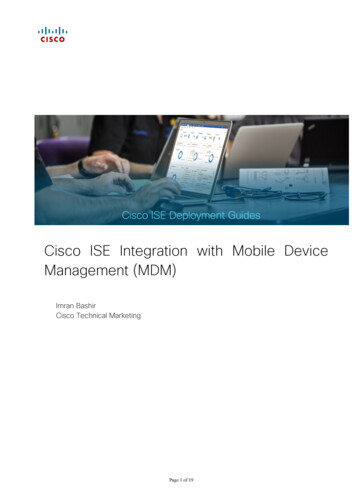
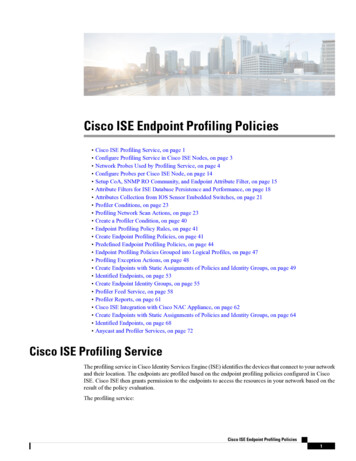
IntroductionWhat Is the Cisco TrustSec System?Cisco TrustSec , a core component of the Cisco SecureX Architecture , is an intelligentaccess control solution. TrustSec mitigates security risks by providing comprehensive visibilityinto whom and what is connecting across the entire network infrastructure, and exceptionalcontrol over what and where they can go.TrustSec builds on your existing identity-aware access layer infrastructure (switches, wirelesscontrollers, and so on). The solution and all the components within the solution are thoroughlyvetted and rigorously tested as an integrated system.In addition to combining standards-based identity and enforcement models, such as IEEE802.1X and VLAN control, the TrustSec system it also includes advanced identity andenforcement capabilities such as flexible authentication, Downloadable Access Control Lists(dACLs), Security Group Tagging (SGT), device profiling, posture assessments, and more.RADIUSGuest ServicesPostureProfilerIngress EnforcementWirelessuserSXPWireduseryrit agcu TSe oupGrCampusNetworkGr Secou urip tyTagMACsecData CenterIngress EnforcementEgress EnforcementFigure 1.About the TrustSec How-To GuidesThe TrustSec team is producing this series of How-To documents to describe best practicesfor TrustSec deployments. The documents in the series build on one another and guide thereader through a successful implementation of the TrustSec system. You can use thesedocuments to follow the prescribed path to deploy, or simply pick the single use-case thatmeets your specific need.
OverviewISE can perform a policy check with SCCM by following methods Using AnyConnect for posture (leveraging OPSWAT libraries) ISE checking status with SCCM as an MDM Server using WMISCCM PoliciesThere could be various policies configured in SCCM, but you typicallystart with a baseline policy config, there could be more policiesconfigured by adminEvery policy configured in SCCM generates a policy ID in SCCM, in ourfindings the Baseline Policy ID does not change even with a new SCCMinstall.E.g. Sample Baseline Policy from an SCCM Server CASSMS G System CI ComplianceState.CI UniqueID 'ScopeId 5E0BA349-421B-
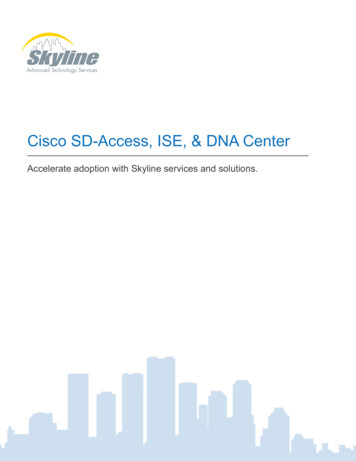
4663-8E5F-3D2C408A3FA5/Baseline 28ff969f-cc82-4246-a15d-214d1489b076'ISE Communication with SCCM ServerISE leverages WMI to send a Query to SCCM Server, here is an exampleflow of a managed device, which is NOT registered with SCCM.SCCM Managed AssetCisco ISESCCM ServersWMIDevice connects to the networkCheck Device Registration with SCCM(WMI Query)Display Message to User”Device NOT Registered”SCCM Server reportsDevice NOT Registered (unknown) 0Update Compliance statusand lastCheckinTimeStampof the device in Endpoint.Issue COAApply network access policy(Limited Access)SCCM server responds with number of policies configured and thecompliance status of those policies e.g. If we have a baseline policyconfigured with other 2 optional policy checks, ISE will get policy resultsfor all the configured policies in SCCM.IssueOnce ISE gets results for all the configured policies, it performs and ANDfunction for the final results, i.e to an Endpoint to be compliant, all theconfigured policies on SCCM must be compliant.This is why, in current implementation of ISE, you cannot select the
policies to be used for compliance, it’s an AND condition.Sample Query sent from ISE to SCCM Serverselect SMS R System.Name, SMS G System CI ComplianceState.CI UniqueID,SMS G System CI ComplianceState.ComplianceState,SMS G System CI ComplianceState.LocalizedDisplayName,SMS G System CH ClientSummary.LastPolicyRequest from SMS R System left joinSMS G System CI ComplianceState on SMS G System CI ComplianceState.ResourceID SMS R System.ResourceId left join SMS G System CH ClientSummary onSMS G System CH ClientSummary.ResourceID SMS R System.ResourceId left joinSMS G System NETWORK ADAPTER on SMS G System NETWORK ADAPTER.ResourceId SMS R System.ResourceId where (SMS R System.MacAddresses like ‘%MAC ADDRESS%' ORSMS G System NETWORK ADAPTER.MACAddress like ‘%MAC ADDRESS%') ANDSMS G System CI ComplianceState.CI UniqueID 'ScopeId 5E0BA349-421B-4663-8E5F3D2C408A3FA5/Baseline 28ff969f-cc82-4246-a15d-214d1489b076’Workaround (Tested and Verified)Once we get results for all the configured policies, create a filter in ISEand only look at the Baseline Policy, this ignores the results for any otherpolicy that is configured on SCCM Server, FYR, the filter is marked as redcolor and is bold.As mentioned earlier, we haven’t seen the baseline policy ID changedacross multiple SCCM installs.mdm.heartbeat.pollintervalMins 5mdm.constants.httpconnectiontimeout 5000mdm.constants.readtimeout veurl 00000000000/serviceEndpoints?api-version 1.6&client-request-id ice.endpoint.name NACAPIServicemdm.sccm.namespace.prefix root\\sms\\sitemdm.sccm.device.query select SMS R System.Name, SMS G System CI ComplianceState.CI UniqueID, \SMS G System CI ComplianceState.ComplianceState, SMS G System CI ComplianceState.LocalizedDisplayName, \SMS G System CH ClientSummary.LastPolicyRequest from SMS R System left joinSMS G System CI ComplianceState \on SMS G System CI ComplianceState.ResourceID SMS R System.ResourceId left joinSMS G System CH ClientSummary \on SMS G System CH ClientSummary.ResourceID SMS R System.ResourceId left joinSMS G System NETWORK ADAPTER on \SMS G System NETWORK ADAPTER.ResourceId SMS R System.ResourceId where(SMS R System.MacAddresses like '%MAC ADDRESS VALUE%' \
OR SMS G System NETWORK ADAPTER.MACAddress like '%MAC ADDRESS VALUE%') AND \SMS G System CI ComplianceState.CI UniqueID 'ScopeId 5E0BA349-421B-4663-8E5F3D2C408A3FA5/Baseline ce.query.column.name SMS R System.Namemdm.sccm.device.query.column.uniqueid SMS G System CI ComplianceState.CI te SMS G System CI ry.column.policyname SMS G System CI e.query.column.lastpolicyrequest SMS G System CH ry.column.key SMS G System CI ComplianceState.CI UniqueIDWorkaround (Proposed, Not Tested or Verified)ISE does not have advance information about the number of policiesconfigured on SCCM server, hence we are not aware of the policy ID’s inadvance.If you know the policy ID’s and the policy ID does not change (other thanBaseline), then you could try adding those policy ID’s in to the filterE.g out of my 10 SCCM policies, I’m only interested in 5 of them, create afilter and include only 5 policy ID’sAgain, this is not tested or verified as of now.Things to change in ISEInstall a Root Patch on ISE and Copy the attached properties file(mdm.properties.gz) and unzip on respective PSN and run tests.It should query only the baseline policy since we have added the policy IDfor baseline policy ONLY.Recommended to run that query on the SCCM server with MAC Addressof on-boarding device. Please check if the PolicyID hardcoded in the
mdm.properties file is ok from Microsoft personnel (we haven’t see thatchange so far).Copy zip file to the following folder in ISE install(/opt/CSCOcpm/config directory)Backup old mdm.properties file mv mdm.properties /tmpUnzip attached zipped file gunzip mdm.properties.gzMake sure unzipped mdm.properties file has proper permissions, if it isread only please change the permissions. chmod 755 mdm.propertiesA sample successful log is attached FYR (ISESCCMPolicyFixLog)2017-07-12 15:54:06,518 DEBUG [admin-http-pool6][] cisco.cpm.mdm.api.MdmServerInfoApi -:admin:::- inside themethod : callDeviceAttributesApiOnMdmServer with input params - mdmServerId : f4f9a180-674e-11e7-9ac4000c293a254f, and macAddr : 70:F1:A1:E5:C2:152017-07-12 15:54:06,519 DEBUG [admin-http-pool6][] cisco.cpm.mdm.api.MdmServerInfoApi -:admin:::- returningfrom the method : callDeviceAttributesApiOnMdmServer2017-07-12 15:54:06,715 TRACE [admin-http-pool6][] cpm.mdm.sccm.util.WmiUtil -:admin:::- WMI ClientexecuteQuery - start query: select SMS R System.Name, SMS G System CI ComplianceState.CI UniqueID,SMS G System CI ComplianceState.ComplianceState, SMS G System CI ComplianceState.LocalizedDisplayName,SMS G System CH ClientSummary.LastPolicyRequest from SMS R System left joinSMS G System CI ComplianceState on SMS G System CI ComplianceState.ResourceID SMS R System.ResourceId left join SMS G System CH ClientSummary onSMS G System CH ClientSummary.ResourceID SMS R System.ResourceId left joinSMS G System NETWORK ADAPTER on SMS G System NETWORK ADAPTER.ResourceId SMS R System.ResourceId where (SMS R System.MacAddresses like '%70:F1:A1:E5:C2:15%' ORSMS G System NETWORK ADAPTER.MACAddress like '%70:F1:A1:E5:C2:15%') ANDSMS G System CI ComplianceState.CI UniqueID 'ScopeId 5E0BA349-421B-4663-8E5F3D2C408A3FA5/Baseline 28ff969f-cc82-4246-a15d-214d1489b076', keyproperty:SMS G System CI ComplianceState@CI UniqueID2017-07-12 15:54:06,802 INFO [admin-http-pool6][] cpm.mdm.sccm.util.WmiUtil -:admin:::- Since Unique ID is emptygenerating Random key to update data.2017-07-12 15:54:06,816 TRACE [admin-http-pool6][] cpm.mdm.sccm.util.WmiUtil -:admin:::- WMI query returned key: 1499900046802, values: {LastPolicyRequest 20170712224213.000000 000,LocalizedDisplayName Himak file chk, ComplianceState 1, Name HK-PC-WIN7}2017-07-12 15:54:06,817 TRACE [admin-http-pool6][] cpm.mdm.sccm.util.WmiUtil -:admin:::- WmiUtil - executeQuery- last element - Incorrect function. [0x00000001]
2017-07-12 15:54:06,817 TRACE [admin-http-pool6][] cpm.mdm.sccm.util.WmiUtil -:admin:::- WMI ClientexecuteQuery - end2017-07-12 15:54:06,817 TRACE [admin-http-pool6][] cpm.mdm.sccm.api.SccmClient -:admin:::- SCCM returneddevice with compliance state: true, checkinTime: 1484289733000, failureReason:2017-07-12 15:54:06,817 DEBUG [admin-http-pool6][] cpm.mdm.sccm.api.SccmClient -:admin:::- Found device withmac: 70:F1:A1:E5:C2:15 formatted mac 70:F1:A1:E5:C2:15 in SCCM server: SCCM12017-07-12 15:54:06,883 DEBUG [admin-http-pool6][] cisco.cpm.mdm.util.MDMUtil -:admin:::- updating device mdmattributes - mdmServer id: f4f9a180-674e-11e7-9ac4-000c293a254f in endpoint2017-07-12 15:54:06,883 DEBUG [admin-http-pool6][] cisco.cpm.mdm.util.MDMUtil -:admin:::- updating device mdmattributes - mdmServer name: SCCM1 in endpoint2017-07-12 15:54:07,195 DEBUG [admin-http-pool6][] cisco.cpm.mdm.util.MDMUtil -:admin:::- updated device mdmattributes with macaddress: 70:f1:a1:e5:c2:152017-07-12 15:54:07,195 DEBUG [admin-http-pool6][] cisco.cpm.mdm.api.MdmEndpointData -:admin:::MdmEndpointData com.cisco.cpm.mdm.api.MdmEndpointDataObject {macaddress: nullOperatingSystem:isRegistered: trueisCompliant: trueregistrationFailureReason: nullcompliancefailureReason: nullcomplianceFailureRemediation: nullisDiskEncryptionOn: false:isPinlockOn: falseisJailbroken: ber:meid:udid:vendorAssignedMdmServerName: SCCM1errorMsg: nullerrorOccurred: false}Changes on Microsoft SCCM ServerCentral Administration Server (CAS)Step 1 – Create a user within the Active Directory domain that will beused by ISE to communicate with SCCM and issue queries about thestatus of authenticating machines.a. Open Active Directory Users and Computers administrative tool.
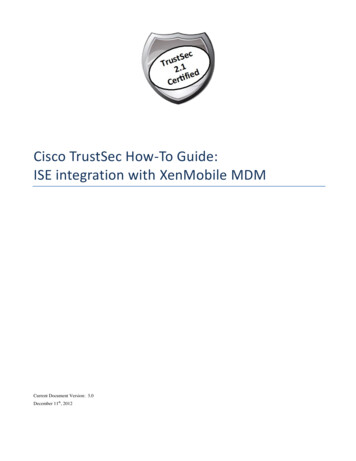
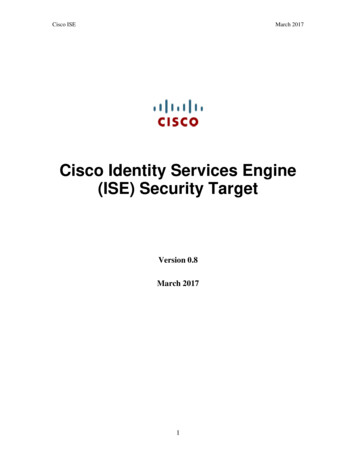
b. Right-click on the OU container where you want to create thenew user and select the option to create a new user. You shouldsee the following dialog box.c. Fill in the information as necessary. Select Next. In this example,we are using the “ise sccm user” logon name.d. Create a password that adheres to your organization’s securitypolicy.e. Uncheck the option “User must change password at next logon”.
f. Click Next. You should see the following.
g. The new user is now created. If you check the properties of theuser, you will see that the user is only a member of the DomainUsers security group in AD.
Step 2 – Add the new user created in Step 1 to the “SMS Admins”security group on the Microsoft SCCM Server.a. On the SCCM Server, open the Computer Managementadministrative tool.
b. Select Local Users and Groups.c. Select Groups.d. Locate the “SMS Admins” security group.
e. Double click on the “SMS Admins” security group. This will openup the dialog box showing which users and groups are a memberof this local security group.
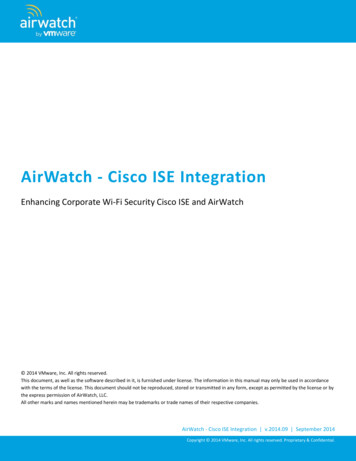
f. We need to add the user created for ISE to this group. Selectthe “Add ” button.
g. Ensure the location selected is the Active Directory domain. Inthis example, the domain name is “home.local”.h. Enter the logon name of the account created in Step 1 and thenselect the “Check Names” button. The user name should nowbe underlined, indicating that the server was able to locate theobject in the AD domain.i. Select “OK”.
j. You should now see that the new user is a member of the “SMSAdmins” local security group.k. Click “Apply” and “OK” to save the settings and close the dialogbox.Step 3 – Configure the Distributed Component Object Model (DCOM) toallow the new user to access, launch, and activate the objects remotely.a. On the SCCM Server, open Component Services administrativetool.
b. In the left pane, expand “Component Services” and “MyComputer”. You should see something similar to the screenshotbelow.c. Expand the “DCOM Config” section and there will be a long list ofobjects.d. You will need to do the following to make the registry keys toappear. These steps need to be done on the SCCMCAS/Primary server in which ISE is trying to connect to.
i.The original owner of the registry keys is TrustedInstallerwhich will not allow you to make modifications to those keys.You will need to take ownership and grant yourself full controlfull access you can then modify the keys. These were theregistry keys that had to be add/modified in order for theDCOMto appear.ii.The information that I used to import into the registry is:Windows Registry Editor Version 5.00[HKEY CLASSES AppID" "{76A64158-CB41-11D1-8B02-00600806D9B6}"[HKEY CLASSES DllSurrogate" " "[HKEY CLASSES 00806D9B6}]"DllSurrogate" " "e. Locate the object named “{76A64158-CB41-11D1-8B0200600806D9B6}” as shown below.
f. Right-click on the object and select “Properties”. A dialog boxwill open.g. Select the “Security” tab.
h. In the “Launch and Activation Permissions” section, select the“Customize” radio button.i. Now click on the “Edit ” button in that same section. Anotherdialog box will open showing the permissions.
j. Click the “Add ” button to add the new user for ISE.k. In the new dialog box, ensure that the location is set to the ADdomain.l. Enter the new username created in Step 1 and select “CheckNames”.
m. Ensure that the username is found and is now underlined,indicating that the account is valid.n. Click “OK”.o. Now select “Allow” for all permissions while the new account isselected. The end result should look similar to the followingscreenshot.
p. Select “OK” on all dialog boxes.Step 4 – Configure ISE to connect to the SCCM server, test theconnection, and add the SCCM server as an available MDM server in theISE system.a. Login to the ISE Primary Admin node web interface.b. Select Administration - Network Resources - External MDM.
c. Click on the “Add” button to add a new MDM server.
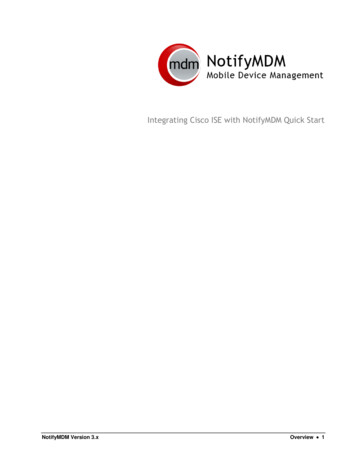
d. The “Name” field can be any name you want to reference theMDM as when creating policies within ISE. The name cannotcontain any spaces. In this example, we are using “My SCCM”.e. The “Server Type” must be set to “Desktop Device Manager” forSCCM.f. Enter the Fully Qualified Domain Name (FQDN) of the SCCMserver or the IP address that is reachable from the ISE Adminnode.g. For the “Site or Instance Name”, please use the SCCM SiteName.h. The username will be the user account that was created in Step1. It is important to preface the username with the domain name.For example, “home\ise sccm user” where “home” is the ADdomain name.
i. Enter the password for the user account created in Step 1.j. Select the “Test Connection” button at the bottom to test theconnection to the SCCM server. If the connection is successful,you should see a dialog box stating it was successful as shownbelow.k. Click the “OK” button on the success dialog.l. Change the “Status” to “Enabled”.m. Click “Submit” to add the new SCCM server to ISE as an MDM.
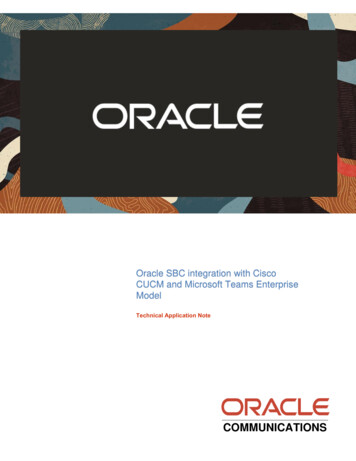
Troubleshooting ISE Integration with SCCMDuring the initial configuration of ISE to connect to the SCCM server, youmay encounter problems with testing the connection. The connectionmay fail and various errors will be presented. Unfortunately, the errormessages may not be clear enough to isolate the issue.Considering that there really are only two configurations required on theSCCM server to allow ISE to connect, we can investigate what the errorslook like in each of those situations.Situation 1 – Problem with User Account or Security GroupMembershipISE Error Message:SCCM Server Error Message: None
Resolution – Ensure that the account is valid, not locked out, and that thepassword works. This can be accomplished by attempting to login to theAD domain using the account. If the login works, verify that the useraccount is a member of the “SMS Admins” local security group on theSCCM Server. Any of these issues will result in the error message shownabove.Situation 2 – Problem with DCOM PermissionsISE Error Message:SCCM Server Error Message:
Resolution – Follow the procedures in Step 3 to ensure that the DCOMobject has been configured to allow the ISE user account the ability toaccess, launch, and activate the objects remotely.
Overview ISE can perform a policy check with SCCM by following methods Using AnyConnect for posture (leveraging OPSWAT libraries) ISE checking sta