Transcription
This image cannot currently be displayed.RemedyLocal AdministratorsGuideRemedy version 2.5Guide updated September 2015For Remedy Support: remedy-admin@cornell.edu
Table of ContentsInterface and Environment Orientations. 3Production Environment . 3Test Environment . 3Logging in to Remedy ITSM . 3Organizational Structure . 3Company . 3Organizations and Departments . 4Support Organizations and Support Groups. 4Customer Data . 5Support Provider Data . 8Configuring Notifications to Customers . 10Standard Notification Templates . 13Configuring Required Fields “On Resolve” . 16Setting Up Incident Creation Notifications to Support Providers . 18Incident Templates . 20Email Templates . 24Creating Email Templates. 24Modifying Email Templates . 27Using Email Templates . 28Reporting . 29Creating Reports via Search. 29Creating Ad-hoc Reports . 31Using Analytics . 33Updating Closed & Canceled Tickets . 33Update by Email Flag . 37Reopening a Closed or Canceled Ticket . 37Remedy Local Admin Guide v2.5 (updated September 2015)page 2
Interface and Environment OrientationsProduction EnvironmentYou and your support providers can access the production server using a web browser with this URL:http://cornell.onbmc.comTest EnvironmentYou and your support providers can access the test server using a web browser with this URL:http://cornell-qa.onbmc.comChanges made to production configuration data are not automatically moved to test. If you wish to havea current test environment it is necessary to make the changes in both places. Roughly twice a year thesupport team will schedule a “refresh” of test to ensure it stays usably in sync with production.Logging in to Remedy ITSMWhen you first login to the system you will be presented with your home page. This page provides youwith a series of links that take you to different components of the ITSM suite.Organizational StructureRemedy uses two parallel hierarchical structures:CompanySupport CompanyOrganizationSupport OrganizationDepartmentSupport GroupCompanyOur Customer Company is “Cornell University.” Our Support Company is “Cornell University – IT.”There are many settings, filters, and configuration data that are company specific.Remedy Local Admin Guide v2.5 (updated September 2015)page 3
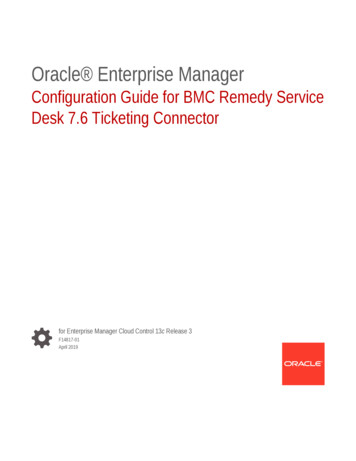
Organizations and DepartmentsRemedy Organizations and Departments aredata used to label customers. The typicalorganizations in a college would be“Administration” and “Academics.”Organizations will be defined centrally.Within the organization “Administration”you would find departments like InformationTechnology, Human Resources, Facilities,and other units with administrativefunctions. Within the “Academic”organization you would find academicdepartments. Local Remedy administratorswill define Departments and Support Groupsfor their Organization.Support Organizations andSupport GroupsSupport Groups play a major role in thedefinition of your company. Where theCompany field and Support Organizationfields are organizational containers, SupportGroups are the only place where Incidentscan be assigned. You cannot assign anincident to a Support Organization orCompany.Remedy Local Admin Guide v2.5 (updated September 2015)page 4
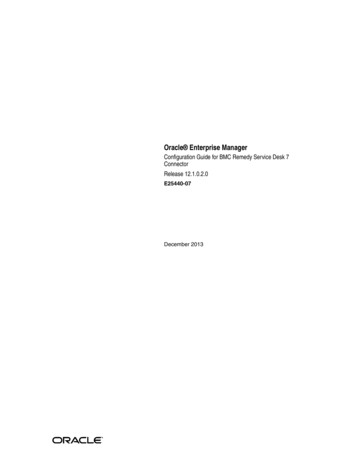
PeopleCustomer DataThere are two kinds of people in Remedy: support providers and customers. A nightly feed from Cornell’sdirectory servers imports everyone as a customer. Changes made in the directory will be reflected one day laterin Remedy. The data comes from different sources as shown below.The import from the directory will overwrite any changes made to these fields in Remedy except the CorporateEmail field.Remedy Local Admin Guide v2.5 (updated September 2015)page 5
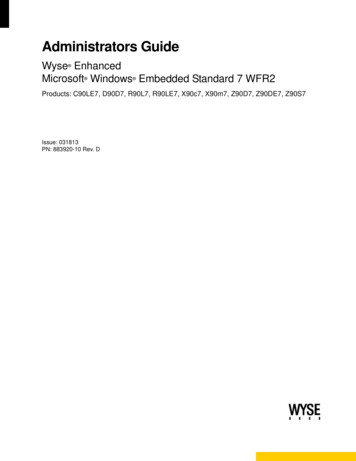
Remedy People Metadata Data Source DocumentIn the Remedy Incident Management console, on the left side navigation pane select My Profile. You own profilewill be displayed. To search for another user, click on New Search and enter the NetID in the Corporate ID field.You can use other search criteria as well (e.g. ta FieldSourcesCommentsFlag Y/N in RemedyRemedyA flag set in Remedy. If set to Y, then thisindividual is designated as a VIP andrequires special handling. A process fordesignating VIPs is being developed and isnot yet complete. Generally, Deans, SeniorLeadership, and their Admin Assistants areconsidered VIP. More to follow.Workday/PeopleSoftOU DescriptionAD Group Descriptionfor an AD OUDesignated forPeopleSoft. Housed ina table owned byIdentity ManagementThis is not the Quest ARS OUs. There is adifferent structure for Workday/PeopleSoftData. The OU full name and its relationshipto the IT Service Group is kept in a tablemanaged by Identity Management.WorkdayFree form field in Workday (can causeinconsistency in the data) When name ischanged or corrected in Workday, it doesn’tapply to all existing employee profiles.(Changes are effective only when the profileis updated in Workday).Workday SupervisoryOrganizationIT Service GroupTable owned byIdentity Management(see Organization fieldabove)Each service group Director is responsible toclaim responsibility for one or more OUabove. They can do so by sending an emailto remedy-admin.Any data update will be reflected in Remedyonly when the employee profile is updatedin either Cornell directory or in Workday.For each ITSG one or more AD OU may exist.Site GroupBuilding NameWhoIamMaintain by the individual in WhoIam.Updated by ager in WorkdayRemedy Local Admin Guide v2.5 (updated September 2015)page 6
All the data is being fed to Remedy by a web service provided by Identity Management. The job runs everymorning at 5 AM and includes the changes for the last 24 hours.Implemented July 1, 2014. Tickets before this time may not have this data.Possible Data issue:1. Wrong IT Service Group: This will happen when an ITSG take over a new OU. When a department doestake over a new OU, the ITSG Director should send an email to remedy-admin@cornell.edu and we canwork with Identity Management to update the data pull.2. Grad Students: Some Grad students are associated to the graduate school (Example: Engineering,Computer Science) which mean that they have SAS as an ITSG. When this is question look in Help Herofor the student’s affiliated college.3. Contractor (e.g. Exception with Sponsor): Contractor are not included in Workday/People soft OU so wedon’t have an organization and an ITSG for them.Reporting Data IssuesIf you notice problems with the People Metadata in Remedy, create a ticket in Remedy and assign to:Company: Cornell - IT Support Org: CIT - Support Support Group: BPR & Tools ManagementORSend and email to Remedy-service@cornell.edu.Remedy Local Admin Guide v2.5 (updated September 2015)page 7
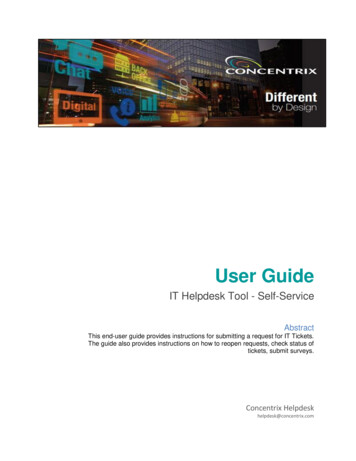
Support Provider DataAdding and Removing Staff to a Support GroupsBefore you can add a staff member to your support group, the user must have a support staff designation inRemedy. To designate a support staff member, send an email to remedy-admin@cornell.edu requesting theuser be granted support staff permissions (support staff designation). You need to provide one support group toadd the user to.Once a user has been assigned a support staff designation then Local Remedy Administrators will have theability to add that user to support groups.1. Log into Remedy.2. From the Applications tab,select Incident Management,then Incident Management Console.3. On the left, under Functions, click My Profile.4. Click the Support Groups tab.5. Select the support group to which you want to add support staff.Remedy Local Admin Guide v2.5 (updated September 2015)page 8
6. Click Modify Selected Support Group. A Support Group window will open.7. Click on the People tab (you may need to click refresh to see the people entries).8. To add a user,a. Click Add. A Support Staff Search window will open.b. Type in the first and last name of the staff, then click Search.If the user has a support staff designation they will show up.If the user doesn’t show up, they do not have a support staff designation. Email remedyadmin@cornell.edu to have the user setup with a support staff designation.c. Highlight the user in the search results, click the Relationship Role field, select Member, thenclick Add.9. To delete a user from your support group,a. Click the user’s name on the People tab, then select Delete.b. The application will confirm if you want to delete the user from the support group. Click Yes.c. If the user is leaving your organization, please send an email to remedy-admin@cornell.edurequesting to revoke the user’s support staff permissions.Remedy Local Admin Guide v2.5 (updated September 2015)page 9
Configuring Notifications to CustomersCustomers submit incidents. The settings described here determine whether the customer receives anautomated email message when the incident is created and/or when the incident is resolved.By default, both notifications are sent to customers.Most of the text in those messages is standardized across all units within the Cornell University “Company,” butfollowing information on the notifications can be customized for each Support Group:Field in RemedyUsage in the Notification EmailsExchange Group AccountThe “From” addressExchange Group Account NameThe descriptive text next to the “From” addressGroup Web AddressThe Support Group’s web addressGroup Phone NumberThe Support Group’s phone numberSpecial Notes(available on incident creation message only)A block of text, which is added to the standardincident creation emailRemedy Local Admin Guide v2.5 (updated September 2015)page 10
Configuring Notifications1. Log into Remedy.2. From the Applications tab,select Incident Management,then Incident Management Console.3. On the left, under Functions, click My Profile.4. Click the Support Groups tab.5. Select the support group for which you want to set group notifications.6. Click Modify Selected Support Group.Remedy Local Admin Guide v2.5 (updated September 2015)page 11
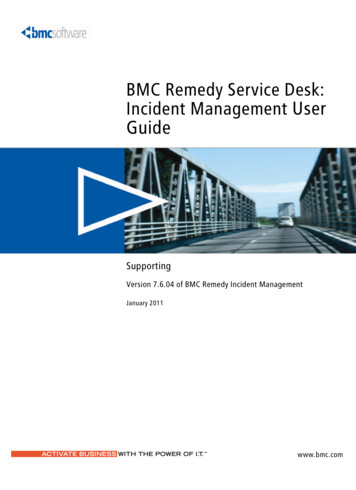
7. Click the Cornell Custom Options tab. Modify the fields on this tab as desired. If your text is longerthan about 30 characters, click the page icon next to the field to see an expanded text entry box. Theentries in the first four fields willappear in notification emails.a. Exchange Group Account Emailb. Exchange Group Account Namec. Group Web Addressd. Group Phone Number8. Check On Submit if you want thenotification message sent to thecustomer on incident creation9. Check On Resolve if you want thenotification message sent to thecustomer on incident resolution.10. On Submit Special Notes: If you havechecked Customer Notification OnSubmit, the text you enter here willappear in the message the customer receives.)11. Click Save.In Qualtrics surveys, the following embedded fields can be eeOpcatSubdateResdateReportsrcIncident NumberBusiness ServicesProduct NameIncident Owner Support GroupIncident Owner OrganizationAssigned Support GroupAssigned Support OrganizationAssigneeTier 1 Operational CategorySubmit DateResolution DateReported SourceRemedy Local Admin Guide v2.5 (updated September 2015)page 12
Standard Notification TemplatesShaded items are the ones you can modify using the preceding procedure.Items in {{double curly brackets}} are filled in based on the incident elements.On Submit notificationFromSubjectBodyExchange Group Account Name Exchange Group Account {{Incident Number}} – {{Summary}}Hello Customer {{Firstname}} {{Lastname}},We have received your request for service. A support person will respond to you as soon aspossible.Your request has been assigned a case number: {{Incident Number}}Request date: {{Incident creation Date/Time}}Original request:{{ Incident Summary}}Updates and additional questions regarding this incident are welcome.For faster service, always include your case number (Incident number) in the subject line ofany related follow-up emails.Special notesExchange Group Account NameGroup Web AddressGroup Phone numberOn Resolve notification without surveyFromSubjectBodyExchange Group Account Name Exchange Group Account {{Incident Number}} – {{Summary}}The following case has been marked as resolved.Case number: {{Incident Number}}Request date: {{Incident creation Date/Time}}Original request: {{Incident Summary}}Resolution: {{Incident Resolution}}Please reply if you have any further questions, or if your case remains unresolved. For fasterservice, always include your case number (Incident Number) in the subject line of any relatedfollow-up emails.Thank you,Exchange Group Account NameGroup Web AddressGroup Phone NumberRemedy Local Admin Guide v2.5 (updated September 2015)page 13
On Resolve notification with survey URLFromSubjectBodyExchange Group Account Name Exchange Group Account {{Incident Number}} – {{Summary}}The following case has been marked as resolved.Case number: {{Incident Number}}Request date: {{Incident creation Date/Time}}Original request: {{Incident Summary}}Resolution: {{Incident Resolution}}Please give us feedback with a Number of survey question question survey by clicking thelink below. Please do not send it to anyone else, because this URL links the survey to yourindividual case information. Survey Link Here We value your input and will use it to improve our service to you and to measure customersatisfaction.Thank you,Exchange Group Account NameGroup Web AddressGroup Phone NumberConfiguring Surveys1. Log into Remedy.2. From the Applications tab,select Incident Management,then Incident Management Console.Remedy Local Admin Guide v2.5 (updated September 2015)page 14
3. On the left, under Functions, click My Profile.4. Click the Support Groups tab.5. Select the support group for which you want to set group notifications.6. Click Modify Selected Support Group.7. Survey On Resolved: If you have checked Customer Notification On Resolved AND you check SurveyOn Resolved, a link to a short feedback survey will be added to the message the customer receives.)8. If you have checked Survey On Resolved, enter the Number of Survey Questions.9. If you have checked Survey On Resolved, enter the Survey URL (the URL will begin withcornell.qualtrics.edu)10. Click Save.Remedy Local Admin Guide v2.5 (updated September 2015)page 15
Configuring Required Fields “On Resolve”1. Log into Remedy.2. From the Applications tab,select Incident Management,then Incident Management Console.3. On the left, under Functions, click My Profile.4. Click the Support Groups tab.5. Select the support group for which you want to set group notifications.6. Click Modify Selected Support Group.Remedy Local Admin Guide v2.5 (updated September 2015)page 16
7. Click the Cornell Custom Optionstab.8. Check Tier 1 OpCat ifa Tier 1 Operational Categoryis required when resolving anincident.9. Check Tier 1 ProdCat ifa Tier 1 Product Categoryis required when resolving anincident.10. Click Save.Remedy Local Admin Guide v2.5 (updated September 2015)page 17
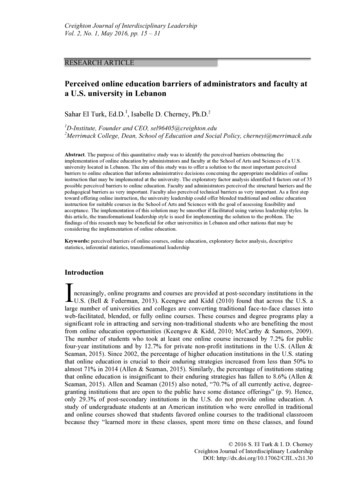
Setting Up Incident Creation Notifications to Support ProvidersBy default, when an incident is created, Remedy sends notifications to all members of the appropriate SupportGroup. An alternative is to use group notifications to send these messages to an Exchange Group Account (EGA)or e-list address instead.The settings in the following procedure take precedence over any settings on the Notification tab in a user’sprofile.To set up group notifications1. Log into Remedy.2. From the Applications tab,select Incident Management,then Incident Management Console.3. On the left, under Functions, click MyProfile.Remedy Local Admin Guide v2.5 (updated September 2015)page 18
4. Click the Support Group tab.5. Select the support group for which you want to set group notifications.6. Click Modify Selected Support Group.7. Click the Group Notification Settingstab.8. In the Group Email box, enter anycombinations of Exchange Group Account (EGA)addresses, e-list addresses, and email addresses.If you enter more than one address,separate addresses with a carriagereturn.Leave this field blank to have Remedyuse the default, which is to sendnotifications to all membe
In the Remedy Incident Management console, on the left side navigation pane select My Profile. You own profile will be displayed. To search for another user, click on New Search and enter the NetID in the Corporate ID field. You can use other search criteria as well (e.g. name).File Size: 2MB