Transcription
Lesson 3: Introduction to the Spreadsheet67INTRODUCTION TO THE EXCEL SPREADSHEETPreparing a GradesheetLEARNING OUTCOMESThis tutorial will help you understand what a spreadsheet is and where a spreadsheetmight come in useful for classroom management. Specifically you will learn about thefollowing topics. Understanding the basic concepts of a spreadsheet, including: the idea of templates cells, rows and columns cell coordinates entering data into a spreadsheet cell Setting up labels, including: setting column widths aligning data in cells entering column and row labels Creating and copying formulas Making changes in a spreadsheet inserting rows and columns deleting rows and columns Producing a printed copy of the contents of a spreadsheet file Saving a backup copy of your work Appreciating the power of spreadsheet templates
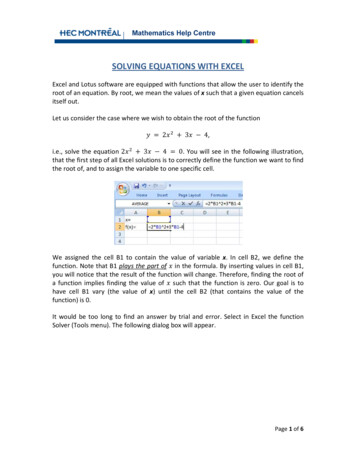
68ESSENTIAL MICROSOFT OFFICE 2000: Tutorial for TeachersCopyright Bernard Poole, Rebecca Randall, 2000. All rights reservedA caveat before you begin: You'll find it easiest to use the tutorial if you followthe directions carefully. On computers there are always other ways of doingthings, but if you wander off on your own be sure you know your way back!3.1GETTING STARTEDShowing the Full menusMicrosoft Office has a silly habit of showing only a few items in the menus when youwant to use them. If you want to see the full menus, you have to double click on themenu name, or slide down to the arrows at the bottom of the menu, or, worse still, waitfor the full menu to reveal itself, which it will after a few seconds. But for this tutorial,we're going to be using quite a few menu items that do not normally appear when youfirst click to select a menu. So let's set the Option in Word to Show Full Menus all thetime.In the Tools menu, select Customize , then in the dialog box that pops up,select the Options tabRemove the check mark next to the item Menus Show Recently UsedCommands FirstThere, now you'll get the full menus all the time. If you find this tip useful, andyou're working a lab where you can't permanently set defaults like this, remember toshow full menus when you start work using any of the programs in the Office suite(Word, Excel, PowerPoint, Access, and so forth). If you have your own computer athome, you might like to permanently set this Show Full menus option. It'll save you noend of time and annoyance.Some backgroundFig. 3.1 on the next page illustrates a typical school worksheet. As illustrated in Fig. 3.1,the leftmost column and the topmost row often are reserved for descriptive labels thatidentify the value stored in each of the cells in the grid. The rightmost column andlower rows of a set of figures are often set aside for row and column totals respectively.In 1978, Dan Bricklin, a young graduate student at the Harvard School of Business,developed a piece of software called Visicalc which simulated a worksheet. It was thefirst electronic spreadsheet, a prototype of the many varieties of spreadsheets availabletoday.The Excel spreadsheet is considerably more powerful than Visicalc, able to handlemuch larger sets of numerical data at greater speeds. Like Visicalc, however, it goesbeyond the traditional manual worksheet in so far as it is programmable. You can buildinstructions into an electronic spreadsheet to do relatively complex mathematicalcalculation and analysis.
Lesson 3: Introduction to the Spreadsheet69Fig. 3.1 Annotated spreadsheetYou also can build instructions into the spreadsheet to carry out humdrum,repetitive calculations--the kind of calculations which could take hours, even days, tocomplete manually but which, when done electronically, take a matter of seconds.The Excel screen acts as a window onto a large grid of rows and columns into whichdata is entered, usually from the keyboard. You can build Formulas into selected cellswhich automatically carry out calculations on designated sets of data. You'll learn howto do that in this lesson.Practice makes perfectAs with the word processor, the best way to learn about the spreadsheet is to build aspreadsheet file and work with it. So here goes.
70ESSENTIAL MICROSOFT OFFICE 2000: Tutorial for TeachersCopyright Bernard Poole, Rebecca Randall, 2000. All rights reservedIf you have worked your way through the first two tutorials in this series you willbe very familiar with the steps to take to load a component of the Microsoft Officesoftware. Go ahead and open Excel. Once Excel is loaded you are ready to complete theexercises that follow.You should see a new Excel spreadsheet file titled Book1 (or some such defaultname). It is always a good idea to immediately name the file that you are about tocreate. The outline version of the file you are about to create will be a template for agradebook.1Put your Data disk in the disk drive, select Save As from the File menu andswitch to the 3 1/2 floppy A: driveIn the Save As dialog box, click on the New folder icon and name the newfolder SpreadsheetsType GradeTmp as the file name for the new spreadsheet and click on theSave buttonYou should now be looking at a screen with the name of your file (GradeTmp) at thetop of a blank worksheet ready for you to insert your data.3.2HELPFUL HINTS WHILE USING THE SPREADSHEETA spreadsheet is a grid divided into columns and rowsThe intersection of the column and row is referred to as a cell (Fig. 3.2).Fig. 3.2 Think of the spreadsheet as a grid divided into rows and columns1 A template is an outline or form which can be used over and over as a layout when carrying out otherprojects that require the same basic file format. Here you are going to build a spreadsheet template tosimulate an empty gradebook. Once you have created the template, you will keep it as a template onyour disk for future use. You will be able to use this template from semester to semester to build theelectronic gradesheets for all your classes.
Lesson 3: Introduction to the Spreadsheet71Right now, cell A1 is selected in the top left-hand corner of the spreadsheet. This iswhere information, in the form of a label, number or formula for calculation, will beentered. Labels are made up of text that describes the numbers in the columns androws. Formulas are mathematical expressions built into certain cells that instruct thecomputer to carry out calculations on specified sets of numbers in the rows andcolumns. As you go on with the tutorial, these concepts will become clearer to you.Moving around in the spreadsheetTable 3.1 lists the effect of pressing the keys listed in the first column.Keys PressedEffectTabShift-TabArrow keysShift-EnterEnterScroll barsMoves selection to the right to next cell in same rowMoves selection to the left to previous cell in same rowMove selection one cell in any directionMoves selection up to previous cell in same columnMoves selection down to next cell in same columnScroll vertically and horizontally through the spreadsheetAccept button ( ) Accepts data in cell but does not move to another cellCancel button (X)Cancels entry in cellTable 3.1 Cell selection commandsThere are 65536 rows and 256 columns in the Excel spreadsheet. That means thereare over 16 million cells into which you can store data! Usually you’ll use the mouse toselect the cell you want to work in. Just click on the cell to select it. Once in a particularcell, use the commands in Table 3.1 to proceed to other related cells.Practice now by moving around the spreadsheet. After you have located severalcells, end up by clicking on cell A1 to make it the current or active cell.Identifying the active cell's coordinatesLook in the top left hand corner of the Excel screen (Fig. 3.3) to see which cell (the activecell) you are in at any point in time.Fig. 3.3 Identifying the address of the cell you are working inClick on any cell now and look at the cell's coordinates in the top left corner ofthe screen
72ESSENTIAL MICROSOFT OFFICE 2000: Tutorial for TeachersCopyright Bernard Poole, Rebecca Randall, 2000. All rights reservedEach cell address (a location in the spreadsheet) begins with a letter to indicate thecolumn, followed by a number to indicate the row. For example, H32 identifies the cellat the intersection of column H, row 32 (Fig. 3.3)Selecting a range (group) of cellsTable 3.2 lists the methods for selecting a group or range of cells.TaskTo select a block of cellsTo select an entire row of cells(horizontally from left to right)To select an entire column of cells(vertically, from top to bottom)To select several rows or columnsMethodDrag diagonally from top left corner of the block ofcells down to the lower right cornerClick on the number (the row label) on the left handside of the spreadsheetClick in the letter(s) of the alphabet (the columnlabel) at the top of the columnDrag across the row or column headingsTable 3.2 Selecting a range (group) of cellsOnce again, take a few minutes now to try each of these methods for selectinggroups of cells.Location of the active (selected) cell after entering data into a cellWhen you type the data for a cell, the data first appears in the Entry bar at the top of thescreen (Fig. 3.4).See how this works for yourself now.Click on any cell and type the number 2000Look at the Entry bar above the spreadsheet window. The data is displayed therewhile you1. check that it is correct before copying it to the active (selected) cell;2. make up your mind whether it should be entered into the spreadsheet at all;3. decide which cell you would like to be the active cell next after the value hasbeen copied to the currently active cell.Fig. 3.4 The spreadsheet Entry bar
Lesson 3: Introduction to the Spreadsheet73You may still decide not to enter the data into the spreadsheet, in which case youwould click on the Cancel box (X) in the Entry bar (Fig. 3.4) and start over. If, on theother hand, the data is correct, you would click the Accept button ( ), which keeps thecell you are working in as the active cell.Click the Accept button () nowNotice that the data is immediately copied to the selected (active) cell.Alternatively, you may want to proceed to the cell immediately to the right of theactive cell into which the number you just typed will go. Or you may want to proceedto the cell just below the active cell, or the cell just above the active cell, and so on.A short while back you practiced moving around the spreadsheet using thecommands listed in Table 3.1. This table also lists the key(s) to press to tell Excel whichcell to go to after you accept the data you have typed into the Entry bar.Practice now by making the cell in which you just typed 2000 the active cell(by clicking on it)Then press each of the keys or key combinations in Table 3.1 and verify theresult of the action in the spreadsheet each timeBlanking out a cell or cells in the spreadsheetThe quickest way to blank out cells is to use the Clear option from the Edit menu.Select the cell holding the data 2000 then, from the Edit menu, selectClear/AllTo do the same to a group of cells you would just drag across the cells to selectthem--they will become highlighted. Then select Clear from the Edit menu as before.Practice now by entering 3 or 4 numbers into adjacent cells in thespreadsheet, then select all of them and use the Clear command to removethem in one goRemember that you can undo the Clear operation (or any other Edit operation) byimmediately selecting Undo Clear from the Edit menu (or press ctrl-Z).Editing the data in the Entry barWhile you are typing in data in the Entry bar you can edit it as if you are using the Wordword processor. So everything you learned in Lessons 1 and 2 will apply.Editing data after it has been entered into a cellIf you are past the cell where you have an error and want to make a correction orchange, move back to the cell in question by selecting (clicking on) it. The data in thatcell will be displayed in the Entry bar at the top of the spreadsheet. Click in the Entrybar (the cursor will show where you clicked on the text) and then just go ahead and
74ESSENTIAL MICROSOFT OFFICE 2000: Tutorial for TeachersCopyright Bernard Poole, Rebecca Randall, 2000. All rights reservedmake any changes you want. Replace the old entry by clicking the Accept button (by selecting another cell in the spreadsheet.3.3) orSETTING UP LABELS FOR YOUR GRADESHEET TEMPLATEWhen you have completed this section and the next section (Sections 3.3 and 3.4) yourgradesheet should look like Fig. 3.5.Fig. 3.5 Completed Gradesheet TemplateThe steps that follow will help you achieve this goal. Follow them carefully.Select cell A2 and type GRADE REPORTCheck the data in the Entry bar to make sure you typed the label correctly;correct any errors
Lesson 3: Introduction to the Spreadsheet75Click the Accept button ( ) when you are sure all is well (or press one of theother keys which accept data into the spreadsheet--arrow keys, Enter/Enterkey, Tab key)This is an example of a label--which is any text you use to describe the data that is ina spreadsheet. All the column and row headings are labels also.You need to widen the A column to allow for longer student last names.From the Format menu select Column/Width.Type the number 15 in the dialog box, then click on OKWhile you're at it, click anywhere in the B column (first name) and adjust thewidth to 12Later in this section you'll practice adjusting other column widths.Select cell A4Type the label Class: (note the colon) and press Enter to move the cellpointer to cell A5Type the label Semester: and press Enter to move the cell pointer to cell A6Finally type the label Year: and click on the Accept button (bar) in the EntryAt this point you should be thinking about saving the work you have completedthus far!Press ctrl-S to save your work to this pointAligning data in spreadsheet cellsThe gradebook will look best if the three labels you just entered into the spreadsheetwere right aligned in their respective cells. Right aligned means that the lab
The Excel screen acts as a window onto a large grid of rows and columns into which data is entered, usually from the keyboard. You can build Formulas into selected cells which automatically carry out calculations on designated sets of data. You'll learn how to do that in this lesson. Practice makes perfect As with the word processor, the best way to learn about the spreadsheet is to build a .