Transcription
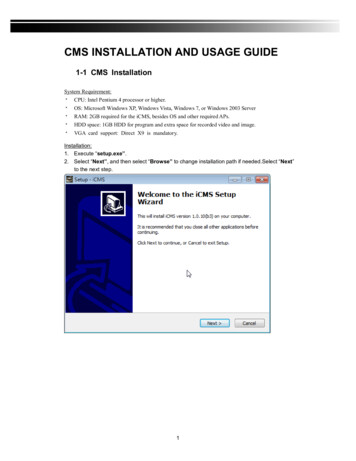
CMS INSTALLATION AND USAGE GUIDE1-1 CMS InstallationSystem Requirement:*CPU: Intel Pentium 4 processor or higher.*OS: Microsoft Windows XP, Windows Vista, Windows 7, or Windows 2003 Server*RAM: 2GB required for the iCMS, besides OS and other required APs.*HDD space: 1GB HDD for program and extra space for recorded video and image.*VGA card support: Direct X9 is mandatory.Installation:1. Execute “setup.exe”.2. Select “Next”, and then select “Browse” to change installation path if needed.Select “Next”to the next step.1
2
3. Programs can be set to a preferred Start Menu Folder, and choose whether to have ashortcut on the desktop. Confirm and press "Next"3
4. Select ‘Install’ then the installation starts.5. Installation is complete! Check the "Launch iCMS" to start the program. Press "Finish"to end the installation process.4
5
1-2 Login and environment of CMSWhen first time login CMS, you must configure account and password for adminstrator.The user's permission (please select "systemadministrator")Please enter the administrator accountPlease enter the administrator passwordConfirm the administrator passwordHint input when forgetting your passwordIf the the username and password of administrator has been established, you canenter directly.If you forget the password, you can click on the "Hint" button to display the prompt.6
After login, the iCMS GUI will show as below and the GUI is composed of 4 mainpanes.1Devices, Groups, EmapsPane2Toolbar3Live view window4PTZ control panelIt supports “add”, “modify”, and “delete” the current devices, groups, emap in the iCMS. Refer to the chapter "Devicses, groups, emaps."It contains icons for “event”, “settings”, “snapshot”, “remoteplayback”, “remote download”, “file playback”, “eventplayback”, “import”, “export” etc. Refer to the chapter “Toolbar.”When CMS connects to a DVR, you can view live videos.Refer to the chapter "Live view window."Control PTZ camera from this panel.Please refer to the chapter "PTZ control."7
1-3 Devices, Groups, Emaps ConfigurationIt supports add, modify, and delete the devices, groups, emap in CMS.1-3.1 Devices1.Add Device: Right-click on device icon and click "Add Device" in the following screen.Enter the following informations in sequence. After the input is complete, click "Add" toclose this window. Press "Cancel" or the upper right corner of the "X" to close window.Input DVR IP addressInput DVR HTTP portInput DVR AliasInput DVR login accountInput DVR login passwordPS: If more than one DVR device data need to be input, please repeat the abovesteps.8
After adding the device, you can see the DVR device name in menu list.2.Remove device: Right-clicking the device name and click "Remove Device" in the following screen.Prompt window will appear. Confirm the deletion, press "Yes", to cancel press "No."To delete all DVR devices, you can right-click the device icon and click "Remove All"button.9
3.Change device name: To modify the device name, you can right-click the device andclick "Modify Device ” as the following screen.You can modify the device alias, login account, and password here. IP address and portcan not be modified.4.DVR property: Right-click the device name and click "Property" in the following screen.It shows information of this device.10
1-3.2 Groups1.Add Groups: Right-click on the group icon and click "Add Group" as the followingscreen.The system will automatically bring up a group name, and modify the name to a preferrgroup name and press "Enter".Double click the group name, the system will show a new monitor screen and create anew tab on the screen for this group.11
12
Drag and drop DVR or camera of this group to the monitor screen.Drag the DVR or choosea single cameraThe system displays cameras in the order of camera addition. The order cannot be rearrearranged but you may delete the camera which you do not want to display.PS. If more than one group to be input, please repeat the above steps.13
2.Delete Group: Right-click the group name and click "Delete Group" in the followingscreen.Prompt window will appear. Confirm the deletion, press "Yes", to cancel press "No."14
3.Rename Group: Right-click the group name and click "Rename" in the followingscreen.Enter the group name you want, and then press "Enter."15
4.Remove all cameras of a group: Right-click the group name and click "Remove All Camera" as the following screen.5.Delete all groups: To delete all groups, right-click the “Groups” and click "Delete Allroups" in the following screen.16G
1-3.3 Emaps1.Add Emap: Right-click the “Empas” and click "Add" in the following screen.First, you select the image for emap. Confirm by “Open, and then the system willbring out an emap name automatically.17
Drag and drop DVR or camera on emap.Drag the DVR or choose asingle cameraAfter drag is complete, there are DVR or cameras icon on the emap.PS. If more than one emap data to be input, please repeat the above steps.Double-click DVR icon will open a new window to display the DVR video.18
19
Double-click camera icon will open a new window to display the camera video.2.Delete emap: Right-click the emap name and click "Delete" in the following screen.Prompt window will appear. Confirm the deletion, press "Yes", to cancel press "No."20
1-4 ToolbarIconInformationShow event watch panel: Search DVR event and export the log file.Show Preferences Dialog: Configure CMS settings.Snapshot: View the snapshot from DVR or CMS.Remote Play: Play the video file on a remote DVR.Remote Download Plugin Toolbar: Download video files from a remoteDVR.Permission: Configure the access previledge of users.File Play: Play the DVR video files from local HDD or USB flash driveon the PC which iCMS is running.Event Play: Play event video files of a DVR.Import/Export Configure file: Import/Export configureation file of CMS.21
1-4.1 Show event watch panelUsers can search the DVR event and save as log file.Left-click, it shows the event panel.Select the start date, end date, and DVR (one or all), and then press "Search"button.22
It shows recorded historical events, including IP address, time of the event, event type,channels, and DVR name.To save log file, press the "Save" button.23
1-4.2 Show Preferences DialogClick, it and the preferences window be be shown.Click on the language drop-down menu to switch the display language (need to restartiCMS to take effect).24
Change recording and snapshot storing path.25
1-4.3 SnapshotTo watch DVR or CMS captured image files.Left-click, it shows snapshot panel.Click the " " button to open the image path, and then press "Yes."The program lists the CMS and DVR snapshot picture files automatically.Click the left mouse button twice on the picture you want to view, and you can see thecaptured image.26
1-4.4 Remote PlayUsers can play the recorded videos from DVR.Left-click, it shows remore playback panel.Select the DVR you want to play, and the system will list available video clips.Double-click a clip will play the selected video clip. You can also use the button at thebottom to playback, pause, stop, rewind, and fast forward.27
1-4.5 Remote Download Plugin ToolbarIt is for downloading the recorded video files of DVR to the PC.Click, the remote download panel will pop up.Choose the DVR to download, the DVR will list the date information of available recorded video in the Date, hour and minute (appear blue) automatically.After selecting the predreed range and pressing, the system will begin todownload the the video clips of the slected time to the PC.28
1.Select DVR3.Select hour and minute(Blue indicates recordeddata)2.Select date(Blue indicates recordeddata)4.Press archive buttonto start downloading videodataA separate window on top of the screen will pop up to display the current downloadprogress at the same time.29
1-4.6 PermissionsConfigure CMS users’s permissions.Left-click, it shows permission priviledge setting window.1.Add permissions:Right-click on the Privilege and click "Add."System creates a new set of permissions, and users can modify the name.30
2.Add account:Add accountRight-click on the permissions and click "Add Account."“Add account” screen appears, and you can configure user permissions and the username and password.The user's permission (select "system administrator" or“user”)Please enter the accountPlease enter the passwordConfirm the passwordHint input when forgetting your password3. Permissions Management: After adding permissions and accounts, you can right-clickon the name of the permission to edit.3-1 Rename: Click to rename the permission’s name.Enter a new name and press Enter.31
3-2 Remove permissions:Click ‘Remove’ to remove this permission priviledge.Confirmation dialog box appears, and press Yes to delete, No to cancel.If only one system administrator account left, then this account can not be deleted.3-3 Add account:Click to add an account.New Account screen appears, and users can set user permissions and the usernameand password.The user's permissionPlease enter the accountPlease enter the passwordConfirm the passwordHint input when forgetting your password32
3-4 Remove All Account under the same permission priviledge: click to remove all accounts of this permission.Confirmation dialog box appears, and press Yes to delete, No to cancel.If there is only one administrator account existed in the iCMS, this account can not bedeleted.4 Account management: After adding user account, you can click to change thepassword or delete.4-1 Edit Account: Right click the user name, you can modify the password and hint.Press the “Modify” button to change.33
4-2 Remove the account: Right-click the user name to remove this account.Confirmation dialog box appears, and press Yes to delete, No to cancel.If there is only one administrator account existed in the iCMS, this account can not bedeleted.34
5 Permission to edit: According to different requirements to set different permissions.5-1 Permission Edit:Click "Administrator", you can see the priviledge status of the Administrator account (Thepriviledge cannot be modified.)Click the "User", you can see a priviledge status of user (The priviledge status cannot be modified)35
When a new priviledge is created, all access priviledge are not selected (default behavior).Double-click the checkbox to selected needed priviliedge. Notice, the iCMS uses doubleclick to enable or disable a checkbox.Double click the left mouse button on the function, and you can have this permission36
1-4.7 File PlayIt plays the backuped files in the storage of the iCMS.Left-click, it shows remote playback panel.Click on the “Open” to select a backuped file to play.You can also use the bottons at the bottom of the window to playback, pause, stop,rewind, and fast forward.To switch to the single screen, double-click the slected CH to make it full-screen.37
1-4.8 Event PlayRemotely play the DVR recorded event video.Left-click, it shows remote event play panel.Select the DVR you want to play, and the system will list the event files within the time(date appear blue). Choose a date, and the system will search for the event recordsof the DVR automatically. Double-click a video clip to playback the selected video. Youcan also use the function listed at the bottom to playback, pause, stop, rewind, and fastforward.38
39
1-4.9 Import/Export Configure fileThe CMS's configuration can be imported or exported.Left-clickto enter the configuration file import / export function.1.Import configuration.Click "Browse" to select the directory where the configuration file is located.Press the “Import” button, and you can import the CMS configuration file.2.Export configuration.Click "Browse" to select the directory where the configuration file is located.Press the “Export” button, and you can export the CMS configuration file.40
1-5 Live View WindowWhen the DVR and group have established complete, you can use this window tomonitor live video. You can also open multiple DVR or group live video input fromdifferent DVR.(The total number of available channels depends on the performance of the computer running iCMS)After login, the screen will show the following status.To watch the live view, please double click on a DVR or a group in the Group and Dvrs pane.41
42
Multiple DVRs or groups are supported.(The total number of available channels depends on the performance of the computer running iCMS)All of the DVR or the group are listed on the tabs on the top of the liveview area.43
44
To turn off liveview of the DVR or group of videos, please click on the "X" at the top right.45
1-6 PTZ ControlPS. some supported special functions depend on PTZ model.Step1: Go to live view monitoring (refer to 1-5 chapter).Step2: Check upper right corner of the screen window of PTZ camera.Flashing color symbol indicates that the channel is the PTZ camera.46
Step3: You can begin to use the left control key to operate the PTZ camera.47
1 CMS INSTALLATION AND USAGE GUIDE 1-1 CMS Installation System Requirement: * CPU: Intel Pentium 4 processor or higher. * OS: Microsoft Windows XP, Windows Vista, Windows 7, or Windows 2003 Server * RAM: 2GB required for the iCMS, besides OS and other required APs. * HDD space: 1GB HDD for program and extra space for
