Transcription
Technical ReportNetApp Storage Encryption:Preinstallation Requirements and ProceduresFor IBM Tivoli Lifetime Key Manager (TLKMv2)Mike Wong, NetAppNeil Shah, NetAppApril 2013 TR-3954 Version 1.3 NETAPP STORAGE ENCRYPTION PREINSTALLATION STEPSNetApp Storage Encryption (NSE) requires a number of components that must be completedprior to configuration within Data ONTAP . This includes installation and configuration of aKey Management Interoperability Protocol key management server (KMIP server), SSLcertificate creation and signing, and manual configuration of Data ONTAP bootloadervariables. This guide offers a step-by-step example of the preinstallation steps using an IBMTKLM Server for Windows as the KMIP server, OpenSSL for Linux certificate generation,and Windows 2008 Certificate Authority for certificate signing.
1INTRODUCTION . 32REQUIRED BOOTLOADER VARIABLES FOR NSE . 33452.1CONFIRM VERSION OF DATA ONTAP . 32.2CONFIGURE BOOTLOADER ENVIRONMENT VARIABLES . 3SSL CERTIFICATE CREATION . 53.1EXPORTING THE CA CERTIFICATE . 63.2GENERATE AND EXPORT THE KMIP SERVER PUBLIC CERTIFICATE . 103.3GENERATE A PRIVATE AND PUBLIC KEY PAIR FOR NSE . 11SIGN SSL CERTIFICATES AND EXPORT FOR USE . 124.1SIGNING THE TKLM .CSR FILE . 124.2SIGNING THE CLIENT.CSR FILE . 144.3EXPORT THE SIGNED TKLM CERTIFICATE . 164.4EXPORT THE SIGNED NSE CERTIFICATE . 19IMPORT THE SIGNED SSL CERTIFICATES . 245.1IMPORT THE SIGNED TKLM CERTIFICATE BACK INTO THE TKLM SERVER . 245.2IMPORT CLIENT DEVICE CERTIFICATE . 275.3IMPORT SSL CERTIFICATES INTO NSE . 306VERIFICATION OF PEM FILES . 317HA CLUSTER PAIR SSL CERTIFICATE CONSIDERATIONS . 33APPENDIXES . 33APPENDIX A: CERTIFICATE CLEANUP . 33A.1DELETION OF CERTIFICATES. 33APPENDIX B: SSL CERTIFICATE REPLACEMENT . 33APPENDIX C: SELF-SIGNED CERTIFICATES . 34C.1GENERATION OF A TKLM SELF-SIGNED CERTIFICATE . 34C.2EXPORTING THE TLKM SELF-SIGNED CERTIFICATE. 36C.3CREATE THE NSE SELF-SIGNED CERTIFICATE . 37C.4IMPORT THE SELF-SIGNED NSE CERTIFICATE INTO TLKM . 38C.5HA CLUSTER CONSIDERATIONS FOR SELF-SIGNED CERTIFICATES . 38APPENDIX D: INSTALLING WINDOWS 2008 CERTIFICATE AUTHORITY SERVICES . 39APPENDIX E: CONFIGURATION OF IBM TKLM SERVER FOR WINDOWS . 42E.1CREATE THE MASTER KEYSTORE . 42E.2CONFIGURE THE COMMUNICATION PORTS FOR NSE . 44APPENDIX F: CERTIFICATES 101 . 452NetApp Storage Encryption: Pre-installation Requirements and Procedures
1 INTRODUCTIONNetApp Storage Encryption has a number of preinstallation steps that must be completed beforeconfiguration in Data ONTAP can begin. These steps can be broken into the following main categories: Bootloader variable configuration in Data ONTAPSSL certificate creationSSL certificate signingInstallation of signed SSL certificates to correct locationsUpon completion of these preinstallation steps, refer to the storage encryption section of the document“Data ONTAP 8.1 7-Mode Software Setup Guide” to complete setup of NSE.2 REQUIRED BOOTLOADER VARIABLES FOR NSEData ONTAP has some specific commands that must to be run prior to running the setup wizard for NSE.Failure to configure these variables can result in loss of access to the encrypted disks until the values areadded.2.1CONFIRM VERSION OF DATA ONTAPNSE is compatible with 7-Mode Data ONTAP 8.1.x GA or greater and clustered Data ONTAP beginningwith 8.2. Earlier versions of Data ONTAP will fail to recognize the disks in the system. The disk will showup in a FAILED state.When running 7-Mode Data ONTAP 8.1.x GA or greater systems running NSE should not be downgradedbelow 8.1 or the disks will not be seen by the system.When running clustered Data ONTAP 8.2, systems running NSE should not be downgraded to any priorversions of clustered Data ONTAP, or the disks will not be seen by the system.2.2CONFIGURE BOOTLOADER ENVIRONMENT VARIABLESData ONTAP requires certain boot environment variables to be configured prior to NSE setup.BOOTARG.STORAGEENCRYPTION.SUPPORTThis bootarg is typically set during the manufacturing process. However, if the encrypted disks are notshowing up at boot time, verify the preceding bootarg is set to true.Halt Data ONTAP and stop at the LOADER-(A,B) prompt.Syntax to set the variable:LOADER-A setenv bootarg.storageencryption.support trueExample where variable is defined:LOADER-A printenv bootarg.storageencryption.supportVariable NameValue-------------------- ootarg.storageencryption.support true3NetApp Storage Encryption: Pre-installation Requirements and Procedures
Example where variable is not defined:LOADER-A printenv bootarg.storageencryption.supportVariable NameValue-------------------- ootarg.storageencryption.support *** Undefined ***IP ADDRESS ENVIRONMENT VARIABLESThese bootargs need to be set so the FAS platform knows which Ethernet interface is used tocommunicate to the KMIP server for authentication key retrieval. This is not the IP address of the KMIPserver.These commands are also entered at the bootloader prompt.Enter the following:LOADER-A LOADER-A LOADER-A LOADER-A LOADER-A setenv kmip.init.interface interface setenv kmip.init.ipaddr IP Address of interface setenv kmip.init.netmask Netmask of interface setenv kmip.init.gateway Gateway of interface saveenvkmip.init.interface is set to the Data ONTAP network interface you want to use. This interface mustbe dedicated for NSE use and cannot participate in network trunking or VIF configuration.kmip.init.ipaddr is set to the IP address of the interface in kmip.init.interface. Note that this will bethe same IP address you assigned during Data ONTAP setup.kmip.init.netmask is the netmask for kmip.init.interface. This is the same netmask used in DataONTAP setup.kmip.init.gateway is the gateway for kmip.init.interface. This is the same gateway used in DataONTAP setup.Once the bootloader variables have been configured, you are ready to start Data ONTAP. Thesubsequent sections provide guidance on creating SSL certificates to establish a secure communicationschannel between NSE and the key manager.4NetApp Storage Encryption: Pre-installation Requirements and Procedures
3 SSL CERTIFICATE CREATIONSecure Sockets Layer (SSL) certificates are used to establish trusted communications between parties. Inthis section, we will create the following SSL certificates, which will then need to be signed before use.This example uses a third-party certificate authority (CA) to sign the certificates. An example using selfsigned certificates can be found in the appendix. The following SSL certificates will be generated: CA public certificate-This is an exported public certificate from the CA.-This file needs to be renamed IP Address of KMIP Server CA.pem for NSE use.KMIP server public certificate- 5This needs to be generated at the KMIP server and usually results in generation of aprivate/public pair.NSE public certificate-This needs to be generated on any computer using OpenSSL in Windows or UNIX .-This file needs to be renamed client.pem.NSE private certificate-This needs to be generated on any computer using OpenSSL in Windows or UNIX.-This file needs to be concatenated with the public certificate and renamed client private.pem.NetApp Storage Encryption: Pre-installation Requirements and Procedures
3.1EXPORTING THE CA CERTIFICATEThis certificate is the public certificate of the certificate authority. It is needed by both NSE and the KMIPserver to validate the signed certificates being exchanged. The following example shows how the CAcertificate is obtained from a Windows 2008 CA server.Figure 1-2: Exporting A Windows 2008 CA Certificate6NetApp Storage Encryption: Pre-installation Requirements and Procedures
Figure 3-5: Certificate Export WizardMake sure to select Base-64 encoded X.509. This is the PEM format required by NSE.7NetApp Storage Encryption: Pre-installation Requirements and Procedures
The CA certificate needs to be named IP Address of KMIP Server CA.pem. For multiple KMIPservers, you would copy this file repeatedly and name them IP Address of KMIP Server 1 CA.pem, IP Address of KMIP Server 2 CA.pem, IP Address of KMIP Server 3 CA.pem, and so on.Figure 6-8: Completing Certificate Export Wizard8NetApp Storage Encryption: Pre-installation Requirements and Procedures
Rename the file to a .PEM extension. This extension is needed by NSE to properly recognize thecertificate.Figure 9-10: Renaming the .PEM fileYou have now successfully created the public certificate from the certificate authority. This file will be9NetApp Storage Encryption: Pre-installation Requirements and Procedures
used in subsequent steps.CONSIDERATIONS FOR HIERARCHICAL CA SERVERSThe preceding steps were for a single, standalone CA server. Many enterprises will have hierarchical CAservers: there will be a root CA at the top level and one or more subordinate CAs, sometimes forming achain of trust. For environments where there is a chain of CA servers, the IP Address of KMIP Server CA.pem file must concatenate the public certificates of each CA serverin the chain.For example, if a customer has three CA servers in a chain, Root CA, Sub1 CA, Sub2 CA, you wouldneed to obtain the public certificate from all three CA servers and concatenate them together:cat Sub2 CA.pem Sub1 CA.pem Sub1 Sub2 CA.pemcat Sub1 Sub2 CA.pem Root CA.pem Root CA Sub1 Sub2 CA.pemThe resulting Root Sub1 Sub2 CA.pem contains the public certificates of all three CA servers. Thisconcatenated file would be renamed IP Address of KMIP Server CA.pem.3.2GENERATE AND EXPORT THE KMIP SERVER PUBLIC CERTIFICATEPublic and private certificates are needed for the KMIP server to establish trust with NSE. In this example,we will use IBM Tivoli Lifetime Key Management (TLKM) server v2 as our KMIP server.Installation and configuration instructions for the IBM TKLMv2 can be found in the appendix. Thefollowing steps assume that the installation and configuration have already been completed.Generate the TKLM server public certificate and create a certificate signing request (.csr) file. Payparticular attention to the common name. You can enter either the IP address of the TKLM server or theDNS name. We will refer to it during the certificate export process.Figure 11: Exporting the IBM TKLMv2 Public CertificateThe resulting file can be found at \ tklm install root \tivoli\tiptklmV2\products\tklm\. This file will be sent tothe CA for signing.10NetApp Storage Encryption: Pre-installation Requirements and Procedures
Figure 12: Location of Exported IBM TKLMv2 Public Certificate3.3GENERATE A PRIVATE AND PUBLIC KEY PAIR FOR NSEThis step needs to be done external to the NSE system. A public and private key pair can be generated ineither Windows or UNIX using OpenSSL, but the following example shows how it’s done using OpenSSLin Linux.Generate the private key first.root@core-vm30: # openssl genrsa -des3 -out client private.key 2048Generating RSA private key, 2048 bit long modulus. . e is 65537 (0x10001)Enter pass phrase for client private.key:Verifying - Enter pass phrase for client private.key:The result will be a private key, as seen in the following example.root@core-vm30: # lsclient private.keyGenerate a certificate signing request (.csr) file from the private key. The file must be named client.csr.root@core-vm30: # openssl req -new -key client private.key -out client.csrEnter pass phrase for client private.key:You are about to be asked to enter information that will be incorporatedinto your certificate request.What you are about to enter is what is called a Distinguished Name or a DN.There are quite a few fields but you can leave some blankFor some fields there will be a default value,If you enter '.', the field will be left blank.11NetApp Storage Encryption: Pre-installation Requirements and Procedures
----Country Name (2 letter code) [AU]:Your CountryState or Province Name (full name) [Some-State]:Your StateLocality Name (eg, city) []:Your CityOrganization Name (eg, company) [Internet Widgits Pty Ltd]:Your CompanyOrganizational Unit Name (eg, section) []:Your OUCommon Name (eg, YOUR name) []:fas2040c-svl04.iops.eng.netap.comEmail Address []:your email@your company.comPlease enter the following 'extra' attributes to be sent with yourcertificate requestA challenge password []:An optional company name []:The result will be a .csr file, which needs to be sent to the CA for signing. Note the preceding commonname; we will refer to it later in our steps.You now have two files: (1) a .csr file, which is the signing request for the public certificate for NSE, and(2) the client private.key, which is the private key for NSE.root@core-vm30: # lsclient.csrclient private.key4 SIGN SSL CERTIFICATES AND EXPORT FOR USEYou should now have two .csr files: one from the TKLM server (in this example the file name is100831213458-tklm server.csr) and one generated using OpenSSL for NSE (in this example the filename is client.csr).An important note for SSL certificates: Note the expiration time for all SSL certificates generated andmake sure these are in line with your certificate expiration policies. When SSL certificates expire, newcertificates will need to be generated and installed according to the procedures outlined in the followingsection. Failure to replace SSL certificates before expiration could result in an inability to retrieve data offthe encrypted disks. For further information, refer to Appendix B: SSL Certificate Replacement.4.1SIGNING THE TKLM .CSR FILEFigure 13: Signing the CSR file in Windows 2008 CA12NetApp Storage Encryption: Pre-installation Requirements and Procedures
Select “All Files (*.*)” type to view the CSR file and browse to the correct folder, in this case\ tklm install root\tivoli\tiptklmV2\products\tklm\.Figure 14: Locating the CSR fileSelect Pending Requests and sign the .csr file by selecting the “Issue” option.Figure 15: Issuing the Certificate13NetApp Storage Encryption: Pre-installation Requirements and Procedures
4.2SIGNING THE CLIENT.CSR FILEFigure 16-17: Submit CSR Request14NetApp Storage Encryption: Pre-installation Requirements and Procedures
Select Pending Requests and sign the .csr file by selecting the “Issue” option.Figure 18: Issue the Signed CertificateThe result is two issued (signed) certificates in the CA.Figure 19: Signed Certificate Result15NetApp Storage Encryption: Pre-installation Requirements and Procedures
4.3EXPORT THE SIGNED TKLM CERTIFICATEFigure 20: Locate Certificate to be ExportedConfirm the TKLM server name under “Issued to:” This should match the common name during the CSRrequest from the TLKM server. In this case we used the IP address as the common name.Figure 21: Confirm Correct IP Address for TKLM16NetApp Storage Encryption: Pre-installation Requirements and Procedures
Figures 22-24: Export Certificate WizardMake sure to select Base-64 encoded X.509. This is the PEM format required by NSE.17NetApp Storage Encryption: Pre-installation Requirements and Procedures
The file name here is not critical. This file will be imported back into the TKLM server.Figures 25-27: Name and Save Certificate File18NetApp Storage Encryption: Pre-installation Requirements and Procedures
4.4EXPORT THE SIGNED NSE CERTIFICATEFigure 28: Locate and Export NSE CertificateMake sure the chosen certificate matches the common name specified during the creation of the csr inOpenSSL.Figure 29-30: Confirm Common Name and Copy to File19NetApp Storage Encryption: Pre-installation Requirements and Procedures
Figures 31-32: Certificate Export WizardMake sure to select Base-64 encoded X.509. This is the PEM format required by NSE.20NetApp Storage Encryption: Pre-installation Requirements and Procedures
The file name here must be called “client.pem” in order to be used properly by NSE.Figures 33-35: Rename CER file and Complete Export Wizard21NetApp Storage Encryption: Pre-installation Requirements and Procedures
Remove the .cer extension from the client.pem file. NSE requires the file to have the .pem extension only.Figures 36-39: Rename PEM file22NetApp Storage Encryption: Pre-installation Requirements and Procedures
23NetApp Storage Encryption: Pre-installation Requirements and Procedures
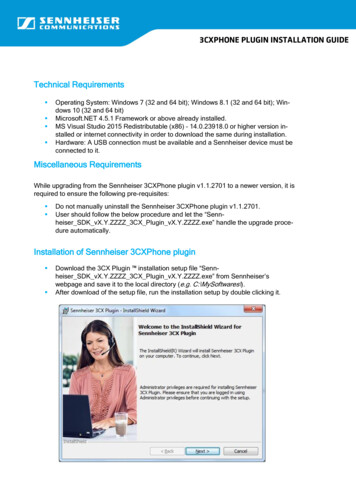
5 IMPORT THE SIGNED SSL CERTIFICATESYou now have three SSL certificates in all: the public certificate from the CA server and the two signedcertificates. This section covers import of the SSL certificates into their correct locations on the KMIPserver (TLKMv2 in this example) and on NSE.5.1IMPORT THE SIGNED TKLM CERTIFICATE BACK INTO THE TKLM SERVERThe TKLM server does not require the signed server certificate to have a specific file name format orextension. It does not need to be renamed prior to import.Figure 40: Loca
5 NetApp Storage Encryption: Pre-installation Requirements and Procedures 3 SSL CERTIFICATE CREATION Secure Sockets Layer (SSL) certificates are used to establish trusted communications between parties. In this section, we will create the following SSL ce
