Transcription
Troubleshooting Guide forCisco UCS E-Series Servers and theCisco UCS E-Series Network Compute EngineFebruary 18, 2015This document provides troubleshooting information for Cisco UCS E-Series Servers (E-Series Servers)and the Cisco UCS E-Series Network Compute Engine (NCE).NoteDocumentation is sometimes updated after original publication; therefore, review the documentation onCisco.com for any updates.ContentsThis guide contains the following sections: Link to Product Documentation, page 2 Types of E-Series Servers and NCEs, page 2 General Troubleshooting, page 2 VMware License Troubleshooting, page 6 Microsoft Windows Installation Troubleshooting, page 6 Host Login and CIMC Login Troubleshooting, page 7 Determining Version Information, page 8 Cisco IOS and CIMC CLI Configuration Troubleshooting, page 12 LED, DIMM, Video Port, USB Port, and CD/DVD Troubleshooting, page 14 KVM Troubleshooting, page 17 Storage Troubleshooting, page 18 SNMP Troubleshooting, page 23Americas Headquarters:Cisco Systems, Inc., 170 West Tasman Drive, San Jose, CA 95134-1706 USA
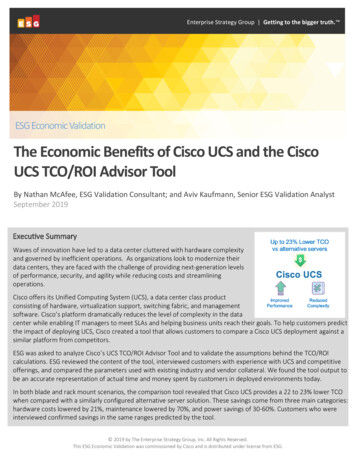
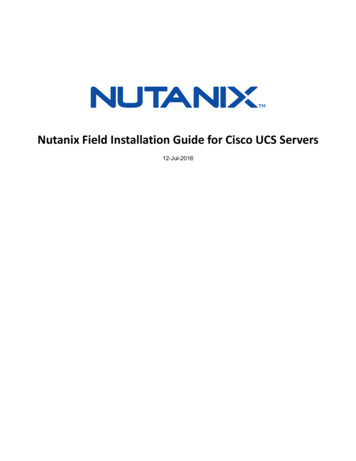
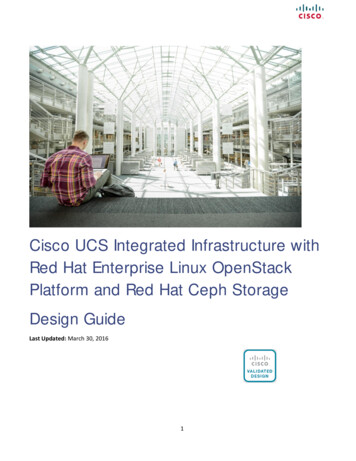
Link to Product Documentation Diagnostics Troubleshooting, page 24 Collecting Technical Support Data, page 24Link to Product DocumentationFor links to the all Cisco UCS E-Series Servers and the Cisco UCS E-Series Network Compute Enginedocuments, see the Documentation Guide for Cisco UCS E-Series Servers.Types of E-Series Servers and NCEsFigure 1Types of E-Series Servers and NCEsDouble-Wide E-Series ServerSM E-Series NCEEHWIC E-Series NCE391749Single-Wide E-Series ServerGeneral TroubleshootingCannot Access the E-Series Server or NCE, page 3 CIMC Hangs, page 3 Cannot Download the Host Image, page 4 Cannot Power on the E-Series Server, page 4 Recovering From a Corrupted CIMC Firmware Image, page 5 Recovering From a Faulty SD Drive, page 5 Recovering From a Corrupted File System, page 5 Verifying and Upgrading to the Latest Firmware Image, page 5Troubleshooting Guide for Cisco UCS E-Series Servers and the Cisco UCS E-Series Network Compute Engine2OL-26447-04
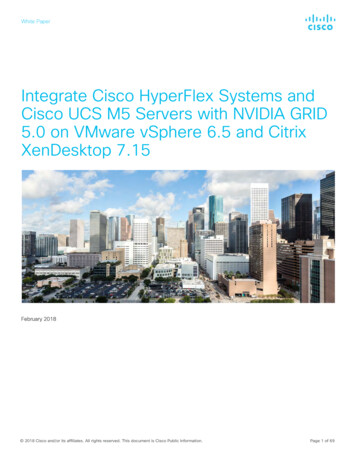
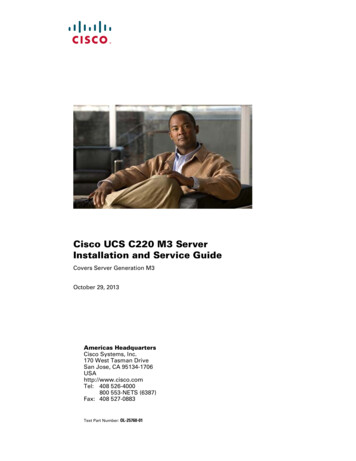
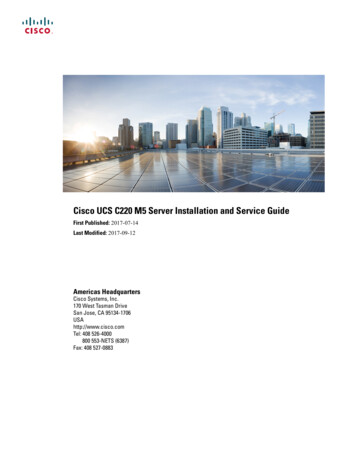
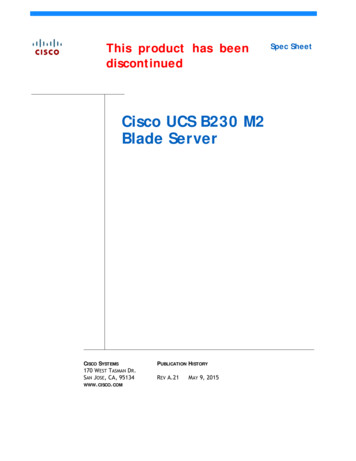
General TroubleshootingCannot Access the E-Series Server or NCESee the “Troubleshooting E-Series Server or NCE Access Issues” section in the “FirmwareManagement” chapter in the CLI Configuration Guide for Cisco UCS E-Series Servers and the CiscoUCS E-Series Network Compute Engine, Release 2.x.CIMC HangsTo resolve this problem, do the following: Use IPMI to reboot CIMC. If using IPMI does not resolve the problem, power cycle the E-SeriesServer. Verify that there is an SD card in the SD0 card slot. The SD card in the SD0 card slot contains theCIMC software and should always be present.Figure 2 shows the location of the SD0 card slot in a single-wide E-Series Server.Figure 2Single-Wide E-Series Server345206SD0 Card SlotFigure 3 shows the location of the dual SD card slots in a double-wide E-Series Server.The SD0 card is the lower card, located in the bottom SD card slot.NoteFigure 3Front Panel of the Double-Wide E-Series 45207PWRM0Dual SD Card Slotsand CoverTroubleshooting Guide for Cisco UCS E-Series Servers and the Cisco UCS E-Series Network Compute EngineOL-26447-043
General Troubleshooting Power down the E-Series Server to check whether the SD card has come out of the slot. If it has,reinsert the SD card. Do the following:– If the E-Series Server is installed in a Cisco 3900 series router, use the hw-module sm slotoir-stop command to power down the server, reinsert the SD card, and then use the hw-modulesm slot oir-start command to start the server.– If the E-Series Server is installed in a Cisco 2900 series router, power cycle the router.NoteDo not remove the SD card when the system is in operation.Cannot Download the Host ImageTo resolve this problem, verify the following: The FTP server on which you want to download the host image is running. The FTP server path to the image files is correct.Cannot Power on the E-Series ServerTo resolve this problem, clear the server's BIOS CMOS memory using the CIMC GUI or the CIMC CLI: Clearing the BIOS CMOS Using the CIMC GUI, page 4 Clearing the BIOS CMOS Using the CIMC CLI, page 5Clearing the BIOS CMOS Using the CIMC GUIBefore You Begin Log into the CIMC GUI as a user with admin privileges. Power off the server.ProcedureStep 1In the Navigation pane, click the Server tab.Step 2On the Server tab, click BIOS.Step 3In the Actions area, click Clear BIOS CMOS.Step 4In the confirmation window, click OK.Troubleshooting Guide for Cisco UCS E-Series Servers and the Cisco UCS E-Series Network Compute Engine4OL-26447-04
General TroubleshootingClearing the BIOS CMOS Using the CIMC CLIProcedureStep 1Enter the BIOS command mode. Use the scope bios command:Server# scope biosStep 2Clear the BIOS CMOS memory. Use the clear cmos command:Server /bios # clear-cmosThis operation will clear the BIOS CMOS.Note: Server should be in powered off state to clear CMOS.Step 3At the confirmation prompt, enter y to confirmContinue?[y N] yRecovering From a Corrupted CIMC Firmware ImageSee the “Troubleshooting E-Series Server or NCE Access Issues” section in the “FirmwareManagement” chapter in the CLI Configuration Guide for Cisco UCS E-Series Servers and the CiscoUCS E-Series Network Compute Engine, Release 2.x.Recovering From a Faulty SD DriveSee the “Troubleshooting E-Series Server or NCE Access Issues” section in the “FirmwareManagement” chapter in the CLI Configuration Guide for Cisco UCS E-Series Servers and the CiscoUCS E-Series Network Compute Engine, Release 2.x.Recovering From a Corrupted File SystemSee the “Troubleshooting E-Series Server or NCE Access Issues” section in the “FirmwareManagement” chapter in the CLI Configuration Guide for Cisco UCS E-Series Servers and the CiscoUCS E-Series Network Compute Engine, Release 2.x.Verifying and Upgrading to the Latest Firmware ImageUse the Cisco Host Upgrade Utility to verify and upgrade to the latest firmware image. See the HostUpgrade Utility Guide for Cisco UCS E-Series Servers and the Cisco UCS E-Series Network ComputeEngine.Troubleshooting Guide for Cisco UCS E-Series Servers and the Cisco UCS E-Series Network Compute EngineOL-26447-045
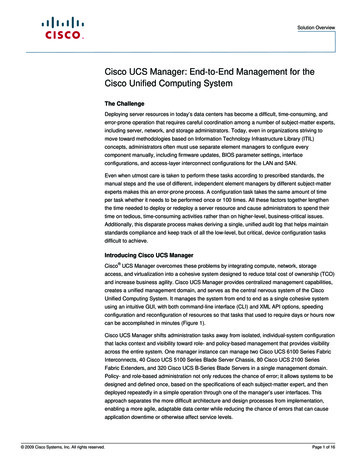
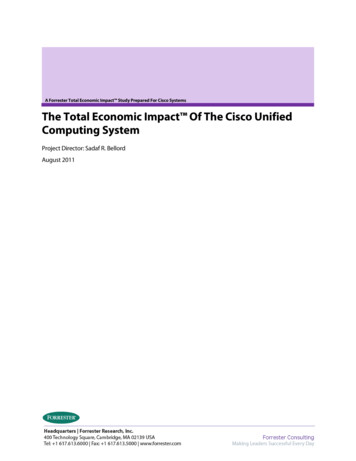
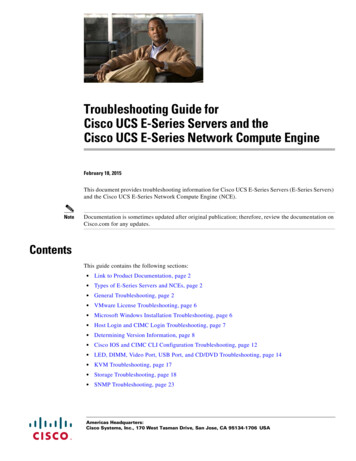
VMware License TroubleshootingVMware License Troubleshooting Cannot Apply VMware FL-SRE-V-HOST License, page 6Cannot Apply VMware FL-SRE-V-HOST LicenseThis problem occurs if you are using more than 32 GB of RAM with VMware vSphere Hypervisor 5.x.To resolve this problem, reduce the RAM to 32 GB or less, or upgrade your license toFL-SRE-V-HOSTVC.Microsoft Windows Installation Troubleshooting VMware Boots After Microsoft Windows Installation, page 6 Microsoft Windows Installation Displays VMware Partitions, page 6VMware Boots After Microsoft Windows InstallationThis problem occurs if you had first installed VMware, and then installed Microsoft Windows. Toresolve this problem, do the following:1.Change the state of the physical drive to JBOD. See the “Changing the Physical Drive State” sectionin the configuration guides for the version of the CIMC that you are using.2.Configure RAID to clear partitions. See the “Configuring RAID Using the CIMC GUI” section inthe configuration guides for the version of the CIMC that you are using.The configuration guides are available oft Windows Installation Displays VMware PartitionsDuring the Microsoft Windows installation, the “Where do you want to install Windows” dialog boxappears (see Figure 4), which displays partitions that were previously created by VMware. This dialogbox also displays the following warning message:Warning: Windows Cannot be Installed to Disk x Partition x.To resolve this problem, clear the old partitions by clicking Drive options (advanced), and then resumewith the Microsoft Windows installation.Troubleshooting Guide for Cisco UCS E-Series Servers and the Cisco UCS E-Series Network Compute Engine6OL-26447-04
Host Login and CIMC Login TroubleshootingFigure 4Where Do You Want to Install Windows Dialog BoxHost Login and CIMC Login Troubleshooting Cannot Session into the E-Series Server (Host), page 7 Cannot Session into CIMC with Active Directory Authentication, page 8Cannot Session into the E-Series Server (Host)The ucse slot session host command does not allow you to log into the E-Series Server. To resolve thisproblem, do the following:ProcedureStep 1Verify that the line speed value is 9600. Use the show line command to verify the line speed value:Router# showTty Line Typ*001122131 131Step 2lineTx/RxCTYAUXTTYTTYA Modem9600/9600 9600/9600 9600/9600Roty AccO AccI-Uses-Noise Overruns Int900/0000/0000/0-If the line speed value is correct, verify that the Baud rate value is 9.6K and the terminal type iscompatible. Use the show detail command from /bios/server-management to verify the Baud rate andterminal type:router# ucse 2 session imcCIMC# scope bios/server-managementCIMC /bios/server-management # show detailSet-up parameters:Assert NMI on PERR: DisabledAssert NMI on SERR: DisabledBaud rate: 9.6kConsole redirection: Serial Port AFRB2 Enable: EnabledFlow Control: NoneTroubleshooting Guide for Cisco UCS E-Series Servers and the Cisco UCS E-Series Network Compute EngineOL-26447-047
Determining Version InformationOS Boot Watchdog Timer: DisabledOS Boot Watchdog Timer Policy: Do NothingPower Restore Policy: Power OnTerminal type: PC-ANSIStep 3Verify that the Enabled option in Serial over LAN (sol) is configured as no. Use the show detailcommand from /sol to verify the sol configuration:CIMC# scope solCIMC /sol # show detailSerial Over LAN:Enabled: noBaud Rate(bps): 9600Cannot Session into CIMC with Active Directory AuthenticationThis problem occurs if you did not provide your full domain name followed by your username. Toresolve this problem, provide your full domain name followed by your username. For example:CIMC login: cert.cisco.com\adadminPassword:PING 172.19.159.52 (172.19.159.52): 56 data bytes64 bytes from 172.19.159.52: seq 0 ttl 128 time 0.000 ms--- 172.19.159.52 ping statistics --1 packets transmitted, 1 packets received, 0% packet lossround-trip min/avg/max 0.000/0.000/0.000 msDetermining Version Information Determining the Cisco IOS Version Installed on the Router, page 9 Determining Information About the E-Series Server Through Diagnostics, page 9 Determining the Hardware Version of the E-Series Server or the NCE, page 9 Determining the BIOS Version Installed on the E-Series Server or the NCE, page 10 Determining the CIMC Version Installed on the E-Series Server or the NCE, page 11 Determining the LSI Firmware Version—Applicable on CIMC Release 1.x, page 12 Determining the LSI Firmware Version—Applicable on CIMC Release 2.x, page 12Troubleshooting Guide for Cisco UCS E-Series Servers and the Cisco UCS E-Series Network Compute Engine8OL-26447-04
Determining Version InformationDetermining the Cisco IOS Version Installed on the RouterNote The supported Cisco IOS software version on E-Series Servers is 15.2(4)M and later versions. Fordetails, see the “Verifying the Router, E-Series Server, and Cisco IOS Software VersionCompatibility” section in the getting started guide for the version of the CIMC that you are using.The getting started guides are available allation-guides-list.html. The Cisco 2921 and 2951 series routers support 4-core only.To determine the Cisco IOS version, use the show version or the show inventory command from therouter:Router show versionCisco CISCO3945-CHASSIS (revision 1.0) with C3900-SPE150/K9 with 1048576K/63488K bytes ofmemory.1 cisco UCSE Module(s)Router show inventoryNAME: “UCSE Server Module on Slot 4", DESCR: “UCSE Server Module”PID: UCS-E140D-M1/K9, VID: V00 , SN: FOC16161F5EDetermining Information About the E-Series Server Through DiagnosticsTo determine the type of E-Series Server that is installed in the router and in which slot it is installed,use the show diag command from the router:Router show diagSlot 4:UCSE Double Wide Module Port adapter, 2 portsPort adapter is analyzedPort adapter insertion time 4d18h agoProduct (FRU) Number: UCS-E140D-M1/K9Determining the Hardware Version of the E-Series Server or the NCEYou can determine the hardware version of the E-Series Server or the NCE from the CIMC GUI or fromthe CIMC CLI: Determining the Hardware Version of the E-Series Server or the NCE from the CIMC GUI, page 10 Determining the Hardware Version of the E-Series Server or the NCE from the CIMC CLI, page 10Troubleshooting Guide for Cisco UCS E-Series Servers and the Cisco UCS E-Series Network Compute EngineOL-26447-049
Determining Version InformationDetermining the Hardware Version of the E-Series Server or the NCE from the CIMC GUIProcedureStep 1In the Navigation pane, click the Server tab.Step 2On the Server tab, click Summary. The Server Summary page appears.Step 3In the Cisco Integrated Management Controller (CIMC) Information area, the hardware version ofthe E-Series Server is displayed in the CPLD Version and the Hardware Version fields.Determining the Hardware Version of the E-Series Server or the NCE from the CIMC CLIEnter the following commands:Server# scope cimcServer/cimc # scope firmwareServer/cimc/firmware # show detailFirmware Image Information:Update Stage: NONEUpdate Progress: 0%Current FW Version: 2.3(1.20140818121921)FW Image 1 Version: 2.3(1.20140818121921)FW Image 1 State: RUNNING ACTIVATEDFW Image 2 Version: 2.3(1.20140818113904)FW Image 2 State: BACKUP INACTIVATEDBoot-loader Version: 2.3(1.20140818121921).33CPLD Version: 0.62Hardware Version: 0Determining the BIOS Version Installed on the E-Series Server or the NCEYou can determine the BIOS version of the E-Series Server or the NCE from the CIMC GUI or from theCIMC CLI. Determining the BIOS Version Installed on the E-Series Server or the NCE from the CIMC GUI,page 10 Determining the BIOS Version Installed on the E-Series Server or the NCE from the CIMC CLI,page 11Determining the BIOS Version Installed on the E-Series Server or the NCE from the CIMC GUITo determine the BIOS version of the E-Series Server, do the following from the CIMC GUI.ProcedureStep 1In the Navigation pane, click the Server tab.Step 2On the Server tab, click BIOS. The BIOS page appears.Step 3In the BIOS Properties area, the BIOS version is displayed in the Running Version field.Troubleshooting Guide for Cisco UCS E-Series Servers and the Cisco UCS E-Series Network Compute Engine10OL-26447-04
Determining Version InformationDetermining the BIOS Version Installed on the E-Series Server or the NCE from the CIMC CLIEnter the following commands:Server # scope biosServer /bios # show detailBIOS:BIOS Version: "UCSES.1.5.0.1 (Build Date: 02/14/2013)"Boot Order: CDROM:Virtual-CD,HDD:RAID,EFIFW Update/Recovery Status: None, OKActive BIOS: mainDetermining the CIMC Version Installed on the E-Series Server or the NCEYou can determine the CIM version installed on the E-Series Server or the NCE from the CIMC GUI orfrom the CIMC CLI. Determining the CIMC Version Installed on the E-Series Server or the NCE from the CIMC GUI,page 11 Determining the CIMC Version Installed on the E-Series Server or the NCE from the CIMC CLI,page 11Determining the CIMC Version Installed on the E-Series Server or the NCE from the CIMC GUITo determine the CIMC version of the E-Series Server, do the following from the CIMC GUI.ProcedureStep 1In the Navigation pane, click the Admin tab.Step 2On the Admin tab, click Firmware Management. The Firmware Management page appears.Step 3In the CIMC Firmware area, the CIMC version is displayed in the Running Version field.Determining the CIMC Version Installed on the E-Series Server or the NCE from the CIMC CLIEnter the following commands:Server# scope cimcServer/cimc # scope firmwareServer/cimc/firmware # show detailFirmware Image Information:Update Stage: NONEUpdate Progress: 0%Current FW Version: 2.3(1.20140818121921)FW Image 1 Version: 2.3(1.20140818121921)FW Image 1 State: RUNNING ACTIVATEDFW Image 2 Version: 2.3(1.20140818113904)FW Image 2 State: BACKUP INACTIVATEDBoot-loader Version: 2.3(1.20140818121921).33CPLD Version: 0.62Hardware Version: 0Troubleshooting Guide for Cisco UCS E-Series Servers and the Cisco UCS E-Series Network Compute EngineOL-26447-0411
Cisco IOS and CIMC CLI Configuration TroubleshootingDetermining the LSI Firmware Version—Applicable on CIMC Release 1.xTo determine the LSI firmware version, do the following from the CIMC GUI.ProcedureStep 1In the Navigation pane, click the Server tab.Step 2On the Server tab, click Inventory. The Inventory page appears.Step 3Click the Storage tab.Step 4In the Storage Adapters area, the LSI firmware information is displayed in the Firmware PackageBuild column.Determining the LSI Firmware Version—Applicable on CIMC Release 2.xNoteThis procedure is applicable to E-Series Servers and the SM E-Series NCE. This section is not applicableto the EHWIC E-Series NCE.To determine the LSI firmware version, do the following from the CIMC GUI.ProcedureStep 1In the Navigation pane, click the Server tab.Step 2On the Server tab, click RAID. The Storage Cards page appears.Step 3In the Storage Adapters area, the LSI firmware information is displayed in the Firmware PackageBuild column.Cisco IOS and CIMC CLI Configuration Troubleshooting Cisco IOS Configurations Not Applied to CIMC, page 12 Cannot View Latest Configuration Changes in CIMC, page 13 Cannot Commit CIMC CLI Configuration Changes, page 13Cisco IOS Configurations Not Applied to CIMCThis problem occurs if Lock IOS Configuration Changes is enabled in CIMC. Use the CIMC GUI orthe CIMC CLI to resolve this problem. Enabling Cisco IOS Configuration Changes to Be Applied to CIMC Using the GUI, page 13 Enabling Cisco IOS Configuration to Be Applied to CIMC Using the CLI, page 13Troubleshooting Guide for Cisco UCS E-Series Servers and the Cisco UCS E-Series Network Compute Engine12OL-26447-04
Cisco IOS and CIMC CLI Configuration TroubleshootingEnabling Cisco IOS Configuration Changes to Be Applied to CIMC Using the GUITo enable Cisco IOS configuration changes to be applied to CIMC, do the following from the CIMCGUI.ProcedureStep 1In the Navigation pane, click the Server tab.Step 2On the Server tab, click Summary. The Server Summary page appears.Step 3From the Server Summary page, click the Lock IOS Configuration Changes button to unlock it.Enabling Cisco IOS Configuration to Be Applied to CIMC Using the CLIUse the set ios-lockout unlocked command to enable the Cisco IOS configuration changes to be appliedto CIMC:Server /chassis # set ios-lockout unlockedServer /chassis *# commitServer /chassis # show detailChassis:Power: offPower Button: unlockedIOS Lockout: unlockedSerial Number: FOC16161F5EProduct Name: E140DPID : UCS-E140D-M1/K9UUID: nnot View Latest Configuration Changes in CIMCTo resolve this problem, after making changes to the configuration, click Refresh.Cannot Commit CIMC CLI Configuration ChangesThis problem occurs under the following conditions: If you assigned a static IP address for CIMC, and then left the values of DHCP Enabled andDNS-use-DHCP as Yes. To resolve this problem, change the value to No, and then assign the staticIP address:ServerServerServerServer rk# set dns-use-dhcp no*# set dhcp-enabled no*# set v4-addr 192.168.100.78*# commitIf you made configuration changes in one scope, and then tried to commit those changes fromanother scope.The commit command must be used to commit changes that are made within the same scope. If youtry to use the commit command to submit changes made in a different scope, an error messagedisplays. To resolve this problem, redo and rec
† Cannot Download the Host Image, page 4 † Cannot Power on the E-Series Server, page 4 † Recovering From a Corrupted CIMC Firmware Image, page 5 † Recovering From a Faulty SD Drive, page 5 † Recovering From a Corrupted File System, page 5 † Verifying and Upgrading to the Latest Firmware