Transcription
1765 ch03.qxd11/15/065:07 PMPage 35CHAPTER 3Managing and ConfiguringCisco VoIP DevicesThis chapter examines how to configure VoIP using a variety of methods: VoIP telephony setup dialog, manualconfiguration of the router for Cisco CallManager Express (CME), a partially automated process, QuickConfiguration Tool (QCT), and Cisco Network Assistant. Each of these methods is addressed in a lab thatallows you to explore each one so that you can determine the most appropriate method or tool to use.IP Telephony IP AddressesNo matter what method of configuration is used, a Cisco IP Phone needs an IP address and a configurationfile to operate. An IP address is normally assigned using DHCP. A DHCP pool of addresses can be createdon the router or on a separate server. In these labs, the DHCP pool is created on the router. When eithermethod is used, the CME router has to be able to let the phone know the IP address of the router or serverthat can provide the IP address. This is true even if the IP address is the same router that is providingCME.DHCP Option 150The Cisco IP Phone uses DHCP option 150 to identify the location of the device that contains the IP Phone’sconfiguration file. The Cisco IP Phone receives its configuration file from a TFTP server. DHCP (specifically,the 150 option) can be used to let the IP Phone know the IP address of the device that contains the phoneconfiguration file. This IP address is a TFTP server, and it can be located on the router providing CME.In the DHCP pool configuration process on the router, this option 150 parameter must be configured, orthe Cisco IP Phone will not function.PC IP AddressingAdditionally, if a PC is to be used, it, too, needs an IP address. If the PC is using DHCP, the DHCP poolneeds to be a different one from the pool used for the IP Phones. Lab 3-2 details how to create a separateDHCP pool for PC addresses on the router. This information is useful and can be used in later labs when aPC is required.ephone-dnWhen dealing with CME, an IP Phone is configured using the ephone option. The term ephone is short forEthernet phone. The telephone line associated with the ephone is known as an ephone-dn, which stands forEthernet phone directory number. The ephone-dn represents a line that connects a voice channel to a phoneso that calls can be made. When you enable the VoIP telephony service, ephones and ephone-dns can becreated and seen in the running configuration output.An ephone-dn has one or more extensions or phone numbers associated with it that allow calls to be made.An ephone-dn is similar to a phone line. Each ephone has a number to identify it during the configurationprocess.
1765 ch03.qxd3611/15/065:07 PMPage 36IP Telephony Using CallManager Express Lab PortfolioThe ephone-dn command creates one virtual voice port and one or more dial peers (covered in the nextchapter). The number of ephone-dns that are created corresponds to the number of simultaneous calls thatcan be made, because each ephone-dn represents one virtual voice port in the router. This means that ifyou want more than one call to the same number to be answered simultaneously, multiple ephone-dns(virtual voice ports) are needed.There are two types of ephone-dns: Single-line—The single-line option should be used when phone buttons have a one-to-one correspondence to the regular phone lines that come into a CME system. The dual-line option lets you maketwo call connections at the same time using one phone line button. Dual-line—Dual-line IP Phones have one voice port with two channels to handle two independentcalls. This capability enables call waiting, call transfer, and conference functions on a phone-line button. In dual-line mode, each IP Phone and its associated line button can support one or two calls. Youselect one of two calls on the same line using the Navigation button located below the phone display.Cisco Network AssistantTo access Network Assistant, you need a registered www.cisco.com CCO account but no special accessprivileges. Network Assistant is a Cisco application that manages standalone devices and device groups—communities and clusters from a computer on your intranet. Network Assistant was free at the time ofwriting. A community can manage up to 20 devices such as routers, access points, and switches. A clustercan manage up to 16 switches. With a community, CDP does not have to be enabled, because you canmanually add a device. Clusters require that CDP be enabled. Lab 3-5 demonstrates a community.Cisco Network Assistant uses a GUI interface to interact with a network device that has an IP addressassigned and HTTP enabled. The interface allows you to apply actions to multiple devices and ports at thesame time for VLAN and quality of service (QoS) settings, inventory and statistics reports, link and devicemonitoring, and software upgrades.
1765 ch03.qxd11/15/065:07 PMPage 37Chapter 3: Managing and Configuring Cisco VoIP Devices37Lab 3-1: Configuring VoIP Using the telephony-servicesetup ProgramThe company OCSIC.org has decided to experiment with using the telephony-service setup program todetermine what commands are deployed as a result.You must use the information in Tables 3-1 and 3-2 to perform some of the steps in the setup process.Table 3-1IP Telephony Addressing SchemePodHostname ofRouter or SwitchIP Address onEthernet InterfaceDHCP PoolExclusionDHCP .10.0.1 5.0.1 –10.15.0.1010.15.0.0/2410.15.0.1DHCPOption .0.1RouterVoIP210.20.0.1/2410.20.0.1 5.0.1 .0.1/2410.30.0.1 .0.1 0.0.1/2410.40.0.1 .4.0.1/24SwitchVoIP4Table 3-210.4.0.4/2410.4.0.1IP Telephony Dial PlanPodExtension NumbersFirst E.164 DID NumberVoice Mail Extension NumberPod 15000 to 502951055550005555028Pod 25030 to 505951055550305555058Pod 35060 to 508951055550605555088Pod 45100 to 512951055551005555128
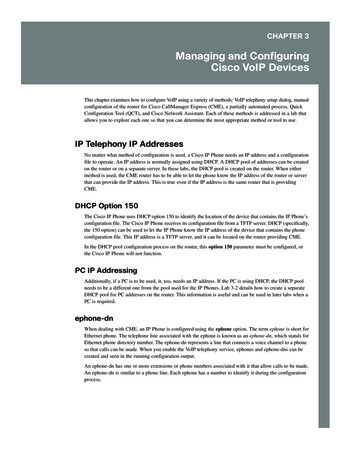
1765 ch03.qxd3811/15/065:07 PMPage 38IP Telephony Using CallManager Express Lab PortfolioThe objectives of this lab are as follows: Cable two Cisco IP Phones to a switch/switch module. Provide power to the phones using either method of connectivity. Configure Cisco CallManager Express. Configure two IP Phones using the telephony-service setup dialog routine. Verify IP Phone registration and connectivity.To perform this lab, you need the following equipment: Cisco CallManager Express-capable router Switch/switch module Workstation with FastEthernet 10/100 NIC installed Two Cisco IP Phones (powered using any method)Figure 3-1 shows the topology used for this lab. Keep in mind that an integrated switch module in therouter could be used instead of the external switch.Figure 3-1Lab Topology: Cisco Router, Switch/Switch Module, and IP Phone ConnectivityIPIPIPIPThe procedure for this lab consists of the following tasks. The following sections describe each task in detail: Task 1—Configure the Cisco IP Phones using the telephony-service setup command. Task 2—Verify connectivity between the Cisco IP Phones. Task 3—Connect a PC to the Cisco IP Phone, and verify the configuration. Task 4—Erase and reboot the router.Task 1: Configure the Cisco IP Phones Using the telephony-servicesetup CommandStep 1.Ensure that the router has no previously configured commands except for the commands created in Lab 2-4 or Lab 2-5. Copy the configuration from Lab 2-4 or Lab 2-5 (depending onwhether a switch module or external switch is being used). Reprogram the VLANs or reprogram the router and switch module/external switch with the commands necessary to create thevoice, data, and management VLANs and route between them.Step 2.From global configuration mode, enter the telephony-service setup command to enter CMEtelephony setup mode:RouterVoIPX(config)# telephony-service setupNote:If you make a mistake while you are in the setup program, you can correct it at the end of the utility.
1765 ch03.qxd11/15/065:07 PMPage 39Chapter 3: Managing and Configuring Cisco VoIP DevicesStep 3.When prompted with the choice to set up the DHCP service for your IP Phones, enter y andpress Enter.Step 4.The IP network for the telephony-service DHCP pool is 10.X5.0.0 (where X is the pod number). This is a DHCP pool to be used by the IP Phones.Step 5.The subnet mask for the DHCP network is 255.255.255.0.Step 6.The TFTP server IP address for DHCP option 150 is an address on the Cisco CME router—10.X5.0.1 (where X is the pod number).Step 7.The default router for the pool also is 10.X5.0.1 (where X is the pod number).Step 8.When you are asked if you want to start the telephony-service setup, answer y for yes.Step 9.For the source IP address, enter 10.X5.0.1 (where X is the pod number).39Step 10. Accept the default port of 2000 by pressing the Enter key. Skinny is a protocol used by CiscoIP Phones. It uses TCP port 2000.Step 11.When asked how many phones to configure, respond with 4, even though only two phones areconnected. You can change this value from the command prompt if necessary.Step 12. When asked whether you want dual lines, answer y and press Enter.Step 13. Select the language you want on the phone. (You can accept the default of English by simplypressing the Enter key.)Step 14. When asked which Call Progress tone to use, select a number relating to the country for callprogress tones. (If you’re in the United States, you can use the default by just pressing theEnter key.)Note: In-band call progress tones (such as ringback and busy tones) and announcements (“The number you havedialed is no longer in service”) are required to successfully signal voice calls. Call progress tones can be generated bythe originating, terminating, or intermediate devices.Step 15. Refer to Table 3-2 to find the appropriate first extension number. The second column listsextension numbers. Find the appropriate row for the pod number being used. Select the firstnumber in the range for the pod being used. For example, if Pod 1 is being used, the firstextension number is 5000.Step 16. When you’re asked if Direct Inward Dialing (DID) is used, answer y and press Enter.Note: DID is a local phone company service that provides a block of phone numbers used to call into a company’sPBX system. With DID, individual phone numbers can be assigned to each person or PC without having a physicalline into the PBX for each person’s connection.Step 17.When you’re asked for the full E.164 number, enter the value from Table 3-2 for the pod beingused. For example, if Pod 2 is being used, the E.164 DID number is 5105555030.Note: A fully qualified E.164 number contains a country code (issued by the ITU), area code (sometimes called anSTD code), and the local telephone number. Because the country has been selected already, it is just the area code andthe phone number.Step 18. When you’re asked if you want forwarding to a voice message service (voice mail), enter y andpress Enter.
1765 ch03.qxd4011/15/065:07 PMPage 40IP Telephony Using CallManager Express Lab PortfolioStep 19.When you’re asked to enter an extension or pilot number of the voice message service, refer toTable 3-2 for the voice mail extension number. For example, if pod 3 is being used, the voicemail extension number is 5555088.Step 20. Press the Enter key to accept the default of 18 seconds for Call Forward timeout.Step 21.You are asked if any of the information needs to be changed. Select no to use the current settings and to exit the utility, or select yes to change an option. If you did not make mistakes inthe previous steps, enter n, press Enter, and proceed to the next step. If you made mistakes,enter y, press Enter, and go back to the first step.Step 22. Watch the console output to see if the phones register. You should see router output similar tothe following:Mar 2 23:57:09.080: %IPPHONE-6-REGISTER: ephone-1 :SEP000F2470F92EIP:10.15.0.11Socket:1 DeviceType:Phone has registered.Note that this may take several minutes. Another indication that the phone has registered is thatthe phone number appears in the upper-right corner of the phone display.Note:VoIP.Ensure that the phones are inserted into the correct switch/switch module ports that have been configured forThe power to the phone may need to be removed and reapplied to get the phone to rerequest an IP address and registerwith the CME router.Also, the phone may need to have its configuration erased and rebooted to register with the CME router.How important is it to pick the extension numbers that will be used for IP Phone extensions?Do you think any numbers should be avoided? If so, which ones?Task 2: Verify Connectivity Between the Cisco IP PhonesPlace a call between the two IP Phones by picking up the handset on one phone and entering the numberof the second IP Phone.After a connection has been made, reverse the process. Make a call from the second IP Phone to the first one.Note: Calls can also be placed by pressing the speaker button on the bottom right of the Cisco IP Phone and thenentering the number of the other IP Phone.If the phones do not connect to one another, perform troubleshooting as necessary. Reset the phone using steps fromLab 2-2 if necessary.
1765 ch03.qxd11/15/065:07 PMPage 41Chapter 3: Managing and Configuring Cisco VoIP Devices41Task 3: Connect a PC to the Cisco IP Phone Port, and Verify theConfigurationStep 1.Connect a PC using a straight-through cable to the port labeled 10/100 PC on the bottom ofone of the Cisco IP Phones. Ensure that the RJ-45 connector inserts fully into the connector.Step 2.Ensure that the PC is configured to receive an IP address from a DHCP server. On a Windowsbased computer, use the Network Control Panel to configure TCP/IP to “Obtain an IP addressautomatically.”Step 3.On the router from global configuration mode, create a DHCP pool for the data VLAN. ThePC will connect to the data VLAN and receive an IP address. In the following commands, the xin the network and default-router commands represents the pod number chosen previously:RouterVoIPX(config)# ip dhcp pool DATARouterVoIPX(dhcp-config)# network 10.x0.0.0 255.255.255.0RouterVoIPX(dhcp-config)# default-router 10.x0.0.1Step 4.From global configuration mode, reserve the first ten IP addresses of the DATA DHCP poolfor networking devices. The x in the ip dhcp excluded-address command represents the podnumber:RouterVoIPX(config)# ip dhcp excluded-address 10.x0.0.1 10.x0.0.10Step 5.Renew the IP address on the PC. It might be necessary to use the commands ipconfig /releaseand ipconfig /renew from a command prompt if the PC has already gotten an address in theexcluded IP address range.Did the PC receive an IP address? If so, what address did it receive? If the PC did not receivean IP address, troubleshoot as necessary.Step 6.From the PC command prompt, ping the default gateway. The ping should succeed.Troubleshoot as necessary.Task 4: Erase and Reboot the RouterDo not save the router configuration. However, it is recommended that you copy the current configurationto a text file that can be used later.Reload the router so that a manual configuration can be completed in the next lab. Do not save thechanges. If an integrated switch module is being used, the del vlan.dat command needs to be used on therouter:RouterVoIPX# del vlan.datRouterVoIPX# reload
1765 ch03.qxd4211/15/065:07 PMPage 42IP Telephony Using CallManager Express Lab PortfolioLab 3-2: Manually Configuring a CME Router forVoIP PhonesIn this lab, OCSIC.org has decided to use the manual setup process to configure the Cisco CallManagerExpress router and phones.The objective of this lab is to configure two Cisco IP Phones using commands entered on the router.To perform this lab, you need the following equipment: Cisco CME-capable router with specific files for an IP Phone (basic CME .tar file) Switch/switch module Workstation with an Ethernet 10/100 NIC installed Two Cisco IP Phones (powered using any method)Figure 3-2 shows an example of the topology used for this lab. Keep in mind that an integrated switchmodule in the router can be used instead of the external switch.Figure 3-2Sample Lab TopologyIPIPIPIPThe procedure for this lab consists of the following tasks. The following sections describe each task in detail: Task 1—Configure a DHCP pool for Cisco IP Phones. Task 2—Verify and optionally load the Cisco firmware file. Task 3—Perform basic router configuration for a Cisco IP Phone. Task 4—Verify Cisco IP Phone registration. Task 5—Add configuration for a second Cisco IP Phone.Task 1: Configure a DHCP Pool for Cisco IP PhonesStep 1.Ensure that the router has no previously configured commands except for commands necessaryto create the voice, data, and management VLANs and route between them. Use the showrunning-config begin tele command to verify that the IP telephony service has not beenconfigured or executed. The pipe symbol ( ) is normally created by holding down the Shift keyand pressing the \ key. Nothing should appear as a result of issuing this command if the IPtelephony service has been deleted or has not been executed. If Lab 3-1 has just been completed, move into global configuration mode and remove the telephony-service commands:RouterVoIPX# show running-config begin teleRouterVoIPX(config)# no telephony-serviceNote: The begin tele parameter searches the running configuration for the first instance of “tele,” which is reallymeant to be telephony-service. If no telephony-service is configured, nothing is displayed, and the RouterVoIPX promptis seen again. If a configuration exists, use the no telephony-service command to erase any existing configuration.
1765 ch03.qxd11/15/065:07 PMPage 43Chapter 3: Managing and Configuring Cisco VoIP DevicesStep 2.43If you just completed Lab 3-1, from global configuration mode remove the DHCP pool for theIP Phones and any tftp-server commands:RouterVoIPX(config)# no ip dhcp pool ITSRouterVoIPX(config)# no tftp-server P003xxxxxxxx.binRouterVoIPX(config)# no tftp-server P003xxxxxxxx.sbnRouterVoIPX(config)# no tftp-server P004xxxxxxxx.binStep 3.Create the DHCP pool for Cisco IP Phone addresses. From global configuration mode, usethe command ip dhcp pool Voice to name the DHCP pool and begin DHCP parameterconfiguration:RouterVoIPX(config)# ip dhcp pool VoiceStep 4.Use the network 10.X5.0.0 255.255.255.0 command to set the range of IP addresses to use inthe DHCP:RouterVoIPX(dhcp-config)# network 10.X5.0.0 255.255.255.0Step 5.Enter the command default-router 10.X5.0.1 (where X is the pod number) to assign a defaultgateway to the Cisco IP Phone:RouterVoIPX(dhcp-config)# default-router 10.X5.0.1Note: With CallManager Express, the Cisco IP Phones receive their initial configuration information and phonefirmware from the TFTP server associated with the CME router. The phones usually get the IP address of their TFTPserver using the DHCP option 150 command. When CME is used, the TFTP server address obtained by the phoneshould point to an IP address on the CME router, because that is where the phone image will be located.The Cisco IP Phone downloads the image configuration file from the device that has the IP address obtained throughthe DHCP option 150.Step 6.Use the command option 150 ip 10.X5.0.1 (where X is the pod number) to assign the TFTPserver address as the CME router:RouterVoIPX(dhcp-config)# option 150 ip 10.X5.0.1Step 7.Exit the DHCP pool configuration mode. From global configuration mode, enter ip dhcpexcluded-address 10.X5.0.1 10.X5.0.10 (where X is the pod number) to prevent this range ofdefined addresses from being used out of the DHCP po
configuration file. The Cisco IP Phone receives its configuration file from a TFTP server. DHCP (specifically, the 150 option) can be used to let the IP Phone know the IP address of the device that contains the phone configuration file. This IP address is a TFTP server, and it can be located on the router providing CME.