Transcription
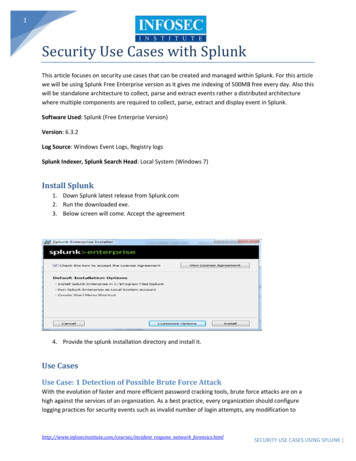
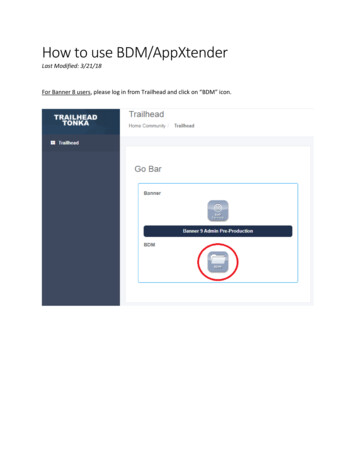
How to use BDM/AppXtenderLast Modified: 3/21/18For Banner 8 users, please log in from Trailhead and click on “BDM” icon.
For Banner 9 users who view/print documents, log in from Trailhead and click on Banner 9 Admin Pagelink:Key in your Banner form, like this:Note: The form in this guide is only an example.Key in the document criteria and click on the RETRIEVE button:
Some known Issues and work around:1) You might see this message connecting to ApplicationXtender the first time:Just Press F5 (refresh page) and you will see your document:If there is no document, you will see:
If you do not see a window pop up or new tab, you may need to disable the popup blocker from yourbrowser, or allow a popup exception accordingly.2) If you are using IE as your browser and the address bar is flashing and appears to be in a stuck state,close IE; right click your IE icon on the taskbar and select “Start InPrivate Browsing” to start over:
For Banner 9 users who import/scan documents:Click on the Add button:To scan a document, make sure you are using Internet Explorer and your scanner is on first. Click onSelect Scanner icon to select your scanner:If Select Scanner icon is greyed out, press F5 to refresh your page.If you see this screen, click Continue:
After you click on Select Scanner icon, you will see this screen:Click Allow, your available scanners will show up, select ISIS driver (default) and click OK:Note: if the Scanner Selection window didn’t show up, restart your scanner and try again.
Now you can click on the down arrow to configure your scanning profile for this session:Note: we recommend using Black and White with 300 dpi.Click the Scan icon to start scanning:Note: If the Scan icon is still greyed out, simply click on it should make it show up.You will see this window while scanning, be patient and DON’T click CANCEL:
When scanning operation is done, index your document using the index panel on the right. Click SAVE:To import a document from your computer or a network drive, click on “Add Page”:You will see this window:Browse to select your file(s), then click UPLOAD.
To add a page to an existing document, go to Page - New Page, then Import File or Scan:
To delete a page from an existing document, select the page first, then go to Page- Delete:
To create a batch, click on NEW BATCH:Select your Application and name your batch, then CONTINUE:Import or Scan in your documents:
When you are done bring them in, make sure to navigate back to the first page (otherwise it stays on thelast page):To index your batch, click New Document:Index Panel will show up on the right, you can index and SAVE:
You then have options to attach the current page to the same index:Or attach all rest of the batch to the same index:If the rest of the batch should have a different index, click Create Another Document. Index, save,repeat until your batch is all indexed:
Troubleshoot:If you see “Failed to load a valid scanner” message:Start Task Manager and end the following 2 processes:** You may need to run with elevated privileges or consult with an administrator to perform the taskabove.
When scanning operation is done, index your document using the index panel on the right. Click SAVE: To import a document from your computer or a network drive, click on “Add Page”: You will see this