Transcription
The Beginners Guide ToSculpting MiniatureFigures From ScratchVesaliusDrew Williams Sculpting StudioJuly 2003Special Gen Con SeminarFIGURE SPECIALISTS FOR TOY, GAME, AND HOBBY INDUSTRIESAn independent developer and designer of figurative sculptures for various toy and game companiesas well as private collectors the world over.visit http://www.jwdc.com/dw
Table of ContentsThe Purpose of this Booklet .2Advanced Materials .2Making a Curing Oven .3Making a Rig .4Making an Armature .5Classic Laws of Anatomy .7Laws of Miniature Anatomy .9Posing the Armature .9Under-AAnatomy .10Super-AAnatomy .11The Human Head & Face .11The Hands .12The Feet .13Further Advanced Materials .13Suggested Resources .14Suggested Suppliers .14Appendix: Image Resources .151
The Purpose of this BookletThe purpose of this booklet is to provide the experienced miniatureshobbyist with the foundation to begin in original miniature fabrication in thesame manner as many of the professionals do. Additional years of trainingand observation, as well as experimentation in tools and materials use is recommended to make full use of the techniques and principles outlined in thisBooklet. However this will hopefully provide a solid 'first step' in the rightdirection.Advanced Materialscopper wire (stripped doorbell wire will do)Jewelry wire clipperssmall flat (no teeth) needle nosed plierssolder (light duty, low temp, rosin core, with a % silver best)Dremel tool (or other multi-speed precision rotary device)micro drill bits and various dental drill bitsvarious needles mounted to handleslarge clay sculpting toolsjewelers coping sawsupply of fresh no. 11 hobby knives bladesunused bottle corksalligator clipslarger clampsreliable super glueheavy plasticard (thickest scrap found at any sign maker shop)measuring device with exact metric (rulers or calipers)assorted fine grit sandpapertexture collection (open cell foam scraps, coarse sandpaper, etc)table vicefreezerreliable oven or other heating device2
Making a Curing OvenA curing oven is not a required tool, but it makes your sculpting life a little bit easier. You can use a regular oven to cure your pieces, but it ties up your kitchen, wastesenergy, and drives up your utility bill needlessly. Not to mention you probably don’t sculptin your kitchen, and a home made curing oven can sit right next to you while you work.Materials Needed:1 Large Coffee Can (Maxwell House ‘Flavor Seal’)Cloth or Electrical Tape1 Small Photographer’s Flood Light that matches the cans diameter.1 Low watt bulb (40 watts is fine)Step 1-DDoor: Cut out a square on the side of the can. This will become the door to theoven. Be very careful not to hurt yourself on the sharp edges.Step 2- Insulation: Cover the can and the sharp edges of the opening with cloth tape. Alsotape the outer side of the metal square you cut out and replace it with a tape ‘hinge’ tomake a door. Be sure to tape all over the edges thoroughly, as you hand will be going backand forth here a lot. You can also add a folded piece of tape at the end to act as a handleand also hold the door closed while curing pieces inside.Step 3-HHeat Element: Remove the clamp from the flood light. Rest the lamp on top andturn it on. Viola! Your own personal curing oven. Be sure to use low watt bulbs, though.Otherwise it could get too hot inside and might cause the epoxy to boil and blister.3
Making a RigIn combination with sculpting a flat tab to the feet of your sculpture, a rig will helpyou keep your fingers clear of your fresh work while also providing good grip with theleast obstruction to the underside of the piece. Rigs are fairly easy to make, and they are areusable piece of equipment, so it’s definitely worth the effort.Materials Needed:1 cork stopper (available at your local winery or arts & crafts store)2 alligator clips (check your local Radio Shack or hardware store)approx. 4”-6” of lightweight aluminum tubing (local model hobby shop)1 drill or dremel tool with matching diameter bit to aluminum piping1 jewelry wire cutter (or heavy duty wire cutter)1 or 2 metal washers slightly larger in diameter to the cork stopperEpoxy, Super GlueNeedle Nose PliersStep 1: Cut 2 equal lengths of aluminumtubing at approx. 2” (Use the needle nosepliers to restore the cut ends to their original shape.).Step 2: Drill 2 holes straight down into thecork towards the center, but approx. 1/2”apart.Step 3: Dab some super glue into the holesand stick the 2 tubes in. It is important tokeep them parallel to each other, and at the same height. After the glue sets you can reinforce them with some epoxy at the base. Glue the washers onto the bottom to add a bottom weight to the rig. Bake the epoxy to make it sturdy before moving on to step 4.Step 4: Insert the 2 alligator clips into the tops of the tubes, bend the metal on the clips asnecessary to make them fit. Be certain they are positioned parallel to one another! If theyare not square with each other, the rig won’t hold your piece right, and cause it to pop outwhile you are sculpting. It might be necessary to rely on careful dabs of super glue to setthe proper position first. After the glue has dried the clips in their proper alignment, youmust reinforce them with epoxy , shoving it down into the tops of the tubes and aroundthe clips at the tubes.There you have it! You can also do a few at a time, this will save you some effort andtime if you plan on juggling several pieces at a time.4
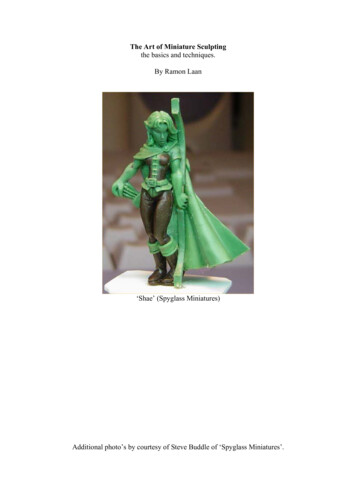
Making an ArmatureThere are many ways to make armatures, but what you’ll see here mostly is my personal approach. I use solder on my wire armatures, as I find it is the most durable and stable. Many other sculptors use putty at the cross points. You may not have a soldering ironon hand (or want to bother), but you should read over this section anyway, as there are alot of things that apply to any armature creation. The following instructions are good for ahuman armature, scale up to 30mm. If you want to go bigger, you can increase thesemeasurements accordingly.Materials Needed:Soldering Iron, wire, ruler, wire clippers, pliers,sharp hobby knife, cork board, thumb tacks, lightduty solderStep 1:Cut the bare stripped copper wire into 3 pieces.The longest being for the legs (6”), the secondlongest for the arms(4”), and the shortest for thetorso connecting them (2”).Step 2:Next you’ll may wantto agitate the surfaceof the wire with yourblade in the crossareas. This will helpmake a tighter bondwith the solder.Step 4:Measure the distancebetween the arms andlegs along the torsowire. The distanceyou’ll want is depended upon what scale,sex, and style you’regoing for.5Step 3:Pin the wires down tothe cork board likethis, with the 2” beingthe torso wire, the 4”the arms, and the 6”the legs and tab.Step 5:When soldering, youshould apply the hotiron as shown,touching both wireswhere they cross.Once both wires arethoroughly heated,bring the rosin coresolder to the opposite side of thecross, letting it meltinto the joint.
Step 6:You’ll want to make sure the cross joint iswell-soldered. You should have soldertouching all the wire’s sides. Try to avoidgetting huge blobs of solder, though.Step 8:To make the head,take your needle nosepliers and loop thehead wire. Be sure toleave a neck, then snipoff the excess wire.When using the pliers,be careful not to pinchthe wire. This can create weak points thatcan and snap.Step 7:After you pull thearmature off theboard, take yourwire cutter andsnip off the excesstorso wire at thecrotch. Get as closeas you can, but becareful not tobreak up the soldered joint.Step 9:Make careful measurements as youmove onto bendingthe joints. At suchsmall scales, a variation as much as acouple of millimeterscan distort a figuresanatomy terribly.Step 10:Bend the rest of the limbs. Loop the leg wires at the feet and then bend sharply downward. You may want to use the extra wire on the arms for weapons or cut it off at thehands. The additional wire on the legs is used to create a stable base or tab. If you createa tab with the wire, You should bend the wire into the shape of a rectangle, with the top ofthe rectangle connecting just 2 to 3 millimeters below the feet.6
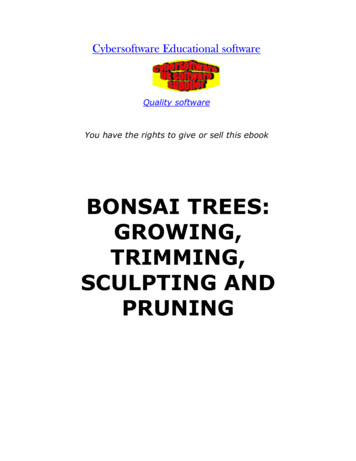
Classic Laws of AnatomyMuch about the fine arts approach to figure sculpting is disposable when regardingmini sculpture for gaming. However, this little glimpse into some of the higher principlesof rendering the human form could turn what would be a good miniature into a greatminiature.LanteriLines of Movement: An active pose will invariably feature aninvisible Line of Movement. This is a fancy name for avery simple principle. Locate the two parts of the bodymost distant from each other in any pose. This could be ahand and a foot, the head and a foot, in extreme poseseven both hands or both feet. Then imagine an unbroken'line' flowing through the form between the two points. Ifthe pose is a good one your imaginary line should have anelegant curve and 'flow' as it follows its route through thebody. Exaggerating the pose to enhance this single elegantcurve in the form is how you make use of this principle.Example: A figure stands with her right hand holding asword above her head, and her left leg extended as sheleans to her right. The Line of movement in this pose isprobably from the sword down to the left foot. With someadded exaggeration to the pose that makes the invisiblecurves of the Line of Movement more appealing to the eye,the whole figure can seem more dynamic and yet elegant.Lines of Contrast: At the same timeyou imagine and reinforce the Lineof Movement in your figure, you arealso given the opportunity to exploitthe human forms natural dispositionto counter-balance itself. As wemove, we normally shift our limbs,shoulders, and hips in opposition toeach other in order to maintain balance. So if one hip is raised slightly,the shoulder on the same side willslope downward an equal number ofdegrees to help compensate theshift in weight. By extension, if anarm is held forward and up, it islikely that the other arm might beheld to the rear and low. Further, ifa figures left hip is moved up as wellas forward, it can be visually poeticif the left shoulder is both moveddown as well as back.7Borghese
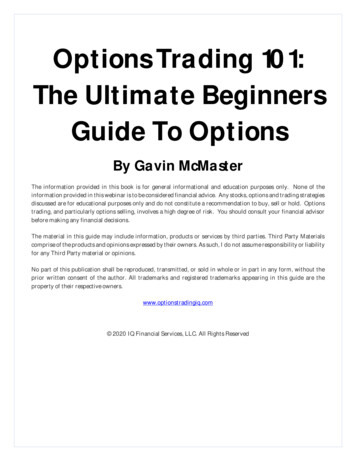
Plumb: If our body is left standing in place, our head willalways be found positioned directly above the foot set totake the majority of our body's weight for that moment. Aswe walk, we naturally move our feet to constantly maintainthis relationship. There are only three instances whenour feet are not in this relationship to our heads. 1When we are in the middle of jumping, midstride, or some other 'transitional' pose. 2 Whenwe are braced to receive an unknown burden,so we may quickly adjust to the correct footonce the new weight is known. 3 And when weare off balanced and falling.When making a figure, decide if theactivity is one of these Four. If it is a wellbalanced stance or walk, draw an imaginary 'plum' line directly down from thecenter of the head. The weight bearingfoot should be located directly belowthis imaginary 'plumb' line. If thedesired pose is 'transitional' (ie:mid-stride running) youmight want to considerchoosing a foot and favoring itover the other, since modelsmade in perfect mid-strideusually don't look comfortableto the viewer. If the pose is offbalanced, then it must be a'defeated' figure you aresculpting. If it is 'braced'then it would be important to do what you canto visually explain whythe figure is braced.Vesalius8
Laws of Miniature AnatomyThe fact that your sculpture is meant to be smaller than your thumb makes certainprinciples of mini-sculpting handy. Viewing a figure in such a scale is actually quite interpretive, since proportions must be exaggerated to make the piece visible to begin with.Consider the fact that if a human being could be shrunk down to 28 millimeters in height,she would probably have wrists and ankles as slender as a hair.Head height should probably be a bit generous. Normally large scale figure sculptorsprefer to proportion their pieces at 7.5 to 8 heads in height. Naturally many people rangearound 7.5 heads. For a miniature that would make the face so tiny no details could reallybe seen, and the form would seem more like a 'pinhead'. It is generally best to keep to 6to 7 heads proportion for miniatures.Another thing you will want to avoid in most instances is posing the figure with bothknees bent. This may sound obscure and unnatural, as we all know that there are manynatural poses where both knees are typically bent, but in 28 millimeter scale this postureoften translates to the viewer as seeming very uncomfortable or even quite lewd.Sometimes a sculptor can get away with it, but be forewarned and take care if you shouldtry.Axis: If you hope to have your figure cast you must check with your mold makers for theirrequirements for casting correctly. Your figures pose may be limited by the castingprocess.Pour: Your caster should be able to advise you on whether your figures pose present
The Beginners Guide To Sculpting Miniature Figures From Scratch Drew WWilliams SSculpting SStudio July 22003 Special GGen CCon SSeminar FIGURE SPECIALISTS FOR TOY, GAME, AND HOBBY INDUSTRIES