Transcription
QuickBooks The Basics for NonprofitsShortridge Business ServicesQuickBooks - The Basics for NonprofitsUsing QuickBooks to Better Manage Your 501(c)3TABLE OF CONTENTSPageLOADING THE PROGRAM2SETTING UP YOUR NONPROFIT1. Company information2. Editing the Chart of Accounts3. Setting up Classes4. Creating Items3ENTERING TRANSACTIONS1. Director uses a personal visa card to secure web address2. Director pays attorney for incorporation with a personal check3. Director uses a personal check to open the corporate checking account4. Pay attorney with a check to file for 501(c)(3) tax exemption5. Pay web designer for logo and website with a check6. Pay for liability insurance with a check7. Use debit card to order business cards8. Receive endowment of stocks9. Deposit a contribution10. Repay loan from director with a check11. Buy mailing list with a debit card12. Enter bill for flyers and event tickets13. Buy stamps and office supplies with the debit card14. Enter the sale of fund raiser dinner tickets and deposit the proceeds15. Enter the vendor bills from the fund raiser dinner event16. Enter a bill for program supplies17. Summary post the payroll from the payroll company reports18OTHER TRANSACTIONS AND IMPORTANT ACTIVITIES1. Enter a pledge for a future donation2. Receive a payment on a pledged donation3. Enter the receipt of an in-kind donation4. Pay bills5. Reconcile the checking account6. Backing up your data461
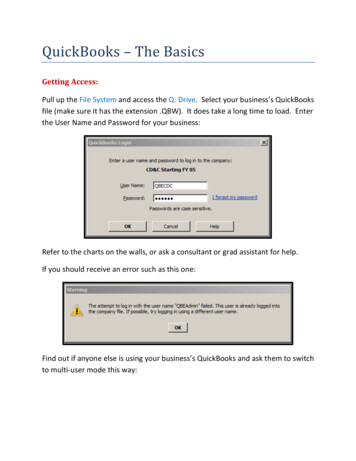
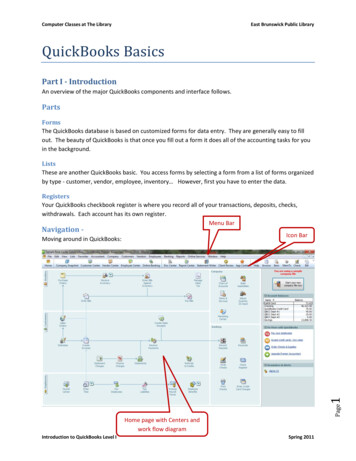
QuickBooks The Basics for NonprofitsShortridge Business ServicesLoading the Program on Your Computer1) After you have purchased a copy of QuickBooks Pro, take the CD out of the boxand insert it into your CD-ROM drive.2) Follow the simple on-screen instructions.The software will walk you through each step of the installation.If the software does not start automatically: Click Start on the Windows taskbar Choose Run Type D:\setup.exe (where D is your CD-ROM drive) Click OKAt the QuickBooks Installation screen, enter the License Number and Product Numberfrom the yellow sticker. Then click through the screens until the installation is complete.3) Start QuickBooks by double-clicking the desktop icon2
QuickBooks The Basics for NonprofitsShortridge Business ServicesSetting up Your NonprofitWhen you open QuickBooks for the first time, the Welcome screen will appear and giveyou three options.Click on Create a new company file.The EasyStep Interview screen appears and will step you through the setup process.3
QuickBooks The Basics for NonprofitsShortridge Business ServicesCOMPANY INFORMATIONEnter your company information.Select your industryScroll down and select Non-Profit.4
QuickBooks The Basics for NonprofitsShortridge Business ServicesFilename for New CompanyQuickBooks will store all your accounting information in computer files. The defaultname of the files is your company name. You can change it if you wish.What do you sell?For our example, we will only be providing services.5
QuickBooks The Basics for NonprofitsShortridge Business ServicesSales ReceiptsWe will use sales receipts to record contributions we receive.Using InvoicesWe can use invoices to record contributions pledged, but not paid immediately.6
QuickBooks The Basics for NonprofitsShortridge Business ServicesManaging BillsWe want to keep track of the bills we owe. We’ll choose yes.Start DateWe’ll use the beginning of the year. Or you could enter the first date of the month of thefirst transaction you’ll be entering into QuickBooks.7
QuickBooks The Basics for NonprofitsShortridge Business ServicesBank AccountWe can set up our checking account now.8
QuickBooks The Basics for NonprofitsShortridge Business ServicesIncome and Expense AccountsQuickBooks suggests some general income and expense accounts to save us time duringset up. We’ll put check marks beside the ones we like and set up the rest next.EDITING THE CHART OF ACCOUNTSFrom the Lists menu,select Chart of Accounts.9
QuickBooks The Basics for NonprofitsShortridge Business ServicesQuickBooks has set up a number ofaccounts for us.We will now create the rest of theaccounts we will need.Click on the Account button.Then click New.10
QuickBooks The Basics for NonprofitsShortridge Business ServicesAdd New Account:Choose Account TypeThe Loan from Director will bea Loan. Press Continue.Add New AccountEnter the account name asLoan from Director, andthen press Save & New.Enter another Other Current Liability Account called Payroll Liabilities.11
QuickBooks The Basics for NonprofitsShortridge Business ServicesEnter Website Expenses as an Expense and a Subaccount of Business Expenses.Enter Personnel Expenses as an Expense.12
QuickBooks The Basics for NonprofitsShortridge Business ServicesEnter Wages – Director, Wages – Staff, and Payroll Taxes all as Expenses andSubaccounts of Personnel Expenses.SETTING UP CLASSESWe use classes to track whether our receipts and expenditures are Restricted orUnrestricted net assets.To activate class tracking in QuickBooks, click on Edit,and then Preferences.13
QuickBooks The Basics for NonprofitsShortridge Business ServicesIn the Preferences window, click on Accounting, then Company Preferences, and thenUse class tracking. Click on OK.Now that we’ve activated the class tracking feature in QuickBooks, we can set up ourclasses.Click on Lists.And then, Class List14
QuickBooks The Basics for NonprofitsShortridge Business ServicesOn the Class List screen,click on Class.and then New.Type Restricted as the first ClassName and then press Next.Set up Unrestricted as the second Class Name.Set up G&A as a Subclass ofUnrestricted.Set up Fund Raising and Programs as Subclasses of Unrestricted as well.15
QuickBooks The Basics for NonprofitsShortridge Business ServicesSet up Tutoring as a Subclass ofPrograms.Finally, set up Basketball as aSubclass of Programs as well.Our class list looks like this:CREATING ITEMSQuickBooks requires the use of Items on donation receipts and pledge invoices. Fromthe Lists menu, select Item List.When the Item List screenappears,click on theItem button,and then New.16
QuickBooks The Basics for NonprofitsShortridge Business ServicesDonation is an Other Charge. The Item Name and Description are both Donation, andthe Rate will be left at zero because each donation may be different. The account wherewe want the funds for this item to appear on our Statement of Support and Expenses willbe Direct Public Support: Individ, Business Contributions. When done, click Next.Endowment and Pledge will also be Other Charges going to the same account.We will set up Event Ticket with additional information so there will be less typingrequired when we prepare the receipts for the ticket sales.17
QuickBooks The Basics for NonprofitsShortridge Business ServicesEntering Transactions1) Director uses Personal Visa Card to Secure Web Address.From the Banking menu, select Use Register.On the Use Register screen, type in theSelect Account field – Loan from Directorand then click OK.On the Loan from Director register, enter the Date, Reference, and Payee.18
QuickBooks The Basics for NonprofitsShortridge Business ServicesWhen we leave the Payeefield, QuickBooks prompts usto add this Payee to the Namelist. Click on Quick Add.Domain Name is an example ofOther name.anClicking on OK takes us back to the register where we enter the amount as an Increaseand the Account as Website Expenses. To enter the class, click on the Splits button.19
QuickBooks The Basics for NonprofitsShortridge Business ServicesWith the Splits box open, we can enter the Class as G&A, and then press Record.2) Director Pays Attorney for Incorporation with a PersonalCheck.On the next line of the Loan from Director register, enter all the information for thistransaction (in this case, Quick Add the Payee as a Vendor rather than an Other Name).Click on the Splits button to enter the Class, and then press Record.20
QuickBooks The Basics for NonprofitsShortridge Business Services3) Director uses a Personal Check to Open the CorporateChecking Account.From the Banking menu, click onMake Deposits.Enter the transaction details on the Make Deposits screen, then press Save & Close.21
QuickBooks The Basics for NonprofitsShortridge Business Services4) Pay Attorney a Check to file for 501(c)(3) Tax Exemption.From the Banking menu, selectWrite Checks.Enter the transaction details on the Write Checks screen, then press Save & New.22
QuickBooks The Basics for NonprofitsShortridge Business Services5) Pay Web Designer for Logo and Website with a Check.With the Write Checks screen open, enter the transaction details, then press Save & New.6) Pay for Liability Insurance with a Check.With the Write Checks screen open, enter the transaction details, then press Save & New.23
QuickBooks The Basics for NonprofitsShortridge Business Services7) Use Debit Card to order Business Cards.With the Write Checks screen open, enter the transaction details, then press Save &Close.To view the resulting financialstatements, click on Reports,Company & Financial,then Balance Sheet Standard.24
QuickBooks The Basics for NonprofitsShortridge Business ServicesThen click on Reports, Nonprofit Reports,Statement of Financial Income andExpenses.25
QuickBooks The Basics for NonprofitsShortridge Business Services8) Receive Endowment of Stocks.From the Nonprofit menu, click onEnter Donations (Sales Receipts).Enter the donor’s name in the Customer:Job field.When you press the tab key, you’llbe prompted to set up the Customer. Click on Set Up.26
QuickBooks The Basics for NonprofitsShortridge Business ServicesEnter the donor’sinformation on theNew Customerscreen, then pressOK.Enter the rest ofthe informationon the Enter SalesReceipts screen,and then pressSave & Close.27
QuickBooks The Basics for NonprofitsShortridge Business ServicesQuickBooks has automaticallyentered the endowment into theUndeposited Funds account.To move the Endowment from theUndeposited Funds into the MarketableSecurities account, click on the Bankingmenu, and then Make Deposit.On the Payments toDeposit screen, clickon the Endowmentto select it and thenpress OK.28
QuickBooks The Basics for NonprofitsShortridge Business ServicesQuickBooks automatically deposits the stocks into the Checking account fromUndeposited Funds.The program willnot allow us tochange the DepositTo account toMarketableSecurities.To correct this, weenter a second lineon the depositscreen.The -300,000zeroes out thedeposit to thechecking account and puts the stocks into Marketable Securities where they belong.9) Deposit a Contribution.Just like we did for the Endowment above, click on the Nonprofit menu, then click onEnter Donations(Sales Receipts).Fill in the Donationinformation on thescreen, Create theCustomer, and thenpress Save & Close.QuickBooks willput the donationinto theUndeposited Fundsaccount.29
QuickBooks The Basics for NonprofitsShortridge Business ServicesTo move the Donation from the Undeposited Funds into the Checking account, click onthe Banking menu and Make Deposit. On the Payments to Deposit screen, click on theDonation to select it and then press OK.Since the donationwas deposited intothe checkingaccount, we don’tneed to changeanything on theMake Depositsscreen.Click on Save &Close.10) Repay Loan from Director with a Check.From the Bankingmenu, select WriteChecks.Complete the WriteChecks screen, andthen press Save &New.30
QuickBooks The Basics for NonprofitsShortridge Business Services11) Buy Mailing List with Debit Card.With the Write Checks screen open, enter the transaction details, then press Save &Close.12) Enter Bill for Flyers and Event Tickets.From the Vendors menu,select Enter Bills.31
QuickBooks The Basics for NonprofitsShortridge Business ServicesEnter the vendor’s name, and when you tab out of the field, select Set Up.Enter the vendor’s information, and then click on the Additional Info tab.32
QuickBooks The Basics for NonprofitsShortridge Business ServicesEnter the applicable Additional Info, and then press OK.QuickBooksprefills theEnter Billsscreen with theVendor’sinformation,terms, & duedate.Enter theinvoice numberas the reference,and then enterthe rest of theinformation onthe screen.Press Save & Close.33
QuickBooks The Basics for NonprofitsShortridge Business Services13) Buy Stamps & Office Supplies with the Debit Card.Open the Write Checks screen and enter the transaction details, then press Save & Close.14) Enter the Sale of the Fund Raiser Dinner Tickets andDeposit the Proceeds.From the Nonprofitmenu, select EnterDonations (SalesReceipts).Complete a SalesReceipt for each donorwho purchased tickets,entering the Customerinformation for eachnew donor as you go.QuickBooks will putthe amounts into theUndeposited Fundsaccount.34
QuickBooks The Basics for NonprofitsShortridge Business ServicesFrom the Banking menu, select Make Deposit and check off each item that you aredepositing.Click on OK and the Make Deposits screen opens. Review the information to ensure itmatches your bank deposit slip, and then press Save & Close.35
QuickBooks The Basics for NonprofitsShortridge Business Services15) Enter the Vendor Bills from the Fund Raiser Dinner Event.On the Enter Bills screen, enter the information from the vendor’s bills.36
QuickBooks The Basics for NonprofitsShortridge Business ServicesThe resulting financial statements look like this.37
QuickBooks The Basics for NonprofitsShortridge Business Services38
QuickBooks The Basics for NonprofitsShortridge Business Services16) Enter a Bill for Program Supplies.Enter the transaction details on the Enter Bills screen.17) Summary Post the Payroll from the Payroll CompanyReports.In this example, we are assuming the following:1. A payroll company is processing the payroll.2. The payroll company is filing all payroll tax returns as needed.3. The payroll company is withdra
At the QuickBooks Installation screen, enter the License Number and Product Number from the yellow sticker. Then click through the screens until the installation is complete. 3) Start QuickBooks by double-clicking the desktop iconFile Size: 2MBPage Count: 55