Transcription
Dell E2016 MonitorUser’s GuideModel: E2016Regulatory model: E2016t
NOTE: A NOTE indicates important information that helps you make better use ofyour computer.CAUTION: A CAUTION indicates potential damage to hardware or loss of data ifinstructions are not followed.WARNING: A WARNING indicates a potential for property damage, personalinjury, or death.Copyright 2015 Dell Inc. All rights reserved. This product is protected by U.S. and internationalcopyright and intellectual property laws.Dell and the Dell logo are trademarks of Dell Inc. in the United States and/or other jurisdictions.All other marks and names mentioned herein may be trademarks of their respective companies.2015 – 07 Rev. A00
ContentsAbout Your Monitor . . . . . . . . . . . . . . . . . . . . . . . . . . . . . . . . . . . . . 5Package Contents . . . . . . . . . . . . . . . . . . . . . . . . . . . . . . . . . . .5Product Features . . . . . . . . . . . . . . . . . . . . . . . . . . . . . . . . . . . .6Identifying Parts and Controls . . . . . . . . . . . . . . . . . . . . . . . . . . . .7Monitor Specifications . . . . . . . . . . . . . . . . . . . . . . . . . . . . . . . . 8Plug-and-Play . . . . . . . . . . . . . . . . . . . . . . . . . . . . . . . . . . . . 14LCD Monitor Quality and Pixel Policy . . . . . . . . . . . . . . . . . . . . . . 14Setting Up the Monitor . . . . . . . . . . . . . . . . . . . . . . . . . . . . . . . . . . 15Attaching the Stand . . . . . . . . . . . . . . . . . . . . . . . . . . . . . . . . . 15Attaching the Vesa Cover. . . . . . . . . . . . . . . . . . . . . . . . . . . . 17Connecting Your Monitor . . . . . . . . . . . . . . . . . . . . . . . . . . . . . 17Organizing Your Cables . . . . . . . . . . . . . . . . . . . . . . . . . . . . . . 18Removing the Vesa Cover . . . . . . . . . . . . . . . . . . . . . . . . . . . . . 18Removing the Monitor Stand . . . . . . . . . . . . . . . . . . . . . . . . . . . 19Wall Mounting (Optional) . . . . . . . . . . . . . . . . . . . . . . . . . . . . . 20Operating the Monitor . . . . . . . . . . . . . . . . . . . . . . . . . . . . . . . . . . 21Turning on the Monitor . . . . . . . . . . . . . . . . . . . . . . . . . . . . . . . 21Using the Front Panel Controls . . . . . . . . . . . . . . . . . . . . . . . . . . 21Using the On-Screen Display (OSD) Menu . . . . . . . . . . . . . . . . . . . 23Using Tilt . . . . . . . . . . . . . . . . . . . . . . . . . . . . . . . . . . . . . . . 34 Contents 3
Troubleshooting . . . . . . . . . . . . . . . . . . . . . . . . . . . . . . . . . . . . . . . . 35Self-Test . . . . . . . . . . . . . . . . . . . . . . . . . . . . . . . . . . . . . . . . 35Built-in Diagnostics . . . . . . . . . . . . . . . . . . . . . . . . . . . . . . . . . 36Common Problems . . . . . . . . . . . . . . . . . . . . . . . . . . . . . . . . . 37Product Specific Problems . . . . . . . . . . . . . . . . . . . . . . . . . . . . . 39Appendix . . . . . . . . . . . . . . . . . . . . . . . . . . . . . . . . . . . . . . . . . . . . . . . 40Safety Instructions . . . . . . . . . . . . . . . . . . . . . . . . . . . . . . . . . .40FCC Notices (U.S. only) and Other Regulatory Information . . . . . . . . .40Contacting Dell . . . . . . . . . . . . . . . . . . . . . . . . . . . . . . . . . . . 40Setting Up Your Monitor . . . . . . . . . . . . . . . . . . . . . . . . . . . . . . 41Maintenance Guidelines . . . . . . . . . . . . . . . . . . . . . . . . . . . . . . 424 Contents
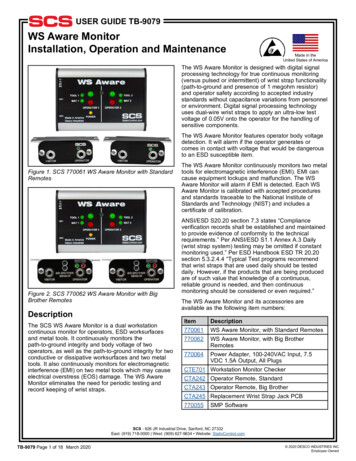
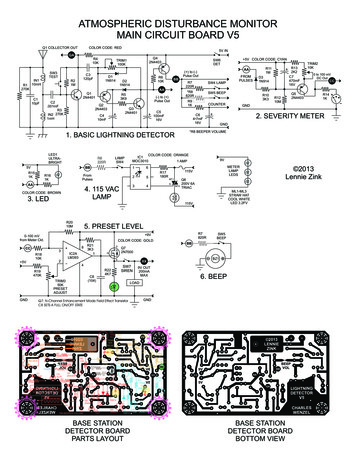
About Your MonitorPackage ContentsYour monitor ships with the components shown below. Make sure that you havereceived all the components and contact Dell if something is missing.NOTE: Some items may be optional and may not ship with your monitor.Some features or media may not be available in certain countries.MonitorStand riserStand baseVesa coverPower cable (varies by country)About Your Monitor 5
VGA Cable Drivers and documentation media Quick Setup Guide Safety and Regulatory InformationProduct FeaturesThe Dell E2016 flat panel display has an active matrix, thin-film transistor (TFT), liquidcrystal display (LCD), and LED backlight. The monitor features include: 49.40 cm (19.45 inch) active area display (Measured diagonally) 1440 x 900resolution, plus full-screen support for lower resolutions. Tilt capability. Removable pedestal and Video Electronics Standards Association (VESA ) 100 mmmounting holes for flexible mounting solutions. Plug and play capability if supported by your system. On-Screen Display (OSD) adjustments for ease of set-up and screen optimization. Software and documentation media includes an information file (INF), Imagecolor Matching File (ICM), Dell Display Manager software application and productdocumentation. Dell Display Manager included (comes in the CD attached with themonitor). Security lock slot. Asset Management Capability. Energy Star Compliant. EPEAT Silver Compliant. RoHS compliant. BFR/PVC- reduced. Arsenic-Free glass and Mercury Free for Panel only. Energy Gauge shows the energy level being consumed by the monitor in real time. TCO Certified Displays. Analog backlight dimming control for flicker free display. CECP (for China only).6 About Your Monitor
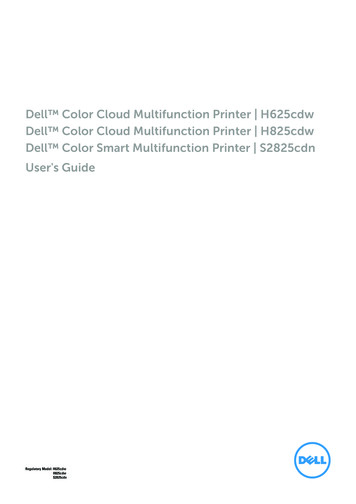
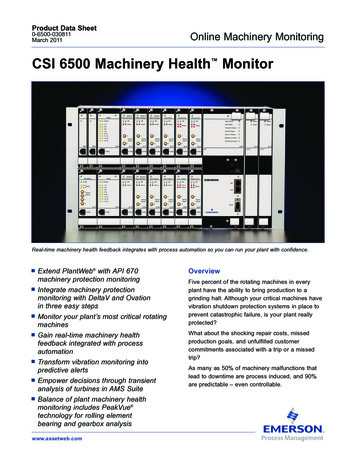
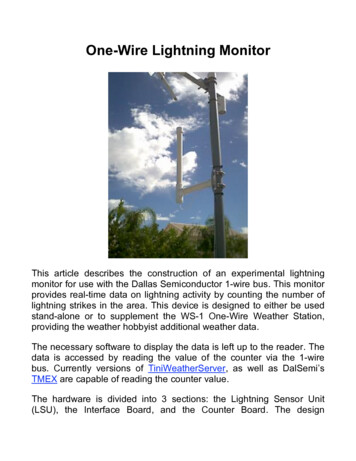
Identifying Parts and ControlsFront viewLabel12DescriptionFunction buttons (For more information, see Operating the Monitor)Power on/off button (with LED indicator)Back ViewLabel Description1VESA mounting holes(100 mm x 100 mm - behindattached VESA cover)2Regulatory label3Security-lock slotUseWall mount monitor using VESA‑compatiblewall mount kit (100 mm x 100 mm).5Lists the regulatory approvals.Secures monitor with security lock(sold separately).Barcode serial number labelRefer to this label if you need to contact Dell fortechnical support.NOTE: Service tag printing (EMEA region only).Dell Soundbar mounting slots Attaches the optional Dell Soundbar.6Cable-management slot4Use to organize cables by placing them throughthe slot.About Your Monitor 7
Bottom ViewLabel Description1AC power connector2VGA portUseTo connect the monitor power cable.Connect your computer with VGA cable.Monitor SpecificationsFlat Panel SpecificationsScreen typePanel typeViewable image:DiagonalActive Area:HorizontalVerticalAreaPixel pitchViewing angle:HorizontalVerticalLuminance outputContrast ratio8 About Your MonitorActive matrix - TFT LCDIn-plane switching type49.40 cm (19.45 inches)418.61 mm (16.48 inches)262.35 mm (10.33 inches)109821.81 mm2 (170.22 inch2)0.2915 mm x 0.2915 mm178 (typical)178 (typical)250 cd/m² (typical)1000:1 (typical)
Faceplate coatingBacklightResponse timeColor depthColor gamut (typical)AG type, hard-coating 3HLED6ms Typ. g-to-g with OD (Fast mode)16.7 million colors72%* (CIE1931)*Color gamut (typical) is based on CIE1976 (85%) and CIE1931 (72%) test standards.Resolution SpecificationsHorizontal scan range30 kHz to 83 kHz (automatic)Vertical scan range56 Hz to 76 Hz (automatic)Maximum preset resolution1440 x 900 at 60 HzVideo display capabilities480i, 576i, 480p, 576p, 720pPreset Display ModesDisplay ModeHorizontalFrequency(kHz)VerticalPixel ClockFrequency (Hz) (MHz)Sync Polarity(Horizontal/Vertical)720 x 40031.477028.32-/ 640 x 48031.476025.18-/-640 x 48037.507531.50-/-800 x 60037.886040 / 800 x 60046.887549.50 / 1024 x 76848.366065-/-1024 x 76860.027578.75 / 1152 x 86467.5075108 / 1280 x 10246460108 / 1280 x 10248075135 / 1280 x 80049.706083.50-/ 1440 x 90055.9460106.50-/ 1440 x 90070.6075136.75-/ About Your Monitor 9
Electrical SpecificationsVideo input signalsAnalog RGB, 0.7 Volts /-5%, positive polarity at75 ohm input impedanceSynchronization input signalsSeparate horizontal and vertical synchronization,polarity-free TTL level, SOG (Composite SYNC ongreen)100 VAC to 240 VAC/50 Hz or 60 Hz 3 Hz/1.5 A (Max.)120 V:30 A (Max.)240 V:60 A (Max.)AC input voltage/frequency/currentInrush currentPhysical CharacteristicsConnector type15-pin D-subminiature (black connector).Signal cable typeAnalog: Detachable, D-Sub, 15 pins.Dimensions (with stand):HeightWidthDepthDimensions (without stand):HeightWidthDepthStand dimensions:HeightWidthDepthWeight:With packagingWith stand assembly and cablesWithout standassembly (for wall mount or VESAmount considerations - nocables)Stand assembly10 About Your Monitor390.95 mm (15.39 inches)454.21 mm (17.88 inches)180 mm (7.09 inches)297.95 mm (11.73 inches)454.21 mm (17.88 inches)50.99 mm (2 inches)176.80 mm (6.96 inches)250 mm (9.84 inches)180 mm (7.09 inches)4.18 kg (9.22 lb)3.05 kg (6.72 lb)2.29 kg (5.05 lb)0.52 kg (1.15 lb)
Environmental umidity:Operating0 C to 40 C (32 F to 104 F)–20 C to 60 C (–4 F to 140 F)10% to 80% (non-condensing)Non-operating5% to 90% rmal dissipation5,000 m (16,404 ft) (maximum)12,192 m (40,000 ft) (maximum) 68.24 BTU/hour (maximum) 54.59 BTU/hour (typical)Power Management ModesIf you have VESA’s DPM-compliant video card or software installed in your PC, themonitor can automatically reduce its power consumption when not in use. This isreferred to as power save mode*. If the computer detects input from the keyboard,mouse, or other input devices, the monitor automatically resumes functioning. Thefollowing table shows the power consumption and signaling of this automatic powersaving feature.VESAModesNormaloperationHorizontal Vertical Video PowerSyncSyncIndicatorActiveActiveActive WhiteActive-offmodeInactiveSwitch off -Inactive Off--Power Consumption20W (maximum)**16W (typical)Breathing White Less than 0.3 W(blinking slowly)OffLess than 0.3 WEnergy StarPower ConsumptionOn Mode13.44 W***About Your Monitor 11
The OSD operates only in the normal operation mode. If you press any button in theactive-off mode, the following message is displayed:*Zero power consumption in OFF mode can only be achieved by disconnecting thepower adapter from the monitor.**Maximum power consumption with maximum luminance.***Energy consumption (On Mode) is tested at 230 Volts / 50 Hz.This document is informational only and reflects laboratory performance. Yourproduct may perform differently, depending on the software, components andperipherals you ordered and shall have no obligation to update such information.Accordingly, the customer should not rely upon this information in makingdecisions about electrical tolerances or otherwise. No warranty as to accuracy orcompleteness is expressed or implied.Activate the computer and the monitor to gain access to the OSD.NOTE: This monitor is ENERGY STAR -compliant.12 About Your Monitor
Pin AssignmentsVGA portPin number15-pin side of the connected signal st6GND-R7GND-G8GND-B9Computer 5 V / 3.3 V10GND-sync11GND12DDC data13H-sync14V-sync15DDC clockAbout Your Monitor 13
Plug-and-PlayYou can install the monitor in any Plug-and-Play-compatible system. The monitorautomatically provides the computer system with its extended display identification data(EDID) using display data channel (DDC) protocols so the computer can configure itselfand optimize the monitor settings. Most monitor installations are automatic; you canselect different settings if desired. For more information about changing the monitorsettings, see Operating the Monitor.LCD Monitor Quality and Pixel PolicyDuring the LCD monitor manufacturing process, it is not uncommon for one or morepixels to become fixed in an unchanging state which are hard to see and do not affectthe display quality or usability. For more information on LCD Monitor Pixel Policy, seeDell support site at: � About Your Monitor
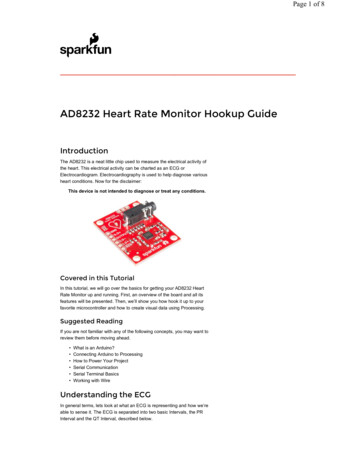
Setting Up the MonitorAttaching the StandNOTE: The stand riser and stand base are detached when the monitor is shippedfrom the factory.NOTE: The procedure below is applicable for the default stand. If you purchasedany other stand, see the documentation shipped with the stand to set it up.CAUTION: Do not remove the monitor from the packaging box before attachingthe stand.Attach the stand assembly to the monitor.1 Follow the instructions on the flaps of carton to remove the stand from the topcushion that secures it.2 Connect the stand riser to stand base.3Lift the cover, as shown.Setting Up the Monitor 15
4Insert the two tabs on the upper part of the stand in the slots on the back ofthe monitor till it snaps into its place.Place the monitor upright.1 Slide one hand in the cutout area on the bottom cushion and use the otherhand to hold the stand.2 Lift the monitor carefully to prevent it from slipping or falling.3 Remove the cover from the monitor.CAUTION: Do not press on the panel screen when lifting the monitor.16 Setting Up the Monitor
Attaching the Vesa CoverNOTE: The vesa cover is detached when the monitor is shipped from the factory.12Insert the two tabs on the upper part of the vesa cover in the slots on theback of the monitor.Press the vesa cover till it snaps into place.Connecting Your MonitorWARNING: Before you begin any of the procedures in this section, follow theSafety Instructions.To connect your monitor to the computer:1 Turn off your computer.2 Connect the VGA cable from your moni
The Dell E2016 flat panel display has an active matrix, thin-film transistor (TFT), liquid crystal display (LCD), and LED backlight. The monitor features include: 49.40 cm (19.45 inch) active area display (Measured diagonally) 1440 x 900 resolution, plus full-screen support for lower resolutions. Tilt capability. Removable pedestal and Video Electronics Standards Association (VESA .