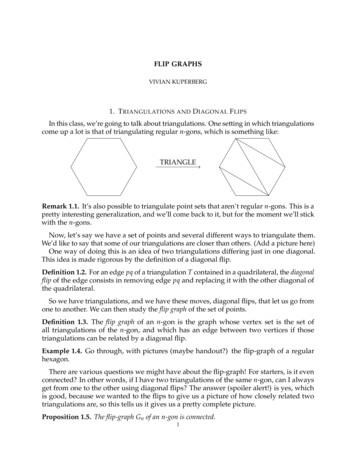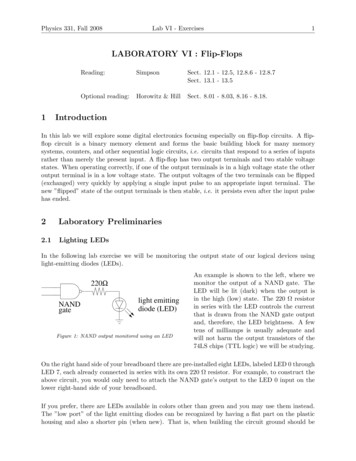
Transcription
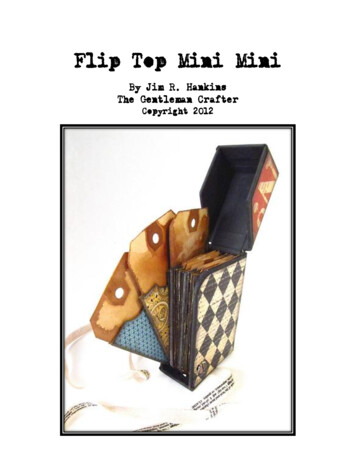
Flip Top Mini MiniBy Jim R. HankinsThe Gentleman CrafterCopyright 2012
Flip Top Mini MiniMaterials:1 Piece of Med. Weight Chipboard2 Sheets of Graphic 45 Olde Curiosity Shoppe Paper10 2-1/4 x 3-1/2" Coin Envelopes1 1-1/2" Metal Album Extension1 Graphic 45 Mini Brad12x12 Piece of Kraft card stock or similar card stock weight paper Scor-tape or glue ofchoice Scrap Pieces of Graphic 45 Olde Curiosity Shoppe Paper Acrylic PaintStep 1Cut all the pieces from the med. weight chipboard.2-Main side pieces 2-3/8 x 3-5/8Spine piece 1-3/8 x 3-5/8Bottom piece 1-3/8 x 2-3/8Top side pieces 2-1/2 x 1-3/8Top piece 1-3/8 x 2-1/2Front piece 1-3/8 x 1-3/81
Step 2:Main Box ComponentUsing the Kraft card stock, apply tape, glue or ATG, to the back side of the bottompiece and subsequent pieces of the precut chipboard pieces.Measure up from the bottom 1/2" and mark a line across the bottom. Next, place thebottom piece on the marked line.Leaving a 1/8 inch gap between all pieces, place your spine piece right above thebottom piece. Add the two Main Side pieces to each side of the spine piece makingsure to leave a 1/8 inch gap.2
Using your ruler and pencil, draw a 1/2" line around all sides of the adhered chipboardpieces. Using scissors or a craft knife, Cut on the lines creating a border that will be thetabs used to make the box.3
Next, cut a 1 x 12 inch piece of card stock. Score it down the middle at 1/2 inch. ApplyScor-tape or similar to each side of the score mark. This will be our structure strip.The strip will add integrity to the box. Next, cut two 3-5/8" pieces and one 1-3/8"piece. Starting with one of the 3-5/8" pieces, pull the tape backing and apply it to the1/8" gap of the left side and spine, making sure the score line lines up with the gap.Repeat for the right side and the 1-3/8" piece.4
Using scissors or a craft knife, cut from the outside corner into the chipboard corner.Repeat for other side. Now, miter all corners.Apply Scor-Tape or similar to all edges. Starting at the bottom, pull backing from tapeand fold bottom border tab up and onto exposed tape. Repeat for all sides except for1-3/8" side piece. However, tape the tab for the top of the 1-3/8 inch piece. The sidetabs on the 1-3/8" piece will be what holds the box together.5
Slowly bend the pieces into a box shape. Next, pull the tape from one side of the 13/8" piece, align the two sides together former a corner and adhere the tab to the sidepiece. Repeat for right side.6
Step 3:Flip Top Lid ComponentYou will basically repeat step two for the flip lid, using the remaining chipboard pieces,Gluing them in place, leaving 1/8 gap, cutting out a 1/2" border, applying the structurestrips for strength, cutting into the corners, mitering the border corners, apply scoretape and adhering the lid together.The lid should be 1/8" larger to slip over the end of the main box.7
Cut two pieces of the structure strips to 5/8". Place the flip lid onto the main box andapply one of the structure strips to the top of the lid and then onto the top of the spinepiece. Now open the lid and repeat this process for the interior. This will be the hinge.8
Step 4:Adding the PagesMeasure and mark at 1/2" in from side piece and 1/2" in from bottom piece of the box.Using a crop-o-dile or a craft pick, punch a 3/16" hole on both sides of the box.Using a 1/2" corner chomper, chomp the lower left side of the coin envelopes; makingsure they are all in the same direction. Using your crop-o-dile, pick, or 3/16" holepunch, punch a hole in the lower left rounded side using the same measurements aswere used for the box side pieces.9
Next, cut the flap of each coin envelope off with scissors or trimmer. The measurementfor this is 3-1/2". With a 1" circle punch, punch a 1/2" semi-circle from the top edge ofthe envelope. Insert a tag. Set aside.This is a good time to mat your pages (envelope).Step 5:Matting your boxPaint or ink all edges and interior if desired.Next, from patterned paper, measure and cut out all of your exterior mats pieces andadhere to all sides using glue, ATG or Scor-Tape. Re-punch holes.Note: For quicker work.You may choose to mat all pieces first, then punch holes andchomp corners.10
Step 6:Putting it TogetherOn the box, insert the 1-1/4 album extension post through one of the sides. Add all tenpages and bring the post through to the other side and insert screw.If you wish, you may alcohol ink the screw heads with Ranger's Espresso Alcohol Ink.Add a Graphic 45 Mini Brad in the center of the top front lid.Glue a piece of Graphic 45 Trim to the bottom of the box, making sure there isapproximately 9 to 10 inches on each side. Bring ribbon up to top and tie into a bow.Viola! A Flip Top Mini Mini! You Did It!Fill the pages with pictures and the tags with written memories.Hope you enjoy making this unusual mini mini!JimThe Gentleman Crafter11
12
Add a Graphic 45 Mini Brad in the center of the top front lid. Glue a piece of Graphic 45 Trim to the bottom of the box, making sure there is approximately 9 to 10 inches on each side. Bring ribbon up to top and tie into a bow. Viola! A Flip Top Mini Mini! You Did It! Fill the pages with pictures and the tags with written memories.