Transcription
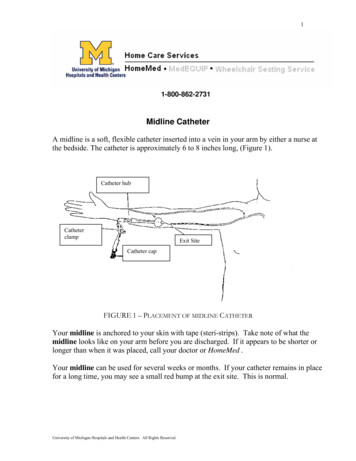
11-800-862-2731Midline CatheterA midline is a soft, flexible catheter inserted into a vein in your arm by either a nurse atthe bedside. The catheter is approximately 6 to 8 inches long, (Figure 1).Catheter hubCatheterclampExit SiteCatheter capFIGURE 1 – PLACEMENT OF MIDLINE CATHETERYour midline is anchored to your skin with tape (steri-strips). Take note of what themidline looks like on your arm before you are discharged. If it appears to be shorter orlonger than when it was placed, call your doctor or HomeMed .Your midline can be used for several weeks or months. If your catheter remains in placefor a long time, you may see a small red bump at the exit site. This is normal.University of Michigan Hospitals and Health Centers. All Rights Reserved.
2KEY POINTS ON CATHETER CARE1. Your catheter MUST be flushed every 12 hours even when you are not infusingfluid or medication.2. Cover the area around the midline withplastic wrap before bathing orshowering. Tape above andbelow the midline dressing3. The exit site should be covered with the transparent dressing at all times todecrease catheter infection. The dressing should be changed ONCE a week.4. If the dressing becomes loose or soiled before the scheduled dressing change, youand your caregiver will need to follow the directions to clean the area and apply anew dressing.5. During the summer months youmay need to change your dressing morefrequently.6. You must clean the skin with a ChloraPrep swabstick before replacing your dressing.7. Carefully inspect the site for any signs of infection (swelling, redness, drainage ortenderness).8. The extension tubing and catheter cap should be changed once a week with eachdressing change.University of Michigan Hospitals and Health Centers. All Rights Reserved.
3STEPS TO MINIMIZE CONTAMINATIONThe term "sterile" will be used frequently. A product is sterile after undergoing aspecial process that eliminates germs. Steps that you can take to minimizecontamination are as follows:1. Before starting any procedure, ALWAYS wash your hands thoroughly with anantibacterial soap such as Dial . This will decrease the chance of infection.2. Select a work area free of dust and drafts and away from household traffic suchas a spare bedroom. Keep this area free of dust, lint, and clutter. Pets shouldnot be allowed in these areas. Adequate light should be provided. Do not usebathrooms, as they are likely to be places that have a large number of germs.3. A stable tray, Formica or similar products (e.g., metal, glass or Plexiglas)placed over a dresser or end table can be used. Clean work surface with ahousehold cleaner such as alcohol, bleach or dish soap, or you may place aclean paper towel on work surface. Nothing should be stored on the tablesurface.4. Work at a comfortable pace. The risk of contamination increases if you rushthrough the procedures.5. Store all your medication solutions and supplies away from other householditems. Do not store urine test kits, ostomy supplies or similar items with anymedication or supplies.6. Keep all supplies, especially medication, needles and syringes, out of the reachof children and pets.7. Make sure each item is sterile by checking for visible signs of contaminationsuch as an opened package or cloudy fluid. A good rule of thumb to follow is:when in doubt - throw it out. Call HomeMed as to whether to throw the itemaway or return it to us.8. When piercing, opening, or connecting sterile items, allow only sterile surfacesto touch other sterile surfaces. Never touch sterile parts with your hands orallow a sterile item to contact a non-sterile surface. Parts of supplies that mustbe kept sterile are protected with a cover.9. If you are inserting a sterile needle through a non-sterile surface, always use analcohol wipe to clean the surface. Never retouch this area after cleaning it.10. Contaminated or damaged supplies should NEVER be used (for example: ifprotective coverings have fallen off medication vials).University of Michigan Hospitals and Health Centers. All Rights Reserved.
4HANDWASHINGThorough handwashing is a very important step before any catheter care procedurebecause it decreases the risk of infection. Washing will clean hands, but notsterilize them, so care must still be taken when handling your catheter or supplies.An antibacterial soap like Dial may be used.Wound, ostomy, or fistula care MUST be done separately from catheter careprocedures. Germs normally live in your intestinal tract and in ostomy or fistulafluids. If these germs or germs from improperly washed hands enter yourbloodstream through the catheter or medication solution they could cause asevere blood infection (septicemia).Procedure:1. Turn on water and adjust to warm. Leave water running throughout the entireprocedure.2. Wet your hands and wrists under the running water.3. Apply antibacterial soap and scrub VIGOROUSLY for 15 seconds. Worklather between fingers and under nails, over palms and back of hands.4. Rinse hands and wrists under running water with your fingers pointing uptowards the ceiling.5. Dry hands with clean paper towel from the tips of the fingers down. Turn offthe water with a paper towel.If you wish, you may also use a waterless soap to clean your hands. You may notbe able to use waterless soap if you have a rash or cuts on your hands. This isbecause waterless soap contains ethyl alcohol that may cause a stinging or burningfeeling. If this occurs, use an antibacterial soap. Also, do not use a waterless soapif your hands become soiled with body fluids.1.Place a dime size amount of gel into one hand.2.Rub into palms and backsides of hands and betweenfingers.3.Rub gently for about 10 seconds and let air dry.TIP:Off-brand hand gels can be lessexpensiveAlways check the label for the gelor lotion to contain either ethylalcohol (ethanol),normal propyl alcohol(n-propyl) or isopropyl alcohol inconcentrationsbetween 60-90%University of Michigan Hospitals and Health Centers. All Rights Reserved.
5FLUSHING YOUR CATHETERThe instructions below are to be followed only if you are not infusing medicationthrough your catheter. If you are infusing medications, refer to the administrationsheets given to you. The catheter must be flushed twice a day when not in use.KEY POINTS:1. Check the syringe for leaks, expiration dates, color changes and floatingmaterials. If any of these occur, set aside and use another. NotifyHomeMed.2. Always check the bag label for your name, drug name, dose and howfrequently you should flush the catheter. If the information does not match,call HomeMed immediately.MATERIALS:(1) prefilled heparin flush syringe for each lumen of catheter(1) blunt needle for each prefilled syringeAlcohol wipes (1 for each lumen)Antibacterial soapPaper towelsProcedure:1. Place a trash can next to your work area.2. Wash your hands by first wetting your hands and wrists underrunning water. Scrub vigorously with antibacterial soap for 15seconds. Work lather between fingers, under nails, over thepalms and back of hands. Rinse hands well by keeping yourhands up with fingers pointing up towards the ceiling so that the dirty waterruns toward your elbows. Dry your hands with a clean paper towel fromthe tips of fingers down. Turn off the faucet with the paper towel.3. Gather your supplies and place in a corner of your work area.4. Place a clean paper towel on your work surface or clean it with a householdcleaner. Let the area air dry.5. Place the supplies on your clean work area.University of Michigan Hospitals and Health Centers. All Rights Reserved.
6PREPARING YOUR HEPARIN FLUSH SYRINGE1. Remove syringe from package.2. Hold the prefilled heparin syringe upward(figure 1).Figure 13. Do not remove the cap. Push on the plunger(figure 1). DO NOT pull back on theplunger.4. Remove the protective cap from the end ofthe prefilled syringe (figure 2).5. Attach a blunt needle to the syringe by:Figure 2Twisting the green cap off the blunt needle.Attach the needle to the syringe by turningthe needle clockwise. Do not remove thegray cap that protects the blunt needle.6. Hold the syringe with the needle pointingupward. If bubbles appear, gently tap thesides of the syringe. The bubbles will rise tothe top of the syringe.Figure 37. Push the plunger to the 5 mL mark to pushall the air out of the syringe (figure 3).FLUSHING YOUR CATHETER1. Vigorously scrub the end of the cap on your catheter with an alcohol wipe.2. Remove the protective covering from the blunt needle of your heparin locksyringe.3. Insert the blunt needle of the heparin syringe into thecatheter cap and inject the heparin solution with a pumpingaction. When 0.5 mL remains in the syringe, gently pushforward on the syringe catheter while clamping the catheter.(“Pump-pump-push and clamp”)University of Michigan Hospitals and Health Centers. All Rights Reserved.
74. Dispose of the syringe in your sharps container.5. The cap on your catheter does not need to be covered. You will need to clean the capwhen you give your next dose of medication or flush the catheter.DRESSING CHANGE PROCEDURE USING A TRANSPARENT DRESSINGKey Points:1.Change the dressing once a week or more frequently if it becomes soiled,loose, or wet.2.Avoid pulling, bending, or kinking the catheter unnecessarily to prevent thecatheter from cracking and leaking.3.Apply a plastic wrap and tape it above and below the exit site or put on a longarm glove when showering or bathing.Supplies:(1) PICC Dressing Change Kit which contains the following:(1) pair of sterile gloves(1) ChloraPrep swabstick packet (3 per package)(1) gauze sponge(1) skin prep pad(1) transparent dressing(1) sterile drape(1) Grip-loc securement device (separate from dressing kit)Paper towelsProcedure:1. Wash your hands.2. Gather supplies and place them in a corner of the work area.3. Clean your work area.4. Open the dressing kit. Remove sterile drape. Open drape and place on yourwork surface. Place the contents of the kit on the sterile drape.5. Remove the old transparent dressing. Do this by pulling the dressing onecorner at a time toward the catheter exit site. After all the corners areloosened, hold the catheter down and pull the dressing up and off. DO NOTTOUCH the skin or catheter that was under the dressing.University of Michigan Hospitals and Health Centers. All Rights Reserved.
86. Carefully inspect the exit site for any sign of infection (swelling, redness,drainage, or tenderness). If any of these signs are present, notify yourphysician or HomeMed after finishing the dressing change procedure.7. Remove the ChloraPrep swabsticks from the package one at a time.8. Gently press the swabstick against the catheter exit site. Carefully clean thearea around the catheter by using a back and forth motion for 30 seconds.Completely clean an area 2 inches around the catheter exit site. Repeat witheach swabstick. (Figure 1).Figure 1 – Cleaning the Skin Around the Catheter9. Allow the ChloraPrep to air dry for approximately 30 seconds. Do not blotor wipe away. Do not fan or blow on area.10. Discard the swabsticks after a single use.11. Apply skin prep to the area around the catheter exit site, starting 1 inch awayfrom the catheter and working outward. Let dry until smooth and shiny.12. Peel the backing from the dressing.13. Apply the dressing by placing the center of the transparent window over thecatheter exit site, while holding the split side of the dressing off the skin. Then,overlap the softcloth tabs under the catheter this should form a tight sealaround catheter disc.14. Press dressing into place.15. Slowly remove the frame on the dressing while smoothing down the dressingedges. Smooth from the center toward the edges, using firm pressure.University of Michigan Hospitals and Health Centers. All Rights Reserved.
916. Take one steri-strip from the frame of the dressing. Criss-cross or “butterfly” itaround the catheter and attach it over the dressing. (Figure 2)17. Place the other steri-strip over the butterfly to hold it in place. Split areaFigure 2 – Placement of Steri-strips Top FlapFigure 3 - Placement of Grip-Lok18. Open Grip-lok package.19. Peel the paper backing from the Grip-lok and place under the catheter on thesplit area of PICC dressing. (Figure 3)20. Lift the top flap and remove the paper backing where it says “peel”.(Figure 3)21. Place catheter tubing on bottom adhesive strip.22. Place top flap over the tubing so that the tubing is placed betweenadhesive strips and top flap is secured. (Figure 3)University of Michigan Hospitals and Health Centers. All Rights Reserved.
10EXTENSION TUBING AND CATHETER CAP CHANGEKEY POINTS:1. The extension tubing and catheter cap should be changed weekly on eachlumen of your catheter.2. Change the extension tubing and catheter cap when you do your dressingchange.Supplies:(1) extension tubing for each catheter lumen(1) Catheter cap for each catheter lumen(1) prefilled heparin flush (blunt needle attached) for each catheter lumenAlcohol wipesProcedure:1. Wash hands, gather supplies. Close the clamp on the midline catheter (orextension tubing).2. Open the catheter cap and the extension tubing packages.3. Remove the clear protective cover from the end of the catheter cap. Removethe protective cover from the extension tubing.4. Attach the catheter cap to the extension tubing by twisting clockwise.5. Remove the protective covering from the blunt needle of your heparin locksyringe.6. Insert the blunt needle of the heparin syringe into the catheter cap and injectthe heparin solution.7. Push the syringe plunger until you see fluid coming through the end. Leave theblunt needle/syringe inserted in the catheter cap and place on the openextension tubing wrapper.8. Wrap an alcohol wipe around both the ends of the old extension tubing and themidline at the catheter hub.9. Remove the old IV extension tubing by twisting counter clockwise. Quicklyremove the protective cover from the end of the new extension tubing andattach to the midline by twisting clockwise.6. Flush the remaining heparin flush into your catheter. Place the syringe(s) and bluntneedle(s), into the sharps containerUniversity of Michigan Hospitals and Health Centers. All Rights Reserved.
11CATHETER PROBLEMSCatheter problems may occur but may be prevented by carefully following the instructionsgiven to you. Below are a list of the signs and symptoms, what to do should they occur, andhow to avoid them.INFECTION:BLOOD INFECTIONFevers and chills.WHAT TO DOCall your physician.HOW TO AVOID IT?Follow instructions at all times toavoid contaminating the catheter.Wash your hands with antibacterialsoap.EXIT SITE INFECTIONFoul odor, oozing drainage,pain or heat at exit site.Change dressing if loose or wet.Do not use contaminated supplies.OCCLUSION:There is a blockage thatprevents the infusion tocontinue and you are unable toflush the catheter using normalgentle pressure.BREAK or ACCIDENTALCUT IN CATHETERLeaking of fluid from the breakor cut area.An internal leak could causeswelling of the arm which willbe cool to touch and painful.WHAT TO DODo not use extra pressure.Check for closed clamps,kinks in the tubing orcatheter. Open clamps. Ifthese are not the causethere may be a clot in thecatheter. Call yourphysician or Homemed.HOW TO AVOID IT?Flush the catheter as instructed,when the infusion is completed oronce a day if no infusions arescheduled.WHAT TO DOHOW TO AVOID ITClamp the catheter betweenthe skin (exit site)STOP THE INFUSION.Call your physician thecatheter will need to berepaired or replaced.Do NOT use scissors near thecatheter.Flush the catheter if blood hasbacked up into the extension.Never use excessive force to flushthe catheter.Never use a syringe smaller than10mL size to flush or infusemedication.THROMBOSISArm (on same side as yourcatheter) becomes swollen andcool to touch. May also causeswollen neck, chest, or armveins.WHAT TO DOSTOP THE INFUSION.Call your physicianimmediately.University of Michigan Hospitals and Health Centers. All Rights Reserved.HOW TO AVOID ITNone
Midline Catheter . A midline is a soft, flexible catheter inserted into a vein in your arm by either a nurse at the bedside. The catheter is approximately 6 to 8 inches long, (Figure 1). Catheter hub . Catheter clamp . Exit Site. Catheter cap . FIGURE 1 - PLACEMENT OF MIDLINE CATHETER. Your midline is anchored to your skin with tape (steri .