Transcription
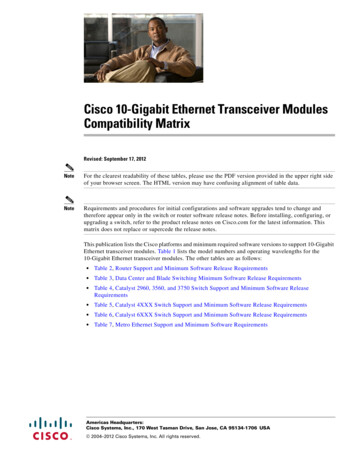
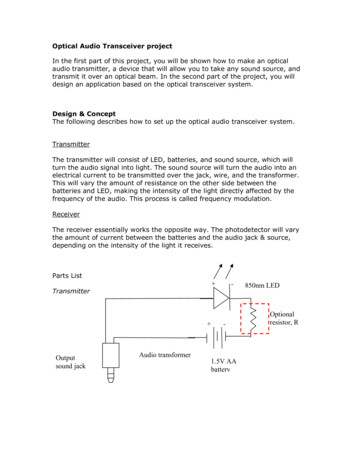
Optical Audio Transceiver projectIn the first part of this project, you will be shown how to make an opticalaudio transmitter, a device that will allow you to take any sound source, andtransmit it over an optical beam. In the second part of the project, you willdesign an application based on the optical transceiver system.Design & ConceptThe following describes how to set up the optical audio transceiver system.TransmitterThe transmitter will consist of LED, batteries, and sound source, which willturn the audio signal into light. The sound source will turn the audio into anelectrical current to be transmitted over the jack, wire, and the transformer.This will vary the amount of resistance on the other side between thebatteries and LED, making the intensity of the light directly affected by thefrequency of the audio. This process is called frequency modulation.ReceiverThe receiver essentially works the opposite way. The photodetector will varythe amount of current between the batteries and the audio jack & source,depending on the intensity of the light it receives.Parts List Transmitter Outputsound jackAudio transformer--1.5V AAbattery850nm LEDOptionalresistor, R
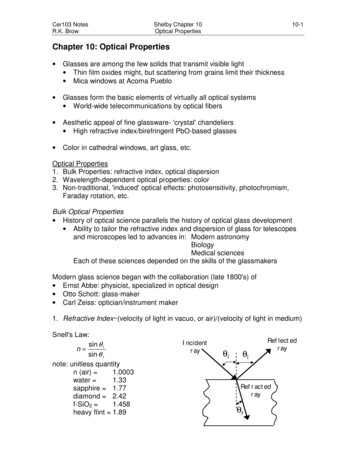
850nm LED (OP265AD, 15.5mW/cm 2, 1.8V, 20mA) Battery (1xAA) Sound Source with an Output Jack An earphone jack to fit the sound source Wires, solder, and soldering ironcathodeReceiver850nmphotodetetor -Microphonejack to yourcomputer- optional
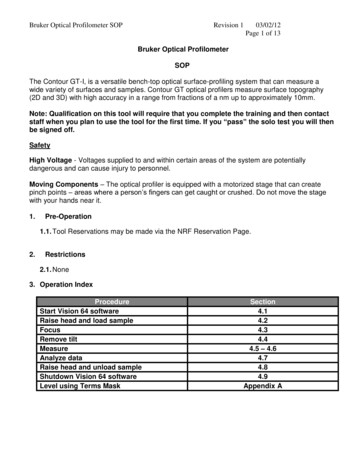
850nm photodetector (Osram 720-SFH213FA, VR 5 V, λ 870 nm,Ee 1 mW/cm 2) AA Battery and Pack (optional) A mono-microphone jack A device to take the sound input (your computer)1Cathode isshorter thananode2Pin #LED12CathodeAnodeCable connectionThree pin audio jacksYou will need to use two of those three pin audio cables shown in Figure 1 forthe first part of the project. One for the LED and the other for the receivershown earlier. One thing you need to be aware for you to be able to connectboth transmitter and receiver to the same laptop or mobile device, thedevices must be equipped with separate microphone and speaker ports (seeFigure 2). Then you can then use the same laptop or mobile device for bothplaying and recording.Four pin mic/speaker splitterIf your laptop or audio devices only accept a four pin connector (most of thenewer laptop only have one audio port), you will need to get a four pinmic/speaker splitter (see Figure 1) to connect both 3 pin transmitter andreceiver jacks to the same audio port so that you can do both playing andrecording from the same device.
Right audioMicrophoneGroundLeft audio (sometimes it’s in blue)Figure 1. Three and four pin audio jack’s pin and wire configuration (top)and 4 pin microphone and speaker splitter (bottom). La pictura de la derechaestá en espanol.Figure 2. Laptop with separate audio in and out ports.
Audacity Audio softwareTo record and play the audio detected by the optical receiver, you candownload the Audacity software that has a link in our course website orfollow this link to download the software directly to your laptop: Download Audacity (audacityteam.org). Please make sure you set up your recordingdevice and play back device according to Figure 3. If signal is properlydetected, you will see a waveform similar to what is shown in Figure 3.Figure 3. Audacity audio software setup for recording audio from the opticalreceiver.ImplementationPlug your receiver into the device with speakers, such as your computer. Youwill have to turn your speakers up until you hear a hissing noise as the audiovolume tends to be rather low. The easiest way to test the receiver is tosimply plug the circuit into the microphone jack in your computer and run‘Audacity’ (A free ware audio editor). The software will allow you to do somefiltering and sound amplification.Connect your sound source, such as your computer into the transmitter andaim it at the photodetector. Press the button on the laser or hold it downwith something such as an elastic band and try to hold it steady. If donecorrectly your tunes should be traveling as light waves and playing to yourears enjoyment.If not, try adjusting the volume of your speakers up, or the volume of yoursound source down, my transmitter will not transmit terribly loud bass. Also
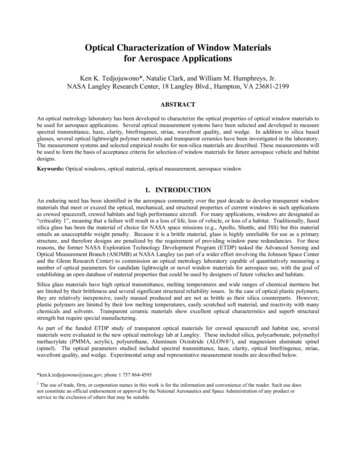
it would be a good idea to double check and solder your connections. Turningoff the lights may be the only option when using this device, since sometimesthe interference caused by household lights is too great.Your optical audio transceiver system once it is set up might look somethinglike in Figure 4a. Please make sure you properly connect the two 3-pin jacksto the appropriate ports on the 4-pin mic/speaker splitter (Figure 4b). If thetransmitter is connected correctly according to the instruction, you will beable to detect a dim red light (Figure 4c) when audio is playing on thetransmitter. If the optical receiver is working properly, you should be ablerecord the audio using Audacity software and the audio signal should showclear waveform like in Figure 3.Four pinmic/speakersplitterOpticalReceiver1.5V AAbatteryOpticalTransmitter(a)(b)(c)Figure 4. (a) overall optical transceiver system setup, (b) 3-pin transmitterand receiver jacks connecting to a 4-pin mic/speaker splitter, (c) dim lightdetected on LED when transmitter is connected correctly.
Design ProjectFor the second part of this project, you need to come up with a design of youown using the above optical transceiver system to perform certain tasks.Examples can be found in the following the YouTube link: UWengr100 YouTubePlease come up with an application that is different from the examples shownon the website. You must demonstrate your design in the oral presentation toget part of the grade in the project. If the setup is too big to bring to theclass, you can record your demonstration and present it along with your oralpresentation in class. You are allow to use any additional electronics,microcontroller, and devices to demonstrate your devices. However, youmust use the optical transceiver as the core of your design.For this project, you only need to prepare PPT, present it in the oralpresentation along with the demonstration of your special design usingoptical transceiver system.
Optical Audio Transceiver project In the first part of this project, you will be shown how to make an optical audio transmitter, a device that will allow you to take any sound source, and transmit it over an optical beam. In the second part of the project, you will design an application based on the optical transceiver system. Design & Concept