Transcription
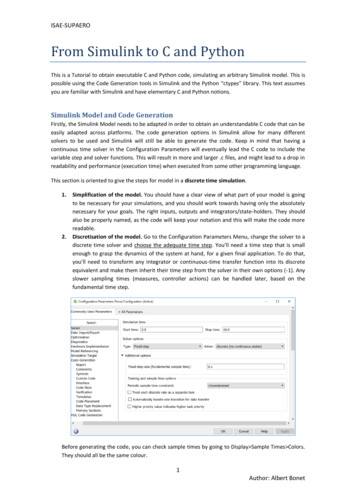
ISAE-SUPAEROFrom Simulink to C and PythonThis is a Tutorial to obtain executable C and Python code, simulating an arbitrary Simulink model. This ispossible using the Code Generation tools in Simulink and the Python “ctypes” library. This text assumesyou are familiar with Simulink and have elementary C and Python notions.Simulink Model and Code GenerationFirstly, the Simulink Model needs to be adapted in order to obtain an understandable C code that can beeasily adapted across platforms. The code generation options in Simulink allow for many differentsolvers to be used and Simulink will still be able to generate the code. Keep in mind that having acontinuous time solver in the Configuration Parameters will eventually lead the C code to include thevariable step and solver functions. This will result in more and larger .c files, and might lead to a drop inreadability and performance (execution time) when executed from some other programming language.This section is oriented to give the steps for model in a discrete time simulation.1.2.Simplification of the model. You should have a clear view of what part of your model is goingto be necessary for your simulations, and you should work towards having only the absolutelynecessary for your goals. The right inputs, outputs and integrators/state-holders. They shouldalso be properly named, as the code will keep your notation and this will make the code morereadable.Discretisation of the model. Go to the Configuration Parameters Menu, change the solver to adiscrete time solver and choose the adequate time step. You’ll need a time step that is smallenough to grasp the dynamics of the system at hand, for a given final application. To do that,you’ll need to transform any integrator or continuous-time transfer function into its discreteequivalent and make them inherit their time step from the solver in their own options (-1). Anyslower sampling times (measures, controller actions) can be handled later, based on thefundamental time step.Before generating the code, you can check sample times by going to Display Sample Times Colors.They should all be the same colour.1Author: Albert Bonet
ISAE-SUPAERO3.Code Generation Options. There are plenty of options throughout this process, and it isimportant not to change options from which we don’t understand the effects. Beforegenerating the code we have to go through the options menu.a. System target file: Choosing “ert.tlc” will generate an understandable code, that willallow us to pass parameters to specific Simulink functions, and this tutorial will followwith this type of generation in mind.You can either keep or change the build configuration, objectives, and check themodel. Checking the model will help you working towards the Prioritized objectives.b. Interface: Here you should pay attention to the data inside your signals to choose allthe Support options. What you don’t have, you should not check since it will affectreadability and execution time.For the Code interface you HAVE TO have Reusable Function and Pass root-level I/O asindividual arguments. For the error management you can choose as you please.2Author: Albert Bonet
ISAE-SUPAERO4.c. Check the Create Code Generation Report case in Report.d. Further options. All these are the basics to get the code generation going and shouldsuffice to make it functional. Further options or issues should be checked foroptimality, but do it at your own risk and understanding.Generating the code. Now you are ready to generate the code. Go to Code C/C Code BuildModel, or simply press Ctrl B. It will take some time to do it and eventually the CodeGeneration Report will pop up.The Generated C CodeIf you have followed this tutorial up to this point, you should be facing the Code Generation Reportwindow. This is a very useful tool, since it allows you to navigate the code easily, as it has files andvariables hyperlinked. In this window, you can find all the source (.c) and header (.h) files generated. Upto four sections of the all the generated code can appear, and I will go through them one by one. Keepin mind that ALL .c and .h files WILL BE NEEDED for your application; the other “junk” files should bedisposable for any C or Python target.Utility filesThis section is intended to be the one where all the elemental data types and Matlab constants aredefined. Matlab has its own native data types and structures; these files allow referring to them and stillhaving C code. This means that you will no longer see native C data types as they are all redefined in thissection. rt defines.h: Some mathematical and other constants are here defined.rtwtyopes.h: All data types are here redefined or declared.Other files appearing might do some other specific action, not too cryptic.Data FilesHere you may find any user defined constants or other data inside the model. If there are any regressioncurves or thresholds of any kind, they will be declared and introduced in these files.3Author: Albert Bonet
ISAE-SUPAEROModel filesThis is the core of the simulation. The ert-type generation, creates explicit functions in theModel name.c file for the Simulink’s 3 main simulation phases, which are: Model name initialize: All variables are declared, states loaded and memory is allocated. Itmight have other functionalities depending on the application/generation.Model name step: This makes the simulation advance one time step. This means that statesand signals will be updated accordingly. This phase is intended to be called as many times asneeded, until the simulation is finished.Model name terminate: This ends and closes the whole simulation, frees the memory spaceand might have other functionalities depending on the application/generation.In the Model name.h file, you will find the structure and type definition, as well as the data types forthe system’s states (they will always come as structured data).Having a clear view of the code and its structure is necessary for any C or Python application. Data types,structures and variables need to be known.The other files are supplementary and not very useful/explanatory.Main fileert main.c is the simulation handler. It is the code in charge of calling all the functions and monitoringthe simulation. In this source file we will find the template for any final application that will use thegenerated code. It is here where signals, timers and errors should be handled, implemented anddeclared.By default, this file does nothing. Nonetheless, it has all the vital structural parts with everything elseclearly indicated with auto-generated comments, and it is up to the user to mould the code to make thesimulation as desired. (“Auto-generate comments” is a default option of the generation that can beunchecked).Any future Python application should come to replace this source code, and should be able to call all theModel name.c functions with the proper data types.Compiling the Generated CodeDepending on the target of our code, several procedures are possible. If the application is C oriented,then the Main file needs to be based on the ert main.c, or simply complete that code, and then becompiled as an application for the final implementation platform.For all intends and purposes, this tutorial is conceived with the idea of a Python application, so thecompiling procedure will be described for that objective in a UNIX platform.We need to create a library that includes and links all the main functions and all the source and headerfiles, except for the main, since we will be making our own Python version. In UNIX, those libraries are.so extension. We will be using the GCC built-in C compiler and we will build a SHARED C LIBRARY.For that, set your path in the folder where all the generated code is. There, write the following lines inthe command line:gcc -shared -o libname.so -fPIC file1.c file2.c4Author: Albert Bonet
ISAE-SUPAEROIn the fileX.c part you should really add ALL the .c files generated by Simulink. A big model mightpotentially generate many .c files that will all be needed for the simulation to work as expected.There are plenty of ways of having a library or application compiled, and you are free to choose the onethat better suits your purposes.Python IntegrationYou should now have at your disposal your .so library. This will be the only file you are going to need inthe Python program path from now on.In order to be able to call compiled C functions from foreign libraries into python, we are going to needanother library called “ctypes”. Please refer to the he best way to convey how the Python code should be implemented is via a detailed example. Thisexample will be equivalent to the ert main.c, but instancing and declaring everything from pythonthrough ctypes. Howerver, some important points should be made: It is important to note that the simulation model works with two main structured variables.One is going to hold the value of every state in the system. The other one is a pointer to thatfirst variable. Please note that they can also include some error handling variables.In the ert main.c file those variables are declared like:static RT MODEL NAME T Model NAME M ;static RT MODEL NAME T *const Model NAME M &Model NAME M ;/* Real-timemodel */static DW Model NAME T Model NAME DW;/* Observable states */ To be able to declare the same structures in a ctypes manner we have to know the data typesand definitions and also its fields’. This information can be found in the Model NAME.h file:typedef struct {real T state1 DSTATE;/* ' S8 /state1 measure' */real T state2 DSTATE;/* ' S3 /state2 measure' */real T DiscreteTimeIntegrator1 DSTATE;/* ' S4 /Discrete-TimeIntegrator1' */uint8 T DiscreteTimeIntegrator LOAD;/* ' S27 /Discrete-TimeIntegrator' */boolean T G1 PreviousInput;/* ' S39 /G1' */} DW Model NAME T;.struct tag RTM Model NAME T { /*Just holding the pointer in this case*/DW Model NAME T *dwork;};By going to these structures, we know the Matlab data types involved in the structured data fields. Toknow the actual C data type, we should go to rtwtypes.h file, where we would see that “real T” is infact type “double”, “uint8 T” is an “unsigned char”, and so on.5Author: Albert Bonet
ISAE-SUPAEROAs made explicit in the documentation of the ctypes library, the equivalence is between data types is asfollows:Now we have everything needed to mimic the ert main.c in Python:from ctypes import * #Import ctypes librarylibc CDLL("./libname.so") #Load library#Rename main functions for readibilityinitialize libc.Model NAME initializestep libc.Model NAME stepterminate libc.Model NAME terminate#Create both ctypes structures of both state variablesclass DW Model NAME T(Structure):fields [("state1 DSTATE", c double),("state2 DSTATE", c double),("DiscreteTimeIntegrator1 DSTATE", c double),("DiscreteTimeIntegrator LOAD", c ubyte),("G1 PreviousInput", c ubyte)]class RT MODEL Model NAME T(Structure):fields [("dwork",POINTER(DW Model NAME T))]#Now mimic their declaration in ert main.cModel NAME DW DW Model NAME T()Model NAME M RT MODEL Model NAME T()Model NAME M pointer(Model NAME M )Model NAME M .dwork pointer(Model NAME DW)6Author: Albert Bonet
ISAE-SUPAERO#Also declare inputs and outputs before initializingModel NAME U ref c double()Model NAME U In2 c double()Model NAME U In3 c int()Model NAME Y Out1 c double()Model NAME Y measure c double()#Initialize modelinitialize(Model NAME M,byref(Model NAME U ref),byref(Model NAME U In2),byref(Model NAME U In3),byref(Model NAME Y Out1),byref(Model NAME Y measure));#Define simulation parameterstimer 0time step 0.01simulation time 10while timer simulation time: #Simulation loop#Any input manipulation or calculation should be done herepass#Input updateModel NAME U ref c double(1)Model NAME U In2 c double(34.5)Model NAME U In3 c int(2)#Step the modelstep(Model NAME M,Model NAME U ref,Model NAME U In2,Model NAME U In3,byref(Model NAME Y Out1),byref(Model NAME Y measure))#Any measures or eventual manipulation should be done hereprint("Output:",Model NAME Y Out1)#Step timertimer timer time step#Any plotting or post processing should be done herepass#Terminate the modelterminate(Model NAME M)7Author: Albert Bonet
This is a Tutorial to obtain executable C and Python code, simulating an arbitrary Simulink model. This is possible using the Code Generation tools in Simulink and the Python “ctypes” library. This text assumes you are familiar with Simulink and have elementary