Transcription
Kelly L. Murdock’s Autodesk 3dsMax2016COMPLETE REFERENCE GUIDE SDCP U B L I C AT I O N SBetter Textbooks. Lower Prices.www.SDCpublications.com
Visit the following websites to learn more about this book:Powered by TCPDF (www.tcpdf.org)
Chapter 2Controlling and Configuring theViewportsIN THIS CHAPTERUnderstanding 3D spaceUsing the ViewCube and the SteeringWheelsNavigating with the mouse and the Viewport Navigation Control buttonsChanging the visual style of the viewportsChanging viewport layouts and adding information to the viewportsDisplaying materials, lighting, and shadowsLoading a viewport background imageControlling the display settings with the Viewport Configuration dialog boxSetting the Viewport BackgroundAltering the viewport layoutDisplaying safe frames and setting display performanceDefining regions and displaying statisticsConfiguring the ViewCube and SteeringWheel controlsAlthough the Autodesk 3ds Max 2016 software consists of many different interface elements, such as panels,dialog boxes, and menus, the viewports are the main areas that will catch your attention. The four main viewportsmake up the bulk of the interface. You can think of the viewports as looking at the television screen instead of theremote. Learning to control and use the viewports can make a huge difference in your comfort level with 3ds Max.Nothing is more frustrating than not being able to rotate, pan, and zoom the view.The viewports have numerous settings and controls that you can use to provide thousands of different ways to look atyour scene, and beginners can feel frustrated at not being able to control what they see. 3ds Max includes severalhandy little gizmos that make navigating the viewports much easier. This chapter includes all the details you need tomake the viewports reveal their secrets.If the Viewport Navigation Controls help define what you see, the Viewport Configuration dialog box helpsdefine how you see objects in the viewports. You can configure each viewport using this dialog box. Toopen this dialog box, choose the Views Viewport Configuration menu command. You also can open thisdialog box by right-clicking the viewport’s General label located in the upper-left corner of each viewportand choosing Configure from the pop-up menu. The Shading viewport label also has a Configure option.The viewport labels are divided into a General menu (shown as a plus sign), a point of view label, and ashading method label. The various pop-up menus for these labels also include many of the settings found inthe Viewport Configuration dialog box, but the dialog box lets you alter several settings at once. You also29
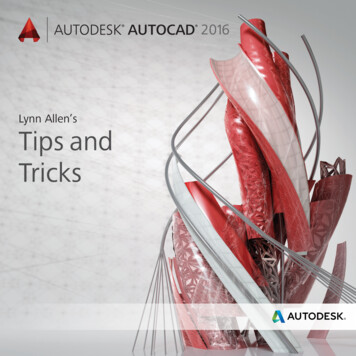
Part I: Getting Started with Autodesk 3ds Max 2016can make this dialog box appear for the active viewport by right-clicking any of the Viewport NavigationControl buttons in the lower-right corner of the interface.The Viewport Configuration dialog box contains several panels, including Visual Style & Appearance,Background, Layout, Safe Frames, Display Performance, Regions, Statistics, ViewCube, andSteeringWheels. The Preference Settings dialog box also includes many settings for controlling the behaviorand look of the viewports.See Chapter 4, “Setting Preferences,” for more on the Preference Settings dialog box and all its options.Understanding 3D SpaceIt seems silly to be talking about 3D space because we live and move in 3D space. If we stop and think about it, 3Dspace is natural to us. For example, consider trying to locate your kids at the swimming pool. If you’re standingpoolside, the kids could be to your left or right, in front of you or behind you, or in the water below you or on the highdive above you. Each of these sets of directions represents a dimension in 3D space.Now imagine that you’re drawing a map that pinpoints a kid’s location at the swimming pool. Using the drawing(which is 2D), you can describe the kid’s position on the map as left, right, top, or bottom, but the descriptions ofabove and below have been lost. By moving from a 3D reference to a 2D one, the number of dimensions hasdecreased.The conundrum that 3D computer artists face is this: How do you represent 3D objects on a 2D device suchas a computer screen? The answer that 3ds Max provides is to present several views, called viewports, of thescene. A viewport is a small window that displays the scene from one perspective. These viewports are thewindows into the software’s 3D world. Each viewport has numerous settings and viewing options.Learning Axonometric versus PerspectiveWhen it comes to views in the 3D world, two different types exist: axonometric and perspective.Axonometric views are common in the CAD world, where the viewer is set at an infinite distance from theobject such that all parallel lines remain parallel. A perspective view simulates how our eyes actually workand converges all points to a single location off in the distance.You can see the difference between these two types of views clearly if you look at a long line of objects. Forexample, if you were to look down a long row of trees lining a road, the trees would eventually merge on thehorizon. In axonometric views, lines stay parallel as they recede into the distance. Figure 2.1 shows thisexample with the axonometric view on the left and the perspective view on the right.30
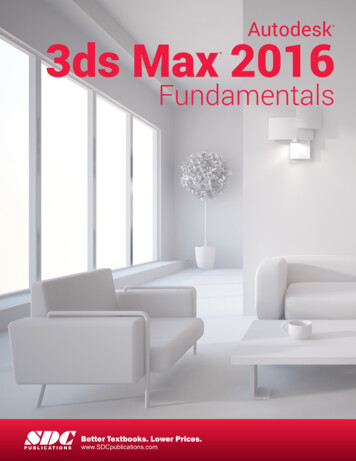
Chapter 2: Controlling and Configuring the ViewportsFIGURE 2.1Axonometric and perspective viewsLearning orthographic and isometric viewsIf you dig a little deeper into axonometric views, you find two different types: orthographic and isometric.Orthographic views are displayed from the perspective of looking straight down an axis at an object. Thisreveals a view in only one plane. Because orthographic viewports are constrained to one plane, they showthe actual height and width of the object, which is why the CAD world uses orthographic views extensively.Isometric views are not constrained to a single axis and can view the scene from any location, but alldimensions are still maintained. The words isometric and orthographic are often interchanged, but they referto a view that has consistent dimensions.Discovering the viewports in 3ds MaxAvailable orthographic viewports in 3ds Max include Front, Back, Top, Bottom, Left, and Right. 3ds Maxstarts up with the Top, Front, and Left orthographic viewports visible. The center label in the top-left cornerof the viewport displays the viewport name. This label is called the Point-of-View viewport label. Thefourth default viewport is a perspective view. Only one viewport, known as the active viewport, is enabled ata time. A yellow border highlights the active viewport.Figure 2.2 shows the viewports with a Viewpoint Datalabs model of a PT-328 U.S. torpedo boat. You cansee the model from a different direction in each viewport. If you want to measure the boat’s length from aftto stern, you could get an accurate measurement using the Top or Left viewport, whereas you can use theFront and Left viewports to measure its precise height. Using these different viewports, you can accuratelywork with all object dimensions.31
Part I: Getting Started with Autodesk 3ds Max 2016FIGURE 2.2The 3ds Max interface includes four viewports, each with a different view.Isometric views in 3ds Max are called orthographic viewports. You can create an orthographic viewport byrotating any of the default non-perspective views.Tip3ds Max includes several keyboard shortcuts for quickly changing the view in the active viewport, including T (Top view), B (Bottomview), F (Front view), L (Left view), C (Camera view), (Spotlight view), P (Perspective view), and U (Orthographic User view).Pressing the V key opens a quad menu that lets you select a new view.Using the Navigation GizmosOne of the key advantages of working in 3D is that you can view your models from an endless number ofviewpoints, but you won’t be able to switch to these endless viewpoints until you learn to navigate theviewports. Being able to quickly navigate the viewports is essential to working in 3ds Max and one of thefirst skills you should master.To make the process of navigating within the viewports and switching among the various views easier, 3dsMax has some navigation gizmos that make this chore easy. These semitransparent gizmos hover in theupper-right corner of each viewport and provide a way to change the view without having to access a tool,select a menu, or even use a keyboard shortcut.32
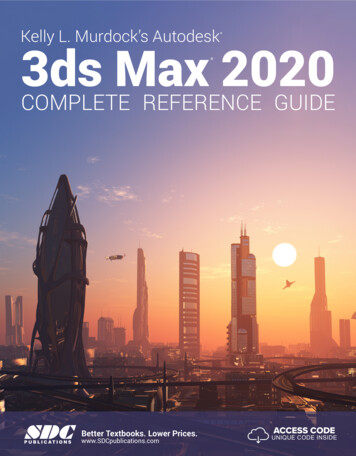
Chapter 2: Controlling and Configuring the ViewportsWorking with the ViewCubeThe ViewCube consists of a 3D cube that is labeled on each side and centered in a ring aligned with theground plane. Its purpose is to show the current orientation of the viewport, but it is also interactive andprovides a way to quickly move among the different views.If you drag the cursor over the top of the ViewCube, shown in Figure 2.3, you’ll notice that the cube’s faces,corners, and edges are highlighted as the cursor moves over them. If you click when any of the cube’s partsare highlighted, the viewport is animated and moves to the new view so it’s positioned as if it’s pointing atthe selected part. By slowly animating the transition to the new view, you get a better idea of the size andshape of the model. It also makes it easy to reorient the model if it gets twisted around to an odd angle. Forexample, if you click the cube’s face labeled Top, the view moves from its current view to the sameorientation as the top view.FIGURE 2.3The ViewCube lets you quickly change the current view.The ViewCube also lets you click and drag on the cube to rotate the view around. The scene rotates alongwith the ViewCube. You also can click and drag on the base ring to spin the model about its currentorientation. When you hover over the ViewCube, a small house icon appears. Clicking this icon changes theview to the defined home view. You can set the Home view by right-clicking the ViewCube and selectingthe Set Current View as Home option from the pop-up menu. These same menu options also are available inthe ViewCube menu and as an option in the General Viewport label (the small plus sign located in theupper-left corner of each viewport). If the ViewCube isn’t visible, you can enable it using theViewCube Show For Active View. Another option is to Show For All Views.Other pop-up menu options let you switch the view between orthographic and perspective views. You alsocan set the current view as Front, reset the Front view, and open the ViewCube panel that is located in theViewport Configuration dialog box with the Configure option.The ViewCube panel in the Viewport Configuration dialog box includes settings for turning the ViewCubeon and off In All Views in Active Layout or In Only the Active View. You also can set the ViewCube sizeand its inactive opacity.TipIf you like the ViewCube but feel that it takes up too much of the viewport, you can change its size to Small or Tiny, or you can setits inactive opacity to 0. When its inactive opacity is set to 0, the ViewCube isn’t visible at all until you move the cursor over itslocation, causing it to appear.The ViewCube panel in the Viewport Configuration dialog box also has options to control what happenswhen you click or drag the ViewCube. You can snap to the closest view when dragging the ViewCube, andyou have options to automatically make the models fit to the view when the view changes, to use animatedtransitions, and to keep the scene upright. If you find that the view keeps ending up at odd angles when you33
Part I: Getting Started with Autodesk 3ds Max 2016drag the ViewCube, try enabling the Keep Scene Upright option. Finally, you have an option to display thecompass under the ViewCube and a setting for the Angle of North so you can change the compass’orientation. The compass is helpful in being able to spin the model around, but if your model is somethinglike a planet that doesn’t have a top or bottom, disabling the compass makes sense.Using the SteeringWheelsThe ViewCube is great for switching between the default views and for rotating the current view, but thereare many additional navigation tools that aren’t covered with the ViewCube. To handle many of these othernavigation tools, such as zooming and panning, 3ds Max includes the SteeringWheels, another gizmo fornavigating the viewports.When 3ds Max is first started, the SteeringWheels are turned off, but you can enable this gizmo with theSteeringWheels Toggle SteeringWheels in the General Viewport menu or by pressing the Shift Wshortcut. The SteeringWheels menu also is found in the General Viewport label, located in the upper-leftcorner of the viewport. Once enabled, this gizmo follows your mouse cursor around as it moves about theviewport, and different parts of the wheel are highlighted when you move over them. If you click and dragwhile a section of the SteeringWheels is highlighted, you can access that control. Right-clicking at any timewill toggle the SteeringWheels off again.There are several different modes for the SteeringWheels in both full-size and mini versions, including theFull Navigation Wheel, with all commands; the View Object Wheel, with commands for navigating aboutobjects; and the Tour Building Wheel, for walking through buildings. The Full Navigation Wheel, shown inFigure 2.4, includes the following modes:FIGURE 2.4The SteeringWheel gizmo includes several different ways to navigate the viewports.*Zoom: This causes the view to zoom in and out of the scene about the pivot. The pivot is set by holdingdown the Ctrl key while clicking.*Orbit: This causes the view to orbit about the pivot. The pivot is set by holding down the Ctrl key whileclicking.*Pan: This causes the view to pan in the direction that you drag the cursor.*Rewind: As you change the scene, 3ds Max remembers each view where you stop and keeps theseviews in a buffer. The Rewind mode displays these views as small thumbnails, as shown in Figure 2.5,and lets you move through them by dragging the mouse. This allows you to rewind and move forwardthrough the buffered views.TipMoving between the buffered thumbnail views with the Rewind feature gradually animates the transition between adjacentthumbnails and allows you to click to change the view to one that is between two buffered views.34
Chapter 2: Controlling and Configuring the ViewportsFIGURE 2.5Rewind mode lets you move back and forth through recent views.*Center: This lets you click an object to be the pivot center for zooming and orbiting.*Walk: This moves you forward through the scene as if you were walking through it. Holding down theShift key lets you move up and down.*Look: This causes the camera to rotate side to side as if looking to the side.*Up/Down: This moves the view up and down from the current location.NoteIt is covered later in the chapter, but you can maximize the active viewport by clicking the Maximize Viewport Toggle button (thebutton in the lower-left corner of the interface) or by pressing Alt W.In the upper-right corner of the wheel is a small X icon. This icon is used to close the SteeringWheelsgizmo. In the lower-right corner of the wheel is a small down arrow. This icon opens a pop-up menu. Usingthe pop-up menu, you can select a different wheel type, go to the Home view as defined by the ViewCube,increase or decrease the walk speed, restore the original center, or open the SteeringWheels panel in theViewport Configuration dialog box. These same options are also available in the SteeringWheels menu inthe General viewport label, along with an option to Toggle the SteeringWheels on and off (Shift W).Using the SteeringWheels panel in the Viewport Configuration dialog box, you can set the size and opacityof the SteeringWheels. Settings for controlling many of the different modes are available as well.35
Part I: Getting Started with Autodesk 3ds Max 2016Tutorial: Navigating the active viewportOver time, navigating the viewports becomes second nature to you, but you need to practice to get to thatpoint. In this tutorial, you get a chance to take the viewports for a spin—literally.To practice navigating a viewport, follow these steps:1.Open the Little Dragon.max file from the Chap 02 directory in the downloaded content set.This file includes a model of a cartoon dragon. It provides a reference as you navigate the viewport.The active viewport is the Perspective viewport.2.Click the Maximize Viewport Toggle button (or press Alt W) to make the Perspective viewport fillthe space of all four viewports.3.Click the Front face in the ViewCube to transition the view to the front view. Then move the cursorover the upper-right corner of the ViewCube, and click to return the view to an angled view.4.Select the SteeringWheels Toggle SteeringWheels from the General viewport menu in the upper leftcorner of the active viewport; then hold down the Ctrl key and click Bruce’s head to set the pivot.Then move the cursor over the Zoom button, and drag until Bruce’s head fills the viewport.5.With the SteeringWheels still active, move the cursor over the Pan button, and drag the window untilBruce’s head is centered evenly in the viewport, as shown in Figure 2.6. Right-click in the viewportto toggle the SteeringWheels gizmo off.FIGURE 2.6The Perspective viewport is zoomed in on the dragon's head using the Zoom and Pan controls.36
Chapter 2: Controlling and Configuring the ViewportsControlling Viewports with a Scroll Wheel MouseNow that I’ve explained the viewport navigation gizmos, I’ll explain another easy way to control theviewports. Often, the quickest way to control the viewports is with the mouse. To really get the benefit ofthe mouse, you need to use a mouse with a scroll wheel (which also acts as a middle mouse button).Rolling the scroll wheel in the active viewport zooms in to and out of the viewport by steps just like thebracket keys ([ and ]). You can zoom gradually by holding down the Ctrl and Alt keys while dragging thescroll wheel.Clicking and dragging the scroll wheel button pans the active viewport. Clicking and dragging with the Altbutton held down rotates the active viewport. If the scroll wheel isn’t working, check the Viewports panel inthe Preference Settings dialog box, found at the bottom of the Customize menu. You can select to use thescroll wheel control to pan and zoom in the viewports or to define and use Strokes, which is a feature fordefining shortcuts using the mouse.CautionBe careful when zooming in with the scroll wheel. If you zoom in too far, the zooming becomes unstable. If this happens, you canselect the Undo View Change (Shift Z) command to undo the zoom or use the Zoom Extents button.Strokes are covered in Chapter 52, “Customizing the Interface.”Using the Viewport Navigation ControlsAlthough the ViewCube, the SteeringWheels, and the scroll wheel make navigating the viewports easy, youcan still use the standard navigation tools located in the bottom-right corner of the interface. The standardviewports show you several different views of your current project, but within each viewport, you can zoomin on certain objects, pan the view, or rotate about the center of the viewport. Clicking a viewport with anyof the Viewport Navigation Controls automatically makes the selected viewport the active viewport. InTable 2.1, the keyboard shortcut for each button is listed in parentheses next to its name.TABLE 2.1 Viewport Navigation ControlsToolbar ButtonNameDescriptionZoom (Alt Z or [ or ])Moves closer to or farther from the objects in theactive viewport by dragging the mouse orzooming by steps with the bracket keys.Zoom AllZooms in to or out of all the viewportssimultaneously by dragging the mouse.Zoom Extents (Ctrl Alt Z), ZoomExtents Selected (Z)Zooms in on all objects or just the selectedobject until it fills the active viewport.Zoom Extents All (Ctrl Shift Z),Zoom Extents All SelectedZooms in on all objects or just the selectedobject until it fills all the viewports.Field of View, Zoom Region(Ctrl W)The Field of View button (available only in theperspective view) controls the width of the view.The Zoom Region button zooms in to the regionselected by dragging the mouse.Pan View (Ctrl P or I), 2D PanZoom, Walk Through (Up arrow)Moves the view to the left, to the right, up, ordown by dragging the mouse or by moving themouse while holding down the I key. The WalkThrough feature moves through the scene usingthe arrow keys or a mouse like a first-person37
Part I: Getting Started with Autodesk 3ds Max 2016video game.Orbit (Ctrl R), Orbit Selected,Orbit SubObjectRotates the view around the global axis,selected object, or subobject by dragging themouse.Maximize Viewport Toggle(Alt W)Makes the active viewport fill the screen,replacing the four separate viewports. Clickingthis button a second time shows all fourviewports again.CautionWhen one of the Viewport Navigation buttons is selected, it is highlighted yellow. You cannot select, create, or transform objectswhile one of these buttons is highlighted. Right-clicking in the active viewpoint or clicking the Select Objects tool reverts to selectobject mode.Zooming a viewYou can zoom into and out of the scene in several ways. Clicking the Zoom (Alt Z) button enters zoommode, where you can zoom into and out of a viewport by dragging the mouse. This works in whicheverviewport you drag in. To the right of the Zoom button is the Zoom All button, which does the same thing asthe Zoom button, only to all four viewports at once. If you hold down the Ctrl key while dragging in Zoommode, the zoom action happens more quickly, requiring only a small mouse movement to get a large zoomamount. Holding down the Alt key while dragging in Zoom mode has the opposite effect; the zoom happensmuch more slowly, and a large mouse move is required for a small zoom amount. This is helpful for finetuning the zoom.The Zoom Extents (Ctrl Alt Z) button zooms the active viewport so that all objects (or the selected objectswith the Zoom Extents Selected button) are visible in the viewport. A Zoom Extents All (Ctrl Shift Z)button is available for zooming in all viewports to all objects’ extents; the most popular zoom command(and the easiest to remember) is Zoom Extents Selected (Z), which is for zooming in to the extents of theselected objects in the active viewport.You can use the brackets keys to zoom in ([) and out (]) by steps. Each key press zooms in (or out) anotherstep. The Zoom Region (Ctrl W) button lets you drag over the region that you want to zoom in on. If youselect a non-orthogonal view, such as the Perspective view, the Zoom Region button has a flyout called theField of View. Using this button, you can control how wide or narrow the view is. This is like using a wideangle or telephoto lens on your camera. This feature is different from zoom in that the perspective isdistorted as the Field of View is increased.Field of View is covered in more detail in Chapter 25, “Configuring and Aiming Cameras.”Panning a viewThe Viewport Navigation Controls also offer two ways to pan in a viewport. In Pan View mode (Ctrl P),dragging in a viewport pans the view. Note that this doesn’t move the objects, only the view. The secondway to pan is to hold down the I key while moving the mouse. This is known as an interactive pan. Inaddition, the Ctrl and Alt keys can be held down to speed or slow the panning motions.Walking through a viewThe Walk Through button (Up arrow), found as a flyout button under the Pan View button, allows you tomove through the scene in the Perspective or Camera viewport using the arrow keys or the mouse just as youwould if you were playing a first-person computer game. When this button is active, the cursor changes to asmall circle with an arrow inside it that points in the direction you are moving. You need to click in theviewport before you can use the arrow keys.38
Chapter 2: Controlling and Configuring the ViewportsCautionThe Pan View button is a flyout only if the Perspective view or a Camera view is selected.The Walk Through feature includes several keystrokes for controlling the camera’s movement. The arrowkeys move the camera forward, left, back, and right (or you can use the W, A, S, and D keys). You canchange the speed of the motion with the Q (accelerate) and Z (decelerate) keys or with the [ (decrease stepsize) and ] (increase step size) keys. The E and C keys (or the Shift up and Shift down arrows) are used tomove up and down in the scene. The Shift spacebar key causes the camera to be set level. Dragging themouse while the camera is moving changes the direction in which the camera points.A handy alternative to Walk Through mode is the Walkthrough Assistant, which is found on the Animationmenu. This utility opens a dialog box that includes buttons for creating and adding a camera to a path. It alsohas controls for turning the view side to side as the camera moves along the path.The Walkthrough Assistant is covered in more detail in Chapter 36, “Animating with Constraints and SimpleControllers.”Rotating a viewRotating the view can be the most revealing of all the view changes. When the Orbit (Ctrl R) button isselected, a rotation guide appears in the active viewport, as shown in Figure 2.7. This rotation guide is acircle with a square located at each quadrant. Clicking and dragging the left or right squares rotates the viewside to side; the same action with the top and bottom squares rotates the view up and down. Clicking withinthe circle and dragging rotates within a single plane, and clicking and dragging outside the circle rotates theview about the circle’s center either clockwise or counterclockwise. If you get confused, look at the cursor,which changes depending on the type of rotation. The Ctrl and Alt keys also can speed and slow the rotatingview.NoteThe Orbit keyboard shortcut (Ctrl R) selects whichever Orbit tool was the last to be used.39
Part I: Getting Started with Autodesk 3ds Max 2016FIGURE 2.7The rotation guide appears whenever the Orbit tool is selected.NoteIf you rotate one of the default non-perspective views, it automatically becomes an orthographic view, but you can undo the changeusing the Undo View Change command in the Views Viewport menu or the Shift Z shortcut.Maximizing the active viewportSooner or later, the viewports will feel too small. When this happens, you have several ways to increase thesize of your viewports. The first trick to try is to change the viewport sizes by clicking and dragging any ofthe viewport borders. Dragging on the intersection of the viewports resizes all the viewports. Figure 2.8shows the viewports after being dynamically resized.TipYou can return to the original layout by right-clicking any of the viewport borders and selecting Reset Layout from the pop-upmenu.40
Chapter 2: Controlling and Configuring the ViewportsFIGURE 2.8You can dynamically resize viewports by dragging their borders.The second trick is to use the Maximize Viewport Toggle (Alt W) to expand the active viewport to fill thespace reserved for all four viewports. Clicking the Maximize Viewport Toggle (or pressing Alt W) a secondtime returns to the defined layout.Maximizing the viewport helps temporarily, but you can take another step before convincing your boss thatyou need a larger monitor. You can enter Expert Mode by choosing Customize Show UI Expert Mode(Ctrl X). It maximizes the viewport space by removing the main toolbar, the Command Panel, and most ofthe lower interface bar.With most of the interface elements gone, you’ll need to rely on the menus, keyboard shortcuts, and quadmenus to execute commands. To re-enable the default interface, click the Cancel Expert Mode button in thelower right of the 3ds Max window (or press Ctrl X again). Figure 2.9 shows the interface in Expert Mode.41
Part I: Getting Started with Autodesk 3ds Max 2016FIGURE 2.9Expert Mode maximizes the viewports by eliminating most of the interface elements.Controlling camera and spotlight viewsYou can set any viewport to be a camera view (C) or a spotlight view ( ) if a camera or a spotlight exists inthe scene. When either of these views is active, the Viewport Navigation Control buttons change. In cameraview, controls for dolly, roll, truck, pan, orbit, and field of view become active. A light view includescontrols for the falloff and hotspots.Chapter 25, “Configuring and Aiming Cameras,” and Chapter 27, “Using Lights and Basic Lighting Techniques,”cover these changes in more detail.Setting the navigation controls to match MayaIn many studios, you’ll find both 3ds Max and Maya. These software packages have different navigationcontrols, but you can set 3ds Max to mimic the Maya controls using the Interaction Mode panel in thePreference Settings dialog box. This panel includes a simple drop-down box for switching the viewportnavigation controls between 3ds Max and Maya. If you make the change, the designated controls will beused automatically the next time you start up the software.Table 2.2 shows the basic keyboard and mouse navigation controls for both 3ds Max and Maya.42
Chapter 2: Controlling and Configuring the ViewportsTABLE 2.2 Viewport Navigation Controls for 3ds Max and MayaViewport Navigation Control3ds MaxMayaRotate ViewAlt middle mouse buttonAlt left mouse buttonPan Viewmiddle mouse buttonAlt middle mouse buttonZoom Viewscrub scroll wheelAlt right mouse buttonZoom Extents SelectedZFZoom Extents AllShift Ctrl ZAMaximize ViewportAlt WspacebarUndo/Redo Viewport ChangeShift Z/Shift YAlt Z/Alt YChanging the Viewport DisplayAlthough the Viewport Navigation Controls are focused on controlling what is visible in the viewports, anumber of useful commands are available in the Views menu and in the viewport labels at the top-left cornerof each viewport that directly affect the viewports. The three viewport labels, shown in Figure 2.10, includethe General viewport label (which is a simple plus sign), the Point-of-View viewport la
Although the Autodesk 3ds Max 2016 software consists of many different interface elements, such as panels, dialog boxes, and menus, the viewports are the main areas that will catch your attention. The four main viewports make up the bulk of the interface. You can think of the vie