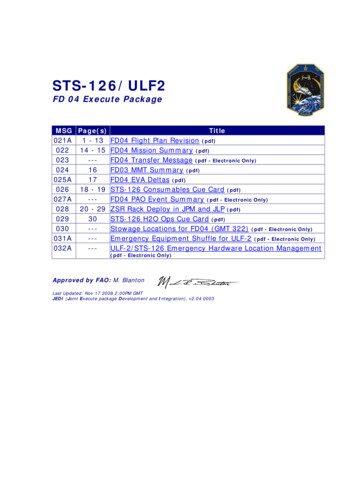
Transcription
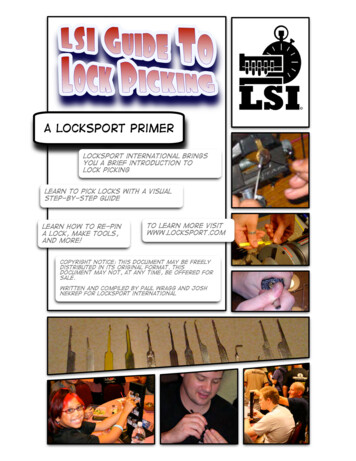
A locksport primerlocksport international bringsyou A Brief introduction tolock pickinglearn to pick locks with a visualstep-by-step guidelearn how to re-pina lock, make tools,and more!to learn more visitwww.locksport.comcopyright notice: This document may be freelydistributed in its original format. thisdocument may not, at any time, be offered forsale.Written and compiled by Paul wragg and Joshnekrep for locksport international
table of contents:1. Introducing LSI.1.2. How Locks work.23. re-pinning a lock.44. the pencil trick.85. mechanical defects.96. applying tension.107. the binding effect.117. possible pin states.128. a brief intro to tool making.139. where to buy tools.1710. where to get more info.1811. why get involved with lsi.1912. lsi membership application.20
INtroducing Locksport InternationalFrom all of us at Locksport International, I'd like to thank youfor picking up this guide. We hope you will find it helpful asyou take on the new challenge of learning to pick locks. Butfirst, allow me to tell you a little about LSI.In early spring of 2005 Josh Nekrep (digital blue onlockpicking101.com) approached Kim Bohnet (Varjeal, siteadministrator on lockpicking101.com) with the idea of startinga club with the purpose of bringing lockpicking enthusiaststogether and promoting the sport/hobby with face-to-faceinteraction. At the time there were a couple large regionalclubs (SSDeV in Germany and TOOOL in The Netherlands) butthere was no broad-based club. Kim and Josh saw a need foran organization that would be open to members all over theworld and set about making it happen. It was felt that it wouldbe easier and more effective for individuals to start a local lockpicking club if much of the groundwork werealready laid for them, and if they had the opportunity to share resources with other associated clubs. Kimand Josh quickly recruited Devon McDormand (frostbyte on lockpicking101.com) to sit as Treasurer. Aftermuch discussion (5 minute conversation on MSN) it was decided that Kim would act as President of theassociation and Josh would take the role of Administrative Director. The term “Locksports” was adopted as ameans of distinguishing what hobby/sport lockpicking enthusiasts do from what locksmiths do. The threefounding members set about laying the foundation for what they hoped would someday be a largeorganization. A short time later, Matt Fiddler and Doug Farre were brought on to sit on the board ofdirectors. Since then, LSI has worked to bring locksport enthusiasts together. As individuals come forward topioneer locksport groups in their area, LSI continues to grow and organize.Locksport is a fun, challenging hobby, and one that is gaining ground around the world. Members gathertogether to learn from each other, share tools and locks, research security vulnerabilities, and most of all,have fun!If you are interested in starting an LSI chapter in your area, see the "How To Get involved With LSI" section atthe back of this guide.You may only pick locks that you own, orthose to which you've been given explicitpermission to pick by the rightful ownerlocksport is an honest, ethical, and legitimate hobby. unfortunately, the wholeworld hasn't figured that out yet (though we're working on it!). because the layperson has a tendency to perceive what we do as somehow nefarious, it is extraimportant that we commit to following a strict code of ethics. for this reason,the above credo is non-negotiable in the locksport community. lock pickingshould never, ever be used to illegal or even questionable purposes.please do not misuse this information. we assume no responsibility for youractions, and in no way condone immoral activity.help keep locksport fun for allby following strictly the one rule.page 1
an unmounted(uninstalled) lockTHE SHELL(upsidedown)HOW A LOCK WORKSA pin tumbler Lock is composedof several basic components.the outer casing is called theshell. inside a shell is a plug.the plug has a keyway - the slotwhere the key goes in - and thewhole thing has a series of pinchambers.The KEyPinsthe keyhmm. thisisn't sohard!theplugpage 2
thespringthe guts of a locka combinationof a key pin,driver pin, andspring iscalled a pinstackthe driverpin (toppin)the bible is thearea ofchambers abovethe shear linethe key pin(bottompin)interesting fact:modern locks wereinvented by linusyale jr. in 1861,though the basicdesign conceptsdate back to around2000 bc. yale'sdesign has remainedlargely unchangedsince 1861 and is thefundamentalprincipal upon whichnearly all pintumbler locks worktoday.this is a lock inlocked position (atrest). driver pinsblock the rotationof the pluga little morecomplicated,but I think I'mgetting it!page 3the shear line is theline where the top ofthe plug meets theshellthis is alock in theunlockedposition.driver pinsrest abovethe shearline
re-pinning a locklocate thecirclip at theback of theplugremove thecirclip witha set ofcirclippliers, or asmall flatscrewdriverthe circlipholds theplug inplace.however,even withthe circlipremovedthe plugwill notcome outbecausethe pinsare stillblockingtheremovalof theplugin order toremove the plug,the pin stacksmust all be liftedto the shear line.this can be donewith the correctkey, by picking thelock, or with athin metal shimwith the key installed, andthe circlip removed, the plugis free to be removed fromthe shellSPROING!CAUTION!removal of the plugwill cause pins andsprings to come outrather violently.don't get ahead!page 4
these are shims.they are availablethrough manylocksmith supplystoresusing a shim toremove the pluginteresting fact:insert a blankkey into thelock, then beginto slide the shimin from theback.as the shimcontacts thefirst key pin,slowly removethe key blankone pin positionallowing the keypin to slidedown and theshim to enterthe spacebetween the keyand driver pin.repeat theprocess for eachpin position,moving the shimfarther into thelock each timeonce completed,your shim will befully insertedinto the lockand all thedriver pins willbe stuck abovethe shear line.you are nowable to removethe plug, butdon't do thatyet! see the nextpage first!page 5shims can be madeusing automotivefeeler gauges. justfind the thicknessthat fits and cutdown to size.before cutting, youmay wish to put thecurl in the shim bywrapping it tightlyaround a pen.
removing the plugclink!changing the key pinswhen removing the plug, be surethat you turn the plug 45 degreesbefore sliding it out, and make surethe plug is upright or else you willdrop key pins!in a pinch,you can usealmostanything asa plugfollower,so long asit fits wellin order to remove the plug, you will need a plugfollower. these can be purchased, or made fromwooden dowel. there are a variety of plug diameters,so you will need a variety of plug followers.however, the most common size for locks in northamerica is 1/2 inch.the purpose of the plug follower is to replace theplug, trapping the driver pins in the bible of the lock.the plug follower must be inserted from the back ofthe lock, and pushed forward to push the plug outthe front of the lock.You're now free to change the key pins in the plug!oh. i just knowI'm gonna messthis part upoh probably,the firsttimepage 6
changing the driver pinsTIP: Use a plastic bag when removing theplug follower. This will contain thesprings and pins when they go SPROING!(And they will!)once the follower is removed, collect allthe springs and pins and keep them safefor reinstallationusing tweezers, carefully load therearmost chamber with one spring andone driver pin. you will need to pressthe pin and spring down into thechamber, then slide the follower in onepin position to hold it in place.repeat this process for each pin positiononce all pinstacks areinstalled, youcan use the plugto replace theplug follower. Itis just likeremoving theplug, but inreverse!ZOINK!you must rememberto keep the plugrotated slightly orthe driver pins willdrop into the wrongplug chambers. itgets bad at thatpoint.reinstall thecirclip andyou arecomplete!page 7
The pencil trickthe pencil trick is great for the beginner. by marking outthe positions of each pin, you will have a visual guide tohelp you know when you are directly under each pin. whenthe pick is in the lock, line each marking up with the face ofthe lock and you will know you're lined up.by knowing just when you're under each pin, you will beable to better understand the feel of lining up with a pin.shoulderMark inline withshoulderof keyline up tipof hookwith pinposition onkeywow! what agood idea!page 8
mechanical defects and tolerancesexaggeratedexamplelock picking worksbecause of avulnerability createdby mechanicaltolerances in themanufacture of locks.small misalignments inthe pin chambers,chambers that aremisshapen (oval), aswell as misshapen pinswill create what iscalled the bindingeffect (explainednext).it's important tounderstand that nolock can be made"perfect". Even in avery wellmanufactured lock,there will always bemechanicaltolerances. in orderfor the pins to movefreely in thechambers, the outsidediameter of the pinsmust be slightlysmaller than theinside diameter of thechamber. thesetolerances will alwaysbe imperfect.hmm. idon't getitpage 9in the next section, wewill look at how toexploit thesetolerances to pick thelockthat's ok,stick withme
applying tensionapplying tension is whatcauses the binding effectto take place.you can apply tension tothe lock with a variety oftools, and either at thetop or the bottom of thekeyway. there is no"correct" way to applytension. it is onlyimportant that the wrenchgrips well, and does notslip or bind against othercomponents of the lock,such as the front pin.page 10
the binding effectwhen rotational tension isapplied to the plug, only one pinwill prevent the rotation of theplug. this is due to themechanical tolerances mentionedpreviously. this one pin is calledthe "binding pin", because it willget "stuck" at the shear line. thisbinding pin can now be lifted,using your pick tool, until itcrosses the shear line and getsstuck above. when this happens,the binding effect will betransfered to another pin in thelock. if tension is maintained, theset pin will remain above theshear line as you continue to setthe next pin. this is the principleupon which lock picking relies.DING DING!STEPS TO LOCK PICKING1. apply tension2. find the binding pin3. lift it to the shear line4. repeat steps 2 and 3 until thelock is openSoundseasyenough.page 11well, just hangtight killer, it'sharder than itlooks
possible pin statesAT restpin stack is sittingat its lowest point.picker will noticespring tension onstackfalse setsoversetthe key pin has beenpushed past the shearline and is nowbinding. key pin willnot fall back down.no spring tension willbe detectedSETdriver pin is trappedabove shear line.key pin will fall backdown and not beunder springtensionundersetit's important to understandthat at any time, each pinstack will be in one of theabove pin states. tosuccessfully open the lock,you must get all pin stacksinto the "set" state. theystart off in the "at rest"state. Along the way, youwill be challenged by falsesets, and recognizing andovercoming these false setswill determine your success.page 12binding pin hasbeen lifted, butnot all the wayto the shearline. key pin isfree to fall backdown and willnot be underspring tension.Cool. this ismakingsense now!
A BRIEF INTRO TO TOOL MAKINGMAKING A PICK FROM A HACKSAW BLADEFOR THISEXERCISE, YOU'LLNEED A BENCHGRINDER, SAFETYGLASSES, A GLASSOF WATER, AND AHACKSAW BLADE.YOU'LL ALSOWANT SAND PAPER(emery paper) INA VARIETY OFGRITS, AND SOMEPATIENCE.importantALWAYS WEAR EYEPROTECTION AND WORK INA WELL VENTILATED AREAWHEN SANDING ORGRINDINGOK, so farso good.next comesthe scarypart!scary part?No, notreally, butyou have tobe carefulpage 13IMPORTANT NOTESUSING YOUR BENCHGRINDER, REMOVE THETEETH FROM THE HACKSAWBLADE.get yourself a picktemplate. These canbe found online.Check atlockpicking101.comfor pick templates.Print the templateto scale and cut outthe shape of thepick, gluing it to thehacksaw blade with aconventional gluestickTHERE ARE A LOT OFMATERIALS THAT AREGREAT FOR MAKINGPICKS, AND A VARIETYOF TOOLS THAT CAN BEUSED. WE HAVE DECIDEDTO USE A HACKSAWBLADE AND A BENCHGRINDER FOR THISEXERCISE BECAuSEBOTH ARE WIDELYAVAILABLE ANDPRODUCE GOODRESULTS. SEE THE NEXTPAGE FOR IMPORTANTTIPS ON BENCHGRINDER SAFETY ANDTECHNIQUE!
grinding out your picksnever usethe side ofthe grindingwheel.always usethe frontedge!grind out the basic shape ofthe pick. use the corners ofthe grind wheel to make thecurved shapes. for finerdetail, you may wish to use arotary tool (like a dremel)with a cutting wheel to get theshape you want.be sure to quench often!!! thisis important. quenching willkeep the metal cool andstrong. do not let the metalchange color while grinding. ifthis happens your tool will betoo weak or brittle.please use power tools safelyand follow all operatinginstructions!once you've got the basicshape, peel away the templateand you're ready for finishingwow! This isstarting tolook like apick. cool!yup! butyou're onlyhalf wayhome. pickfinishing isthe realsecret!page 14
pick finishingpick finishing is where it's at. Get goodat this! the smoother your picks, theeasier they will move through the lock,the better feedback you'll get from thepins, and the better you'll be at pickinglocks!start with a heavier grit of sand paper(emery paper), perhaps between 150 and200 grit, and then work your way toprogressively finer and finer grits,finishing with somewhere between 1100and 2000 grit.to start, laythe pick flaton a surfaceand sand.for the rough finishing, wrap the paperaround a block of wood and sand allsurfaces, paying special attention tothe edges of the neck and tip of the pick.for the tight corners, try wrapping thepaper around a chop stick.sand the picks until you get a veryshiny, very smooth finish.beginner's tip!when you think you'vesanded enough, you'reprobably only half finished!you want these babies tolook like little mirrors! it'sa lot of work, but worth itin the end!once you're happywith the level ofsanding, you maywish to reallyshine them up! trytaking a rotarytool (dremel)with a hard feltpolishing wheeland somepolishingcompound. you'llbe amazed at thedifference!My hands arenumb fromall thissanding!no kidding!welcome tomy world.page 15
making a tension wrenchwiper bladeinserts workgreat! you canfind theminside therubber on thebladeCut 'em downto size and putan l-shapedbend into oneendI think Ican handlethatfile themsmooth and puta twist in thehandle forcomfort andcontrolthen polish themup real goodwith some steelwoolviola! you havea wrench thatlooks just asgood as the protools! way togo!thanks, Imade itmyself!page 16
LOckpickshop.com is a leading seller of quality lock pick tools. offeringgreat pricing and stellar service, lockpickshop.com has fast become apreferred tool seller amongst locksport enthusiasts everywhere.readers of this document are entitled to10% off any regularly priced merchandiseat lockpickshop.com!USE THE COUPON CODE"LSI" when checking outwww.lockpickshop.compage 17
WHere to getmore infowww.locksport.comlocksport internationalis looking for pioneersto form locksportgroups in your area!w w w . l o c k p i c k i n g 1 0 1 . c o mEvery day, hundreds (possibly thousands) ofenthusiasts gather together in the worlds leadingonline locksport community. lockpicking101 serves asa huge resource of information on every locksporttopic imaginable. members regularly answer questionsand discuss topics of technique, tools, locks, andmore! there is no better place online for thelocksport hobbyist to hang out and learn!page 18
why get involved in LSI?because it's fun! picking locksis cool. But many havediscovered that gettinginvolved in a locksport groupis even cooler. membersparticipate in contests and aranking system. they learntogether, challenge eachother, and most important,they have fun together!page 19
the positions of each pin, you will have a visual guide to help you know when you are directly under each pin. when the pick is in the lock, line each marking up with the face of the lock and you will know you're lined up. by knowing just when you're under each pin, you will be able to better