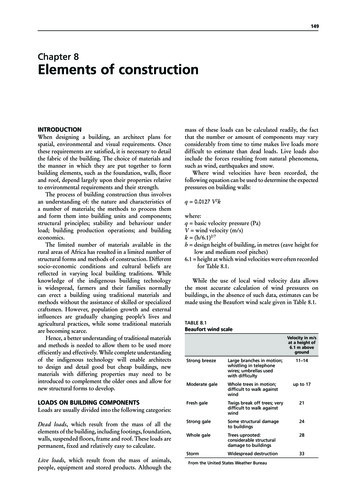
Transcription
DESIGNELEMENTS GUIDE
Acknowledgements: New York Institute of Art and Design (NYIAD)Course materials are written by NYIP staff, project managers,subject matter experts, and faculty. The Complete Course In InteriorDesign—Design Elements Guide was written by NYIAD faculty andstaff along with NYIAD Director of Education Jay Johnson and NYIADCurriculum Developer Steven Evans. The Lessons were designedby Ondine Bue and NYIAD Curriculum Designer Keith Gallagher.New York Institute of Art and Design is a registered trademark ofDistance Education Co. LLC in the United States and/or other countries. 2013 Distance Education Co. LLC. All Rights Reserved.Visit Us Online at www.NYIAD.eduASID1LSN6.indd2 The Complete Course in Interior Design
Table of ContentsDOORS4WINDOWS8HEATING/COOLING UNITS10DRAWING STAIRS11MOLDINGS AND TURAL SYMBOLS18HAND LETTERING CHART19UPHOLSTERED FURNITURE GUIDE20IntroductionThis is a guide to different styles of interior architecturalelements (and instructions on how to draw them) thatyou will find useful in your career as a professionalinterior designer. Keep this handy as a referenceguide in case a certain design element or techniqueescapes your memory. Each concept will be discussedin detail later in the Course, so if you’re looking at thisfor the first time, don’t worry if you don’t understandeverything right away.Some of the sections in this Guide specifically relate tolessons you’ll receive later in the Course. Feel free tostudy them now if you wish—and then refer to themperiodically as you go through the Course.design elements guide 3
TYPEs OF DOORSUnder each illustration you’ll see how to indicate that type ofdoor on a floor plan.4 The Complete Course in Interior Design
design elements guide 5
6 The Complete Course in Interior Design
Styles of Doorsdesign elements guide 7
Types of Windows8 The Complete Course in Interior Design
design elements guide 9
Types of Heating/Cooling Units10 The Complete Course in Interior Design
Drawing StairsIn Figure 1 you see a staircase labeled with the namesgiven to its different parts. In Figure 1A you see a detail ofhow to measure steps. Rise refers to the height of eachstep—usually 6" to 8". Run refers to the depth of eachtread—usually 10" to 11".AIn Figure 2 you see a typical straight staircase. How do youdraw it? Simply count the number of steps, and measurethe “rise” and “run” of one step. Record this information ina rough sketch, as shown in Figure 2A. Then, in a finishedfloorplan draw this staircase to scale, as shown in Figure 2B.In your Room Condition Checklist, you may record otherinformation, such as a brief description of the staircase, itshandrail, balustrades, and any other significant details.Figure 1As you can see in Figures 2A and 2B, only the lower partof the staircase is shown in plan—ending in a slash drawndiagonally across the stairs as shown in Figure 2C. This isthe conventional way to indicate stairs that are leadingup to a higher floor. It simply means that not all of thestaircase is considered to be part of the floor you are on.Figure 2As you can also see, an arrow in Figure 2A is labeled “Up.”Why do we label this arrow as “Up”? (After all, doesn’t thisstaircase also come “Down” from the floor above?) Wealways label the arrow in the direction of stairs as viewedfrom inside this room we are are drawing. If a staircaseascends from that room, we label it “Up.” If a staircasedescends from that room, we label it “Down.”For example, in Figure 3 you see a staircase that descendsfrom the room. In 3A you see how to draw a roughsketch of this staircase. In this case, because this staircasedescends from this room, we label it “Down.”ABCFigure3 3FigureABdesign elements guide 11
stairs: exerciseSometimes you’ll have a situation such as that in Figure 4,in which a pair of staircases is one over the other.In 4A you see a rough sketch. In 4B, a finished floorplan.While these may look confusing at first, you can see thatthese drawings clearly indicate that one staircase is overanother by slashing each staircase in the middle.HOW DO YOU DRAW THEM?AFigure 4AFigure 5How should you draw the staircase shown in Figure 5?A12 The Complete Course in Interior DesignBDraw it as shown in 6A and 6B.What about a spiral staircase, shown in Figure 6?Finally, how should you indicate a raised area in aroom, such as that shown in Figure 7?BDraw it as shown in 5A and 5B.Figure 6Figure 7BABDraw it as shown in 7A and 7B.
Styles of MouldingsBaseboardsdesign elements guide 13
14 The Complete Course in Interior Design
Styles of FireplacesFreestandingdesign elements guide 15
How to Sketch ColumnsCOLUMN IN CORNERCOLUMN ALONG WALLSKETCH16 The Complete Course in Interior DesignROOM WITH COLUMNS
How to Sketch ClosetsCLOSET WITH HINGED DOORCLOSET WITH SLIDING DOORSdesign elements guide 17
Architectural SymbolsThe following are some architectural symbols that you may need asyou learn how to create sketches and floorplans.18 The Complete Course in Interior Design
Hand Lettering ChartsA B CDEFG H IJKLM NOPQRSTUVWXYZa b c d e fg h ij kl m no p qr s t u v w xy zdesign elements guide 19
UpholsteredFurniture GuideWhen you have furniture custom made, you will mostoften be dealing with upholstered sofas or chairs. Thepurpose of this Guide is to help you make the decisionsnecessary to have such furniture custom made.At first, the variety of choices may seem bewildering. Asyou will see in this Guide, however, with a little knowledge,these choices are really easily made.GENERALLY, YOU WILL CUSTOM-DESIGNA SOFA OR CHAIR IN TWO STEPS. First, you will decide upon the general style andproportions of the piece of furniture. Second, you will specify the details you want:a. Base Detailsb. Skirt Detailsc. Arm Detailsd. Cushion DetailsTYPICAL DIMENSIONS FOR UPHOLSTERED FURNITURETYPICAL HEIGHTS OF OCCASIONAL TABLES20 The Complete Course in Interior DesignAccordingly, this Upholstered Furniture Guide is dividedinto two parts.First, you will find charts showingtypical styles of sofas and chairs.Armed with this information, you will have no problemcustom designing your own sofas and chairs. All you haveto do is combine the different styles, proportions, anddetails in any way you like.Your custom upholsterer should be able to help and guideyou here. The upholsterer will show you the styles anddetails the upholstery shop is prepared to manufacture,possibly suggesting some variations not shown here. Withthis help, and the information in this Guide, you shouldhave no difficulty designing upholstered chairs, sofas, andother pieces of furniture to your exact specifications.
Style Chart: chairsdesign elements guide 21
Style Chart: sofas22 The Complete Course in Interior Design
design elements guide 23
Style Chart: Chaises and Daybeds24 The Complete Course in Interior Design
Style Chart: Benches and Ottomansdesign elements guide 25
details Chart: CushionsINSPIRATIONALOR DESIGNQUOTE ABOUTWINDOWS26 The Complete Course in Interior Design
design elements guide 27
ASID1LSN6.indd
20 The Complete Course in Interior Design TYPICAL DIMENSIONS FOR UPHOLSTERED FURNITURE Upholstered Furniture Guide When you have furniture custom made, you will most often be dealing with upholstered sofas or chairs. The purpose of this Guide is to help you make the decisions necessary to have such furniture custom made. At first, the variety of choices may seem bewildering.