Transcription
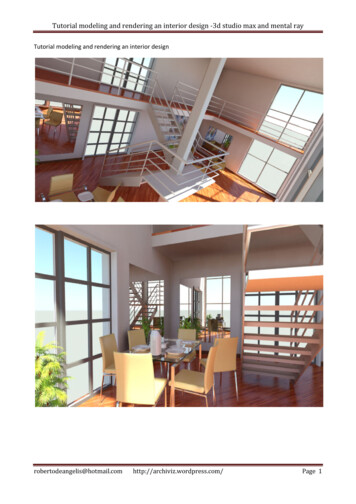
Tutorial modeling and rendering an interior design -3d studio max and mental rayTutorial modeling and rendering an interior wordpress.com/Page 1
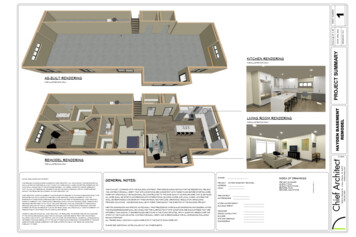
Tutorial modeling and rendering an interior design -3d studio max and mental rayDraw a rectangle of dimensions x 10, y 6. With the wall command by setting a thickness correspondingto 0.3 and a height 6 2 floors draw the wall with the right justification clockwise so snap on the vertices ofthe rectangle.With the fixed windows command having active snap on the grid insert a window length of 2.5 and aheight of 6 on the right side of the wall. Change the window dividing it into 2 panels with horizontal and 5vertical profile sheared. Clone the window and move it to the right of 2.5, repeat the cloning of bothwindows and move them to the right of 5.Enter other type 3 door sliding width and height 2 2.2 2 positioned at ground level and the third to the firstlevel as shown. Make with the command line with a depth L 1 on two sides of the rectangle, using theextrude extrude modifier of .25 clone and change the thickness to 0.05. move the package that representsthe ceiling and the floor of the gallery to share decking z press.com/Page 2
Tutorial modeling and rendering an interior design -3d studio max and mental rayComplete the casing wall by drawing a rectangle 10.6 x 6.6 to 0.3 and extruding it to make the ground floorslab. Clone the box and move it to share 6 to make the ceiling of the loft. Drawing with the commandUtypestairs a scale of width 2.1 depth 2 with width of the ramp 1. The overall value of the height of thescale is 3 for a number of 16 Raised.implemented with the command railing, railing with a circular top rail with diameter 0.05 lower circular railwith diameter 0.03 and 3 elements, post diameter circular spaced 0.04 1.5. We complete the upper level bydrawing a railing similar to the right side of the balcony. Drawing on the lower part of the wall of the linesas the path to the baseboard, draw a rectangle of dimensions 0.01 x 0.1 for the section. Select one at a timewith command lines and loft-click the shape and select the rectangle to create the viz.wordpress.com/Page 3
Tutorial modeling and rendering an interior design -3d studio max and mental rayIl sistema DaylightWe prepare the lighting of the scene taking advantage of the system that we find in the icon daylightsystem. The daylight and 'an integrated system consisting of mrsun direct sunlight, mrsky indirect light inthe sky and compass and that' the rose of the cardinal points. To position the daylight we choose the mode'date, time and location at which to define the locality' geographical day and time.vupon insertion of daylight, a dialog box warns us that this type of light source and 'need to activate acontroller photographic exposure and if we agree the tax. This is followed by another dialog box thatprompts us to always activate in the window environment as mr phisical sky map of the environment thatwill allow us' to have both a preview that in rendering a gradient of blue connected to the set time.The effect of these changes and 'activating visible from the dropdown render the control environment thatgives rise to the following dialog box. The controller photographic exhibition allows us as a professionalcamera to set shutter speed, aperture and film speed. In an alternative way we will be able to avail of utotal exposure value EV. to help you set the exposure value of the standard values are available for themost common exposure scenarios, such as scene extension with daylight and so dpress.com/Page 4
Tutorial modeling and rendering an interior design -3d studio max and mental rayTo see a preview in the preview of the level of lighting and the color of the sky and 'necessary in the dialogbox viewport background can be activated from the dropdown menu view, select the check parameter onthe use environment background. To see the shadows in the menu display style of the window in thecurrent tab, select the setting and shadow lightning illuminates the scene with lights, active shadinghardware, operating exposure values in the active window and shadows.Create two cameras placed in two opposite corners of the loft to frame the interior space with a focallength of 20 mm and retaining control of parallel vertical (parallax). For this purpose, even though the roomwas not perfectly horizontal axis can be selecting a room with the right button to activate the modifierroom correction that restores the iz.wordpress.com/Page 5
Tutorial modeling and rendering an interior design -3d studio max and mental rayShaders management in mental rayEach rendering engine typically binds indissolubly to the types of light and materials. If mental ray and'rendering engine active material editor will allow access to library materials for mental ray. The firstmaterial and 'architect and design that has a template of the main types of material used in architecture.With the card special effect in the material, we can activate the Ambient Occlusion effect of emphasizingthe contrast of light and shade to accentuate the point of contact between the surfaces, very useful on thewalls and the large horizontal surfaces. The board self illumination from 'the opportunity' to define the selfillumination of the material as in opal and neon .wordpress.com/Page 6
Tutorial modeling and rendering an interior design -3d studio max and mental rayIn a material typically use three main maps: the widespread that provides us with the color of the surface,the reflection map to highlight the behavior at points of strong light, and the bump map for the purposes ofrelief. For the material of the parquet floor use maps from a commercial library produced by Arroway.For each material are provided three maps mentioned with a very high resolution 6000x6000 pixels. Wecan play with 6 square meters of material in which will be 'avoided the effect of repetition (tiling) typical ofsmall maps. The option use real world scale in the material and in the modifier mapping and setting the sizeof the texture coordinates in the section of the map will 'do the ordpress.com/Page 7
Tutorial modeling and rendering an interior design -3d studio max and mental rayTo have a correct and fast previewing textures can activate the menu render setup button setup from thecard bitmap performance and memory options. Selecting the check proxy system will give 'rise to anindexing process that will allow' to show a preview for maps greater than 512 pixels by half a lighter versionof the map. During rendering the resolution of the map will remain viz.wordpress.com/Page 8
Tutorial modeling and rendering an interior design -3d studio max and mental rayGlobal illuminationThe term usually indicates a global illumination lighting method that can represent together the effects ofthe light that comes directly from the surface (as in the left image made with the standard rendering enginefor 3d studio max, the scanline) with the light that spreads indirectly bouncing off the surfaces in the scene(right image illuminated by indirect light in the sky and created with mental ray).In the picture below made global illumination you notice the effects of direct and indirect wordpress.com/Page 9
Tutorial modeling and rendering an interior design -3d studio max and mental rayLinear workflow and gamma correction.The use of a range of colors and proper 'need to get images where the colors are more' faithful as possibleto reality '. To this end, Microsoft has developed a standard sRGB and that 'common all devices that handlecolor scanners, camcorders, cameras, monitors and so on. The problem remains in the 3D software wherein addition to the color components of the input tools texture, color palette of sofware photo editing andfinal rendering we manage the process of illumination of the scene.The linear workflow also known as gamma correction and 'an inescapable when we use global illuminationand controls for the management of exposure such as the photographic exposure control, worth obtainingwashed-out images and chromatically however not faithful. The operation is performed by the card andValuation Range dialog preferences menu 'dropdown Customize. And 'need to enable checkmarks of thevarious options that the correct range with a value of 2.2.This unfortunately is not 'necessary for all elements of the texture as bump and displacement are olderthan the range 2.2 output. For this reason the maps that we will use for the bump and hiviz.wordpress.com/Page 10
Tutorial modeling and rendering an interior design -3d studio max and mental raywe will have to perform a selective modification of the range to about 1 in the material editor.global illumination algorithms in Mental ray.In mental ray have two main algorithms for the computation of global illumination : The final gathering andphoton mapping that can be used separately or in a complementary manner . The first fundamentaldifference between the two algorithms regards the calculation method of indirect light which in the case ofthe final gathering is done with respect to the observation point while in photon mapping and ' relative tothe scene as a whole; from what ' follows that the first and ' "view dependent" and requires recalculation atevery change in the position of the camera while the second and ' always applies regardless of point of view. Another important difference concerns the use of the two algorithms, the final gathering is suitable forexterior scenes, while the photon mapping is used mainly in the interior with natural and artificial lightalone or in connection with the previous year. The interior illuminated with natural light that we are goingto render will begin to use only the photon mapping . Precondition 'that is present in the scene one ormore ' photometric light sources that our case and the ' represented by the daylight system with mr sunand mrsky which are respectively a source of direct and indirect lighting . In this algorithm the indirect lightis achieved through the emission of a certain amount 'of rays of light , photons of which you can' vary overthe number also the diameter and the accuracy . To enable the photon mapping and ' need to activate thecheck parameter global illumination tab of the same name in the indirect illumination tab of the dialog boxrender setup. It ' also need to check the option to enable the generated object and receive globalillumination ress.com/Page 11
Tutorial modeling and rendering an interior design -3d studio max and mental rayAt this point, with the average parameter gi photon light come on in 1000 to emit photons defining theradius to 0.1 with the maximum parameter sampling radius. We get the picture wordpress.com/Page 12
Tutorial modeling and rendering an interior design -3d studio max and mental rayNow we are going to increase both the number and the radius of the emitted photons, respectively, 1000and 0.2. Of course this 'involves a calculation time even though the image and' far from satisfactory.photons overlap but there are still spaces completely blacks.In the next step we bring to 10,000 the emitted photons and disabling the max sampling radius let thesoftware determine the optimal diameter of the photons to illuminate the scene. The results are still quitesubstantial artifacts in the form of dark spots and a substantial inhomogeneities' the spread of rchiviz.wordpress.com/Page 13
Tutorial modeling and rendering an interior design -3d studio max and mental rayWe increase by a factor of 10 the number of photons bringing their number to 100,000. Gradually, the areain indirect light is more 'evenly lit. It 'good to clarify that the net increase in computation time of theemitted photons does not always allow for better light diffusion.This is highlighted by the next test where we issued 500,000 photons getting a worse result than the last.There is that 'a threshold beyond which not only employ more' time to render the scene but mostly we getquality 'bottom. Sara 'own experimental approach to help determine this threshold value which in our caseand' 100,000 photons. In general, for the greater part of the scenes depending on the number of polygonsof which comprises a value of 500 thousand, 1 million photons can 'be z.wordpress.com/Page 14
Tutorial modeling and rendering an interior design -3d studio max and mental rayWith ram player tool called up from the pulldown menu render a comparison we can put the last tworendering, for sincerarci differences.To save the map of photon mapping set the read and write tofiles photons in this way to the next rendering will create 'a filewith the extension. Pmap. The calculation of the photon mappingwill be 'skipped with the reading of the rdpress.com/Page 15
Tutorial modeling and rendering an interior design -3d studio max and mental rayTo eliminate the remaining artifacts will use the final gathering as a finishing tool. Tab of the final gatheringindirect illumination tab tick the check of the same name to enable the algorithm. The panel on thecalculation of the final gathering presents an easy-to-use template with a slide bar that allows the user toincrease the quali
exterior scenes, while the photon mapping is used mainly in the interior with natural and artificial light alone or in connection with the previous year. The interior illuminated with natural light that we are going to render will begin to use only the photon mapping . Precondition 'that is present in the scene one or