Transcription
Introduction to Microsoft Office 2016:WordLast Updated: September 2018Cost: 2.00
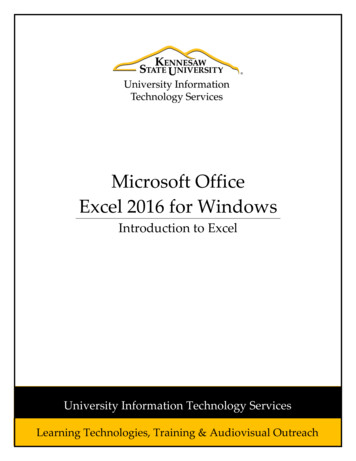
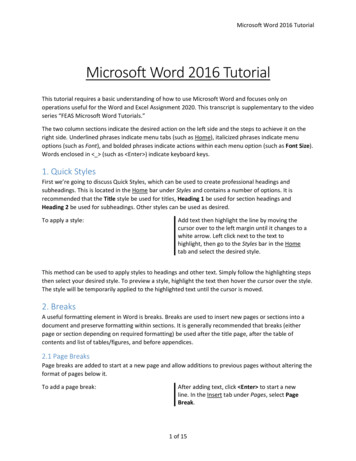
Microsoft Word is a word processing software. You can use it to type letters, reports, and otherdocuments. This class introduces users to Microsoft Word 2016.NOTE: Experienced users may benefit from this tutorial, as 2016 is different from previousversions.Opening Word 2016First, we will need to open Word 2016. This can be done by double-clicking on the Word 2016icon on the desktop or,In Windows 10,1. Open the Start Menu.2. Clicking All Apps.In Windows 7,1.2.3.4.Click the Start Menu.Click All Programs.Choose Microsoft Office.Click Word 2016.Understanding the BackstageAll of Microsoft Office 2016 contains the Backstage area. The Backstage is where you manage,save, and open your files. Here you can also print, select templates, and complete other usefultasks.Let’s take an in depth look at the Backstage. First, click your File tab (found atthe top left corner of the window).BackstageThe first page you see is the Info Page. Info displays your file’s name, size, and authors. Youcan also see when the last AutoSave occurred. AutoSaves are Office’s safety net. Periodically,your computer will automatically save your file as a temporary file. If you experience a computershut down, you can recover some of your work from the AutoSaves.WARNING: Please do notrely on AutoSave. Saveyour work often!2
New: You can create a new, blank document or select from Word’s templatelibrary. Word provides resume, calendar, and flyer templates to help you getstarted.Open: Click this option to open a previously saved file and continue editing it.Save: Save your file frequently. You can also click thein the upper leftcorner. Or, press CTRL S on your keyboard at the same time.Save As: The first time you save your file you will see the Save As menu. Seebelow for more information.Save as Adobe PDF: Lets you save the document as an Adobe PDF file.Print: Print your document using this screen. We will go into more details aboutthis later in the class.Share: This is new to Office 2016. This allows you to email your file, upload it toa blog site or present your document online. You will need additional accounts touse these features, such as a Microsoft Account (to present) or a WordPressaccount (to blog). For this introduction we will not cover these features in-depth,but be aware that these capabilities exist.Export: Allows you to export (or save) your document as a different documenttype.Account: Allows you to change the colors of your Office Background and sign inwith a different Microsoft Account if needed.Options: Gives you access to the advanced features in Word. This feature alsoallows you to rearrange the ribbon or other settings in this application.To return to the Word window, click the arrow at the top.Lesson 1: Creating New DocumentsOnce you open Word 2016, you have actually started a newdocument. You will see a blank page and a blinking cursor.NOTE: Either before you start or shortly after, you should save your document. Saving adocument frequently prevents a loss of file if your computer unexpectedly shuts down.At this point, you can start entering text. You may need several sessions in Word to completefinal versions of lengthy or complex documents.3
When you type text into a Word document, each character appears to the left of the blinkinginsertion point (the cursor) in the document window. The text you enter into a document caninclude letters, spaces, numbers, and symbols. As you type, the insertion point moves acrossthe screen from right to left. NOW YOU TRY: Try typing: The quick brown fox jumps over the lazy dog.Lesson 2: Save AsThe Save As menu appears the first time you save your file. You can also use the Save Asmenu to save different copies of the same file by giving each copy a slightly different file name.This can be done at any time.Example: myfile.docx and myfile2.docx.You can save your file before, during, or after you have finished your session. Let’s save our filenow so you can learn about the Saving screen.Open the Save As screen. Remember, you have to be in the backstage area.NOTE: The file pathsare blocked out.By default, you have two places that you can save your file: (1) directly on your computer, or (2)in a OneDrive Account.4
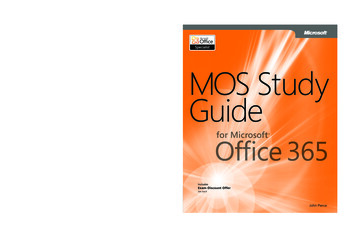
OneDriveYour OneDrive account is a cloud storage service where you can save your file on Microsoft’sservers instead of your computer. This option allows you to access your files from anycomputer, anywhere that has Internet access. For this course we will not be going overOneDrive, only saving our file to the computer. For more information, including pricing, pleasevisit onedrive.live.com/about.Unless you want to use an OneDrive account, you will save most of your files onto a computer.From the Save As screen:1. Select This Computer.2. Click Browse.The Browse button opens the Save As dialog box menu (see below).NOTE: A dialog box is a pop-up menu that displays additional options.You can also use the Save As dialog box to save different copies of the same file by giving eachcopy a slightly different file name.5
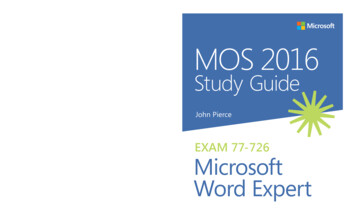
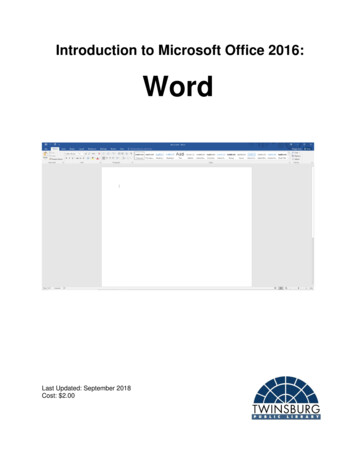
1. File Name box Word will automatically insert a default filename when you first save adocument. This default is always the first phrase in the document, but you have theability to modify it. Word can handle filenames of up to 255 characters. These filenamescan include uppercase and lowercase letters, numbers, and even spaces. However,they cannot contain the following symbols: : * \ “ ” ? /2. File Path At the top of the box, you can see the file path of the document. The File Pathshows which folders the document is saved under.3. File Location The default location where the document will be saved is My Documents.To store the document in a different location (including flash drives), you can click on thefolder or drive on the left side of the Save As dialog box.4. Similar Files When you are saving a document, files of similar types will be displayed.For example, if you are saving a Word 2016 Document, you will see other Word 2016(.docx) documents listed.5. New Folder You might consider creating a new folder before saving your file. This stepwill help you organize and find them later.6. File Type When you save a file, you can also change its format type. For example, youcan save your file as a PDF (protected document format) or as a Word Document. Clickthe drop down box to save your preferred type. The file type is denoted by the filename’s extension (.pdf, .doc, .docx, or .jpg).NOTE: You can also save files as older Word Documents (such as Word 2003). NOW YOU TRY:o Save your document to the Desktop.o Change the name of your document. Use something simple, like the title of thedocument or your last name.o Make sure that the file type of the document is a Word Document.What happens when you exit out of Word beforesaving a document?If you click the “X” before you save, you will see thepop-up to the right.You have three options:1. Save to open the Save as dialog box.2. Don’t Save to discard the document.3. Cancel causes Word to return to the document.6
Lesson 3: Opening Existing DocumentsDocuments previously stored on your computer or OneDrive can be opened for revision.Choose Open from the backstage.If the file you that you want to open is on OneDrive, then select OneDrive to download and editfiles stored in your OneDrive account (see page 5 for more information).Notice that recently saved documents are listed on the right side. You can open these byclicking on the folder or file name.If you don’t see the file that you need, choose Browse. This will cause the Open dialog box topop up. It is very similar to the Save As dialog box. Use this tool to search for and open your file.7
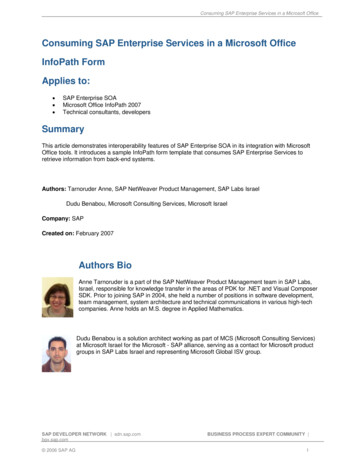
Open Dialog BoxIf you see your file in the current location, select it and click Open (4).A file saved in a specific folder is opened by double-clicking the folder to view the files in thefolder (2).For a file saved on a flash drive, select the flash drive on the left (1) to view folders and files onit.If you do not remember where you saved the file, you can type the file name in the Search Box(3) and click the magnifying glass symbol to search for it.NOTE: Search will only look through one drive at a time. To search your flash drive, you needto click the icon located on the left side NOWoooYOU TRY: Opening a fileClick on the File tab in the upper-left corner.Click Open.Find the file that you saved in the last lesson and open it.Lesson 4: Print PreviewYou can preview your document before youprint it. This ensures the document will haveyour preferred look/layout.To access the print preview:1. Click the File tab.2. Click Print.8
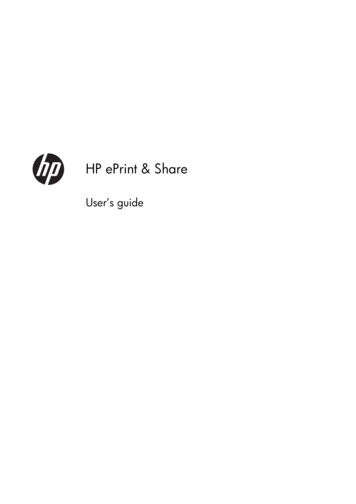
The Print Preview in Word 2016 is automatically displayed with the print menu. To return to theWord window without printing, click the arrow at the top-left corner.Lesson 5: PrintingAfter you create a new document, you can print it. You do not have to save the documentbeforehand.Click the File tab and click Print. It’s the same menu from the previous lesson.You can use this menu to adjust your current print settings. For example, you can specify howmany copies you need or the portion ofthe document you would like to print(e.g. single page or paragraph).1Before we go any further, let’s look atother Printing Options includingselecting a range (set of pages you wantto print) and choosing a printer.21. Determine how many copies toprint.2. Select which printer to use. Youshould verify that the correctprinter is selected if you haveaccess to more than one printer.3. If your printer is capable, you canprint on both sides of the paper(called duplex printing).4. Select the print range (all,specific pages, or selection). Toprint specific pages, type thepage numbers in the Pages: box.5. Select paper size. Typically, youwill use “letter size” or 8.5” x 11”.6. You can opt to print multiplepages per sheet. This willdecrease the size of your text.4356Now that you understand the backstageview, it is time to return to the Wordwindow for the rest of the class.WARNING: If your printer is wifi enabled, make sure it is your printer you are printing to!9
Lesson 6: Parts of the Word WindowThe Quick Access ToolbarAt the top left is a list of your most used commands. The default buttons are Save, Undo, andRedo. However, you can change your default buttons to other commands.Save: Saves your document in its current locationUndo: Lets you undo your most recent action (this command is your best friend).Redo: Undo an undo. In other words, if you undid your most recent action, you canclick redo if you decide to go back and keep it.Customize Quick Access Toolbar: You can add more commands to the tool bar byselecting this option.Search/HelpIn 2016, Microsoft introduced the Search Box feature. The boxis located next to the ribbon tabs. If you wanted to complete aspecific task but did not want to browse for it on the ribbons,you can type a keyword to find it.10
The Title BarNext to the Quick Access toolbar is the Title Bar. The Title Bar displays the title of thedocument on which you are currently working. Word names the first new document you open“Document1” until you save it and give it a new name.The RibbonIn Microsoft Word 2016, you use the ribbon to issue commands. The ribbon is located near thetop of the screen and below the Quick Access toolbar.At the top of the ribbon are several tabs; clicking a tab displays several related commandgroups.Home: This tab contains the most commonly used commands in word. Some of these includecommands to change how the text looks and is displayed on the page. The Cut, Copy, andPaste commands are also here.Insert: This tab contains commands that allows you to insert various objects such as pictures,tables, and shapes into the document.Design: In this tab you can change the way the document looks and add visual features.Page Layout: Here you can change the position of the text on the page and the documentformatting.References: You can manage your sources and citations. You can also add a table of contentsand footnotes here.Mailings: This tab lets you set up and use the Mail Merge feature of Microsoft Word.Review: This tab allows you to use spell and grammar check, insert comments, track changesthat you have made to the document, and use a thesaurus.View: In this tab you can change how the Word window looks.11
NOTE: Changing how the Word window look will not affect how the document looks whenprinted, just how it looks when you view it on the computer.You will notice the faint lines that divide the ribbon.Command GroupThis is a Command Group. A command group is where similar commands are stored togetherin the ribbon. For example, in the picture above, all of the commands that allow you to edit thefont are stored in the Font command group. There are several command groups located in eachtab.To locate a command, you will need to click on a tab and open that ribbon. NOW YOU TRY: Open the Insert tab, for example, to open the Insert ribbon. Whatcommand group contains the command to insert:o a table?o wordart?o header?o a picture?Dialog Box MenusSome of the command groups have commands that are not shown. These additional optionsare indicated by a dialog box launcher button. Let’s look at the Paragraph Dialog Boxlauncher. The Paragraph command group is found under the Home ribbon.How to launch a Dialog BoxClick the small arrow found in the lower-right corner of thecommand group.A pop-up menu will appear (see right). In this case, theParagraph dialog box lets you adjust the line spacing andalignment of the document. (You will be using this dialog boxlater in the class.)NOTE: Word 2016 is automatically set to space multiple linesin between paragraphs. You may need to adjust the linespacing before you begin your document.12
The Text AreaJust below the ruler is a large area for your work. The blinking vertical line in the upper-leftcorner of the text area is the cursor. It marks the insertion point. As you type, your text displaysat the cursor location.The RulerThe ruler is found below the ribbon. Using the ruler, you can efficiently adjust your page marginsand paragraph indents.To view your ruler:1. Click the View tab.2. Click the check box next to Ruler in the Show group. Whenthe box is checked, the ruler is visible.The Horizontal and Vertical Scroll BarsThe vertical and horizontal scroll bars enable you to move up, down, and across yourwindow simply by dragging the white square located on the scroll bar. On the right isan example of the vertical scroll bar.The vertical scroll bar is located along the right side of the screen. To move up anddown your document, click and drag the vertical scroll bar up and down.The horizontal scroll bar is located just above the status bar. To move back and forthacross your document, click and drag the horizontal scroll bar back and forth.NOTE: You won't see a horizontal scroll bar if the width of your document fits on yourscreen.The Status BarThe Status Bar appears at the bottom-left corner of Word. The status bardisplays the current page and the word count (the number of words) ofyour document. You can customize what displays on the Status Bar.To customize the status bar:1. Right-click the status bar.2. Select the options you want displayed from the menu that appears.3. Click an item to select it or deselect it. A check mark next to anitem means it is displayed in the status bar. NOW YOU TRY: Add the Line Number option to the status bar.13
Lesson 7: Understanding Document ViewsIn Word 2016, you can displayyour document with one of thefollowing five views: Draft, WebLayout, Print Layout, Full ScreenReading, or Online Layout. Thesesettings are found in the View tab.1. Draft View: Draft view eliminates excess space. You will not be able to see margins orthe page layout.2. Web Layout: View your document as it would appear in a web browser such as InternetExplorer.3. Print Layout: Shows everything from margins to page layout. It is the most commondocument view, as it shows how the document will look when printed4. Read Mode: You can view how your document looks as a two-page spread. This is agreat way to test how your document may look on tablet devices. You cannot edit whilein this mode.5. Outline View: Displays the document in outline form. You can display headings withoutthe text. If you move a heading, the accompanying text moves with it.NOTE: You cannot edit while in Read Mode. However, you can make some settingadjustments such as changing the background to Sepia. You still have full access to theBackstage. To get out of Read Mode, hit the Esc key on the keyboard. NOW YOU TRY:o Change the document view to Read Modeo Change the document view back to Print Layout.14
Lesson 8: HighlightingMany of Word’s shortcuts and functions require that you know how to highlight text.How to Highlight1. Position the cursor in front of the first letter of your sentence.2. Click the mouse button once, so that the blinking insertion point is present.3. Click on the left mouse button and hold the button down; then drag the mouse over theentire sentence.4. Release the mouse button.5. Notice that your sentence now appears in a different color. This is called highlighting.To remove the highlighting, click anywhere outside the highlighted text.Select with the Shift and Arrow Keys1. Position the cursor in front of the first letter of your text. Click the mouse button once so thatthe blinking insertion point is present.2. Hold down the Shift key on the keyboard.3. As you hold the Shift key, press the right arrow key. This will highlight one letter at a time.4. Press the down arrow key until the first paragraph is highlighted.5. Click anywhere outside the highlighted area to remove the highlighting.Tip: If you need to highlight the entire document, press the Ctrl and A keys at the same time.Lesson 9: Changing the FontA font is the style, or typeface, of the text. Some of the most common fonts are Calibri, TimesNew Roman, and Arial. The default font of Word 2016 is Calibri.Font sizes are measured in points. Point size is the vertical measurement of a character. Oneinch equals 72 points. The most common point sizes are 10 and 12 point. This handout iswritten in 11 pt. Arial.Point SizeFont15
The ribbon has shortcuts to make it easier to change the size, shape, and style of your font.From here, you can Bold ( ), Italicize ( ), or Underline ( ) your text. You can also changethe point size and the font style. First highlight the text, then select the command.NOTE: If you decide to type in 16 point and Times New Roman font at the beginning ofyour document, this decision will remain as you continue to type (provided you don’tchange these settings). NOW YOU TRY:o Type your name.o Highlight your name.o Click the drop-down arrow on the Font menu bar. It’s located under the Hometab.o Select a different font style.Lesson 10: Line SpacingThe default line spacing of Word 2016 is multiplespacing. This means when you press Enter, there willbe a wider space in between sentences.You can change the default line spacing at any time. For example, you can change the settingwhen you open a new document, in the middle of drafting a document, or after you havefinished. Some users prefer to type their document first and format it (or change the style) afterthey’ve typed. Others prefer to format before typing. NOW YOU TRY:o Type your name and address as three (3)different lines. It should look like this:Twinsburg Library10050 Ravenna RoadTwinsburg, Ohio 44087ooooHighlight your name and address.Click on the Paragraph icon or on theparagraph’s right corner button ( ) to reveal theparagraph dialog box.Notice the option to change the line spacing.Click on the small triangle under Line Spacing,and choose single.Click OK.You can change line spacing for an entire document by specifying the spacing before you begintyping. Or, you can change the line spacing by highlighting a specific paragraph (as you justdid).16
Lesson 11: Cut, Paste, and CopyTo Cut: means to remove the text from your document and store on your ClipboardTo Copy: means to make a duplicate of it.To Paste: means to deposit the text that you have either cut or copied, to anotherlocation in your document, or to a different document.Use format painter to apply formatting settings to another set of text on yourdocument.Tip: This is great for keeping any headings or titles consistent in your document.ClipboardThe clipboard is a feature of all Microsoft Office products. It is a temporaryholding place of text or images that you have copied or cut.To see what is stored on the clipboard:1. Click on the Home tab.2. Click on the right corner button (The Clipboard appears.) on the Clipboard group. NOW YOU TRY: CopyingoooHighlight your name. Click on the copy icon () in the ribbon. This creates aninvisible copy of your name.Move the cursor down a few lines by pressing the Enter key on the keyboard.Click the paste icon (). This should paste a second copy of your name on yourdocument. Every time you click the paste icon, another copy of your name appears. NOW YOU TRY: CuttingoooOnce again highlight your address. Click on the cut icon in the toolbar. This actuallycuts the original text (e.g. your address) from the document. It disappears from thedocument and is now on the clipboard.Click on a different area of the document.Click the paste button. Your address now appears in a new spot.Lesson 12: Spelling and Grammar CheckGrammar Check: A feature of Microsoft Office that checks for grammar errorsthroughout the document.Spell Checker: A feature of Microsoft Office that checks for spelling errors throughoutthe document.17
What do the lines mean?When you see wavy blue lines, this means that grammar check has found a possiblegrammatical error.When you see wavy red lines, this means there are possible misspellings. If it’s spelledcorrectly, you can always add the word to its dictionary so it doesn’t keep coming up as amisspelled word.How to Fix ErrorsA.) You can right-click over the red or green lines. Word willdisplay a menu of how to correct any possible mistakes(see right).ORB.) You can select Spelling & Grammar under the Reviewribbon.You will see a pane open on the right side of your screen thatdisplays possible mistakes in the document.Click Change if you agree with Word’s suggestion.Click Ignore if you do not agree.Click Ignore All if you want to ignore all instances of the word in thecurrent document.Click Add to add the word to the dictionary of your computer.Click Change to change only this instance of the word.Click Change All to replace all instances of the misspelled word withthe suggested word.18
AutoCorrect: A default feature that automatically correctscommon typos and grammar errors without yourinvolvement. You can decide to keep this feature active orturn it off.To turn AutoCorrect off:1.2.3.4.Click File.Click Options.Click Proofing.Click AutoCorrect Options.Lesson 13: Beyond Typing: Using the KeyboardThe following commands can be used on your keyboard to navigate within Microsoft Word.To move the insertion point.Press.One character to the left or rightLeft Arrow or Right ArrowOne word left or rightCTRL Left Arrow or CTRL Right ArrowOne line up or downUp or Down ArrowOne paragraph up or downCTRL Up Arrow or CTRL Down ArrowOne page up or downPage Up or Page DownTo left or right end of current lineHome or EndTo first or last character of the entire documentCTRL Home or CTRL End19
Basic Shortcut Keys for Navigating Through DocumentsThe following are keyboard shortcuts (keys are ndHelpDescriptionCreates a new blank documentOpens a saved documentSaves the current documentPrints the current pageCancels the last change to the documentCopies the selected text to the clipboardPastes the cut or copied selectionRemoves the selection and places it in theclipboardFinds text within the current documentOpens Word’s Help CenterDisplays the next pageMoves the cursor to the top of the next pageDisplays the previous pageMoves the cursor to the top of the previous pageMoves to the end of the current lineMoves the cursor to the end of the documentMoves to the beginning of the current lineMoves the cursor to the beginning of the documentKeyboard ShortcutCtrl NCtrl OCtrl SCtrl PCtrl ZCtrl CCtrl VCtrl XCtrl FF1Page DownCtrl Page DownPage UpCtrl Page UpEndCtrl EndHomeCtrl Home20
documents. This class introduces users to Microsoft Word 2016. NOTE: Experienced users may benefit from this tutorial, as 2016 is different from previous versions. Opening Word 2016 First, we will need to open Word 2016. This can be done by double-clicking on the Word 2016 icon on