Transcription
Body MechanicsAndLifting/TransfersStaff Handbook
Table of Contents Terminology Basics of Body Mechanics Lifts and Transfers oBed MobilityoTwo PersonoThree PersonoPivotoAquatics Area TransfersoMechanical LiftsoBathroom TransfersPositioning ConsiderationsoWheelchair PositioningoPressure SoresoRepositioning in Wheelchair
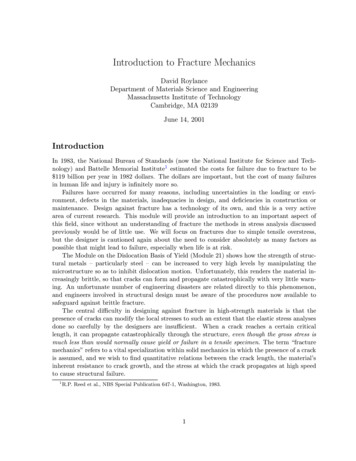
TerminologySome of the terminology used in this handbook is listed below for reference:Body Mechanics – Maintaining a proper position during movementContracture – Permanent shortening of muscle that limits motion at the joint involvedSpasticity - Extreme or abnormal tension of the muscles which increases with quick passive movementsFlaccidity – Lack of tension in muscles that results in “floppiness”Supine – Lying on the back, face up.Prone – Lying face down.Basics of Body MechanicsToday, four out of five individuals will suffer some type of back pain during their lives. Nearly 90% of allback pain falls into the musculoskeletal category including sprains and strains of the muscles orligaments due to lifting. Much of this pain can be lessened and even prevented through the use ofproper body mechanics. Body mechanics can be defined as maintaining a proper position duringmovement. Proper use of body mechanics will conserve energy, reduce stress and strain on bodystructures and reduce the possibility of personal injury.1Body mechanics are very important when working at a job that requires a lot of lifting. Body mechanicsare equally as important in every day life situations from taking out the trash to playing with yourchildren or grandchildren. The more aware you are of moving your body in ways that help to preventinjury, the less prone you will be to injury. Once you have a back injury, you are more prone to injuringyourself again, so any steps you can take to protect yourself now from injury will be helpful in the longrun.Some essentials to body mechanics that need to be addressed include2: Plan out all activities before performing themSurvey the area and clear any objects that could pose a tripping hazardKeep the distance to move an object/individual as short as possiblePosition yourself as close as possible to the object/individual to be movedRaise/Lower surface which you are lifting to or from if possible to prevent unnecessary forwardbending Use a wide base of support, one foot slightly ahead of the other Bend at your knees and hips while keeping your back as straight as possible Look ahead, not at the ground Push up with your legs to perform the lift. Continue to keep back straight during the lift Do not twist back, move your feet instead Do not hold your breathThe following photographs illustrate poor use of body mechanics.a. Lifting with your back and not your legs
b. Twisting your body instead of moving your feetc. Twisting while reaching an object on a high shelfd. Not removing obstacles in the way, creating poor body mechanicsa.b.c.d.The essentials that are listed above are a general list of steps that should be taken every time you lift,whether it is at home or while transferring individuals at work. It may not always be possible to keep anobject close to your body to decrease strain on your back because of its size or shape. In this situation,planning how you are going to lift the object ahead of time will help to ensure you are using the mostappropriate strategy.The following photographs illustrate good use of body mechanics.a. Using legs to perform a liftb. Holding an object close to the body while carrying itc. Pivoting while moving your feet instead of twisting your bodyd. Standing square to a shelf when reaching for an object without twisting bodya.b.c.Lifts and Transfersd.
According to policy, no individual over 50 pounds should ever be lifted by only one person. Aminimum of two staff persons is required for all transfers. Please be sure to follow the lifting guidelinesfor each individual you are working with as recommended by the Physical Therapist. The identified liftor transfer can be found in each Unit Chart under the Assessment Tab, titled PT evaluation and/or onthe Positioning/Mobility List.There are many different ways to complete the lifts and transfers contained in this training. Differentemployers may have expected a different approach to these transfers. This training is tailored to ourclientele and is what should be used when transferring the individuals.According to the 2007-2008 Staff Injury Report from Western Pennsylvania, 49% of the injurieslisted were strains of the lower back. The other top injuries included strains of the shoulder (13% ofinjuries) and strains of the upper back (11%). According to the report, the most common ways that staffhave been injured included: the client jerking unexpectedly, attempting to catch client during fall ordrop, staff assisting with transfer was lifting improperly, twisting back while lifting and poor handplacement during lift. Staff should always be prepared for unexpected movements of client, using the‘Things to Remember’ listed below will help to ensure the safety of the individual as well as the staff.Things to Remember: USE TEAMWORK: Coordinate efforts – timing is essential for a successful lift. One person, the person at the top of a two-person lift is in command of the lift and should count1-2-3-lift All persons involved in a lift should communicate that they are ready, avoid distractions duringlift (no irrelevant conversation) It is important to position the individual properly after transferring them (See PositioningConsiderations Section) Let the individual see the destination during the move The lift should be performed at a controlled speed, not fast and jerky Control the lowering of the individual (many clients are at risk for osteoporosis, be awarethat being repeatedly dropped into their wheelchair may increase their risk of fracture) Get to know the individual, some clients may be insecure about being transferred, some mayhave very spastic muscle tone and some may have very flaccid muscle tone. It is very importantto speak and move in a calming manner before and during a lift to keep an individual that maybe apprehensive at ease during a transfer. Understanding that an individual may hold on verytightly during a transfer because of their spastic tone or may slide through your fingers becauseof their flaccidity will help to adapt your handling of the individual.1 For individuals who are aggressive or excessively spastic when a transfer is attempted - waituntil the person calms down, and becomes attentive to participate as much as possible. Usecalming techniques first before attempting the lift. Get additional help if needed.
Before Every Lift: Explain to the individual what you are going to do Place the wheelchair as close as possible to the surface you are moving the individual to Have the area to which the individual will be transferred in place prior to beginning the transfer(tub bench in appropriate position, toilet seat in place, etc.) Lock the brakes Remove the tray, footrests, armrests, headrest, and laterals to get as close to the person aspossible Avoid pulling the individual forward in the wheelchair by their arms (Be aware of the risk forosteoporosis) Make sure there are no obstacles in the way of your lift Assure a firm grip (avoid pulling/lifting at the shoulders)1NOTE: Remember Policy on Dress Code: Wear shoes with closed toes, closed heels, and non-slipsoles.
Bed MobilityWhen moving an individual in bed, the following should be considered: If possible, adjust the height of the bed to reduce strain on your back Move individual body segments (head/shoulders, hips, then legs) to reduce the effort requiredand to provide greater control Position your body as close to the side of the individual as possible, trying not to reach with yourarms2Side-to Side Movement 21. Position one forearm under the individual’s upper back and one forearm under the middle ofthe back * It may be necessary to support the individual’s head with your upper arm as youmove them2. Gently slide the upper body toward you3. Do not lift, slide on your forearms4. Next, position your forearms under the individual’s lower trunk and just below the hips5. Gently slide that body segment toward you6. Finally, position your forearms under the thighs and legs and gently slide them toward you7. When pulling the individual towards you, be sure that you are pulling straight toward your body.This will decrease the amount of force needed to move the individual.** For both the side-to-side and upward movements in bed, if the individual has a history of skinbreakdown, a draw sheet should be used. A sheet should be placed under the individual Two staff members will complete the transfer with one staff on either side of the individual Staff members will grasp sheet and roll until close to the side of the individual Assure a firm grasp on the sheet and lift individual slightly off of bed and move in the directionnecessary to reposition
The following photographs illustrate side-to-side bed mobility.a. Proper technique for sliding an individual to the edge of the bed.b. Proper use of a draw sheet.b.a.The following photograph shows poor technique for side-to-side bed mobility.A. NEVER pull an individual by their arm or leg while moving them, always support at the trunk.This could cause injury or a fracture, especially in individuals with osteoporosis.A.Upward Movement 21. Before attempting to move the individual upward, bring them close to the edge of the bed usingthe above technique2. Bend the individual’s hips and knees so the feet rest flat on the bed3. You should face toward the individual’s head and stand at the individual’s mid-chest level withone foot slightly in front of the other4. Support the individual’s head and upper trunk with your arms and lift until the shoulder bladesclear the bed *If you are unable to lift the person’s trunk or if the lift creates excessive strain inyour back, it may be necessary to ask for assistance5. Your chest should be close to the individual’s chest to reduce strain on the back6. Slide the lower trunk and pelvis upward approx 6-10 inches *Do not attempt to move theindividual over a long distance unless they are able to assistThe following photographs illustrate upward bed mobility.
a. Proper technique for upward movement in bed, assisting the individual to lift the head andshoulders during the transfer.b. Use of a draw sheet.a.b.The following photograph illustrates poor technique for upward bed mobility.A. Improper technique: NEVER pull an individual by their arms.A.Supine to Sidelying Transfer 21. Stand facing the individual on the side you are rolling the person toward.2. If you are rolling the person onto their right side, cross the left leg over the right leg and positionthe right arm straight and at shoulder height3. Roll the person by gently pulling from behind the left shoulder and the left hip4. Once the person is sidelying, position them for comfort with pillows under the head, andbetween the knees and ankles.
The following photographs illustrate the Supine to Sidelying Transfer.a. Support the individual at the hip and shoulders standing square to the person’s chest.b. Slowly pull the individual toward your chest until they are lying on their side.a.b.Supine to Sit Transfer 21. Move the individual close to one side of the bed or mat and roll to a sidelying position2. Make sure the person’s hips and knees are bent3. Keeping a wide base of support, reach under the person’s shoulder with one hand and a hand atthe knee4. Moving in one fluid motion by putting body weight on one foot and then the other, move theperson into a sitting position ** It may be necessary to complete this step segmentally. Whilethe individual is sidelying, move the legs over the edge of the surface, then lift theshoulders/upper body to a sit position.5. Once the individual is up in the sitting position, they can then be transferred to their wheelchairusing the techniques listed below.
The following photographs illustrate the Supine to Sit Transfer.a. First perform the supine to sidelying transfer.b. Position one arm under the shoulder of the individual and one arm cradling the legs under theknees.c. Shift your weight from one leg to the other while assisting the individual to a sitting position.a.b.c.
Prone to Sit Transfer 21. Move the individual close to one side of the bed or mat2. If you are going to roll toward the right side, cross the left leg over the right and position theright arm close to the person’s side with the elbow straight and hand tucked under their hip3. Grasp the individual at the hip and shoulder regions on their left side and roll toward you into asidelying position (make sure the individual’s arm is not stuck underneath them)4. Ensure there is enough space to roll the individual onto their back before completing thetransfer, if there is not enough space, move the person forward while sidelying5. Guide the individual from sidelying to supine by gently lowering them to a supine position6. Once the individual is supine, follow the steps for the supine to sit transfer and then transfer theperson into their wheelchair
The following photographs illustrate the prone to sit transfer.a. Prepare the person to roll onto their side by tucking their arm at their side and crossing one legover the otherb. Roll the individual into a sidelying position by grasping the person’s hip and shoulder regionc. Continue to roll the person into supine and then follow the steps for a supine to sit transferd. Move the person to a sitting position from sidelyinga.b.c.d.
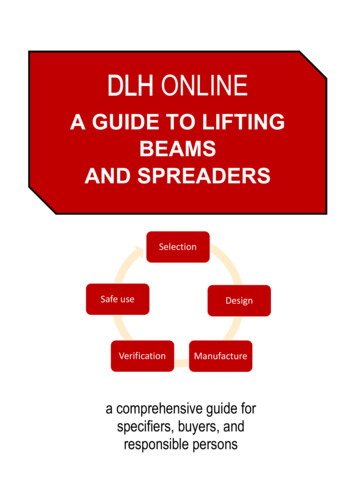
Wheelchair TransfersTwo Person – Top and Bottom Lift 1,21. When possible, the taller, stronger person should stand behind the chair (TOP)2. The top person should stand behind the wheelchair and reach through the individual’s armpitsand grasp the person’s opposite forearm with the hands and fold the individual’s forearms overchest/stomach 23. The person at the bottom should bend their hips and knees, keep their back straight and lowerthemselves to the same level as the individual4. The person at the bottom should support the individual’s hips and knees by placing hands underthighs, just above the knees5. The person at the bottom will remove the pelvic positioning belt, chest harness, foot strap, etc.*Double check to be sure the individual is released from all strapping and positioningequipment. **Do not move away from the individual when positioning equipment is removed.6. On the count of three, lift slowly and in unison7. Lift only as high as needed8. Shift or step to the side and place the client gently on the designated surface. DO NOT TWIST9. Position individual appropriately in the designated area (Refer to Positioning ConsiderationsSection)10. When Lifting from a surface to the wheelchair, place the individual in a sitting position first andreverse the procedure. If the individual is prone, they need to be assisted into supine, thensitting first.11. Be sure to attach the pelvic positioning belt before the top person releases their grasp
The following photographs illustrate the top and bottom transfer.a. Appropriate arm graspb. Alternative arm grasp if crossing arms is not possible (PT will determine and provide instructionas to which technique should be used)c. Start positiond. Lifte. End positiona.b.c.d.e.
The following photographs illustrate improper technique for a two-person top and bottom transferA. Improper technique: should grasp behind kneesB. Improper technique: chair should be placed as close to the surface you are moving theindividual to as possible to decrease the amount of time needed to lift the individualC. Improper technique: Avoid distractions and extraneous conversationA.B.C.Three Person Transfer 1May be used when: The individual is being fed by tube – THE SOLE PURPOSE OF THE THIRD PERSON IS TO ATTENDTO THE FEEDING EQUIPMENT The individual is overweight. The third person will assist by taking some of the individual’sweight at the buttocks and helping to guide them during transfer The individual has positioning restrictions due to surgery or a medical condition. The thirdperson will assist by taking some of the individual’s weight at the buttocks and helping to guidethem during transfer.1. Will be performed as the two-person lift shown above with the assistance of a third person2. After lifting, if the individual needs to be repositioned or needs a seat cushion, ask another staffmember to assist you with a two person lift. DO NOT LIFT ALONEPivot Transfer (The individual is an active participant in the transfer)It is helpful to understand the basics of sit-to-stand before performing this transfer. Before standing theindividual, ensure the following:
o The individual’s bottom is scooted out to the end of the chairo Their feet are placed slightly behind their kneeso They are bending forward at the waist, bring their ‘nose over their toes’Completing these three steps before standing will make it much easier on both the staff and theindividual to complete the transfer.** A transfer disc/board is commonly used for this type of transfer. It is important to apply the basics ofsit-to-stand when using this device. The placement of the disc should promote the individual’s feet tobe placed slightly behind their knees to use the proper standing technique.The photograph to the left demonstrates the proper placement of the transferdisc.-The individual is scooted to the end of the chairBoth feet are placed in the center of the discThe individual’s feet are placed slightly behind his knees1. Position wheelchair at a 45-90 degree angle to transfer surface2. Normally, the individual should be moved toward their stronger side while you assist at theweaker side (consult the physical therapist if you are unsure)3. Assure the individual has shoes on for standing transfers (ensure that braces or Ankle FootOrthoses are on if the client requires these for weight bearing)4. Get the individual in a sitting position and slide them to the edge of the surface so their feet arehanging and/or touching the floor. *If individual is in a tilt-in-space wheelchair, be sure that it istilted as far forward as possible5. Positioning yourself in front of the individual, place one of your feet between the individual’sfeet. The other foot will be positioned between the individual and the surface to which you aretransferring.6. Bend at your hips and knees, keeping your back as straight as possible7. ALLOW THE INDIVIDUAL TO DO AS MUCH OF THE TRANSFER AS THEY CAN8. Lean the individual forward and place your arms under his/her arms around the trunk9. The individual’s arms can remain at his/her side or they can be put around your waist or on yourshoulders NOT AROUND NECK10. On the count of three, lean the individual forward as you straighten your legs to form an uprightposition11. Once the individual is upright and has cleared the surface, slowly pivot him/her towards thetransfer surface so his/her back is facing the surface (The individual may be able to take smallsteps to assist you in pivoting them.)12. Slowly lower the individual to a seated position by bending your hips and knees
13. Stabilize the individual in the appropriate position on the transferred surface (according tohis/her PT evaluation and/or positioning/mobility list)The following photographs illustrate the pivot transfer.a. Starting positionb. Assisting the individual to pivotc. End positiona.b.c.
The following photographs demonstrate improper technique of a pivot transfer.A. Improper technique: Individual’s feet are not placed under their knees, individual is sitting backin the chair, they should be scooted forward and leaning their trunk forward.B. Improper technique: NEVER allow individual to grab around your neck.A.B.
Lifts in the Aquatics AreaThree Person Lift1. Position the wheelchair at the edge of the pool with individual facing the pool2. Apply the Personal Flotation Device (PFD) to the individual3. Two people will need to stand on either side of the wheelchair and a third person will need tostep into the pool, to lift the individual’s legs4. If you are lifting at the right side of the individual, you will place your left arm under theindividual’s right arm and bend their arm at the elbow5. With your left hand, grasp the individual’s right forearm by the elbow6. Gently push their arm in towards their body and hold it gently, but firmly, against their torso7. Your right hand will support under the persons leg above the knee8. If you are approaching from the left, do the same as above but your right arm will hold theperson’s left arm and left hand will support under their left leg9. Next, bend at your knees, with your feet spread and keep your back straight10. The person lifting at the bottom should be in the water and standing directly in front of theindividual11. One of the people at the top of the lift should unfasten the pelvic positioning belt12. One of the people at the top of the lift should be in command, and on a count of three, the topstaff should lift up and step forward to the lip of the pool – THIS SHOULD BE COMPLETED INUNISON13. Now bending their knees, the staff should slowly lower the individual to the lip of the pool14. In this position, the individual will be sitting with his/her legs in the water and his/her buttockson the edge of the pool15. On another count of three, ease the individual into the water. Lifting is minimal here. You needonly to clear the edge of the pool, to ensure that the individual does not scrape their back or hittheir head16. At this point, the staff person in the water is in control of the lift, lowering the individual into asupine position in the water17. To transfer from the pool to the wheelchair, reverse the procedures outlined above18. Replace the pelvic positioning belt
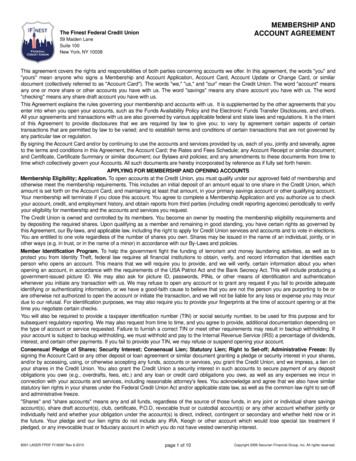
The following photographs illustrate a three-person lift in the aquatic area, wheelchair to pool.a. Start position, the third person involved in the lift will be in the water supporting the feet andlegs.b. Positioning while individual is seated on lip of pool.c. End position, individual is slowly lowered into pool and bottom staff takes control of lift.a.b.c.
The following photographs illustrate a three person lift in the aquatic setting, pool to wheelchair.a. Start position, bringing individual from pool to their wheelchair/shower chair, one top persongets into pool to lift individual from pool to sitting on lip of pool.b. Position while individual is seated on lip of pool, top person is back on pool deck to assist otherstaff member.c. End position, individual is seated in their wheelchair or shower chair, safety belt is replaced.a.b.c.Alternative Three-Person LiftThis type of lift is used when the individual has difficulty maintaining an upright seated positionin order to successfully perform the above transfer.1. A two-person top and bottom transfer as discussed previously in this training is used to transferthe individual from their wheelchair to a mat on the side of the pool.2. While the individual is on the mat, their Personal Flotation Device is applied.3. One of the staff members on the pool deck will move into the pool to assist the bottom persononce the PFD is secured.4. The staff in the water will stand beside each other and place their forearms under the individualat their head/upper trunk and their lower trunk/hips.5. From this position, the individual is lifted enough to clear the edge of the pool and is loweredslowly into the water.
The following photographs demonstrate the alternative three-person aquatic transfer, wheelchair topool.a. Two staff persons on the pool deck perform a two-person top and bottom transfer to moveindividual from wheelchair to a mat on the pool deck.b. All staff members are assisting in placing the personal flotation device to the individual.c. One person from the pool deck moves into the water to assist the individual into the pool fromthe mat.d. End position, individual is slowly lowered into the water.a.b.c.d.
The following photographs illustrate the alternative three-person aquatic transfer, pool to wheelchair.a. Start position, two staff members are in the water to move the individual from the pool to themat using a two-person top and bottom transfer.b. Once the individual is on the mat, the PFD is removed.c. One staff member from the water comes back up on to the pool deck to perform a two-persontop and bottom transfer into the individual’s wheelchair.a.b.c.
Use of Mechanical Lifts(Hoyer Lifts)Use of a mechanical lift is necessary in situations where a manual lift would pose a safety risk to eitherstaff or the Individual being transferred. The PT will determine which individuals must be transferred byuse of the mechanical lift. This determination is made based on the physical characteristics and medicalhistory of the individual.The mechanical lift MAY be recommended for: Individuals whose size or weight prevents a safe manual transfer Individuals who have severe osteoporosis and are at risk of fracture Individuals who have a history of multiple fractures Individuals whose contractures or muscle tone prevent a safe and secure grasp by staff Individuals who have low muscle tone and are excessively floppy during a manual transfer Individuals whose tone fluctuates quickly, making transfers unpredictableUsing a mechanical lift provides several benefits. The potential for patient injury (such as falls and skintears) that may occur during a manual lift is reduced by using mechanical lifts. Mechanical lifts provide amore secure process for lifting and transferring which may increase patient comfort and lessen theiranxiety.Proper placement of the sling is essential to prevent slippage of the sling during the transfer and also toprevent injury to the individual’s legs. The PT will determine whether the straps of the sling should becrossed under both legs or if the sling straps can be brought up between the legs. For individuals withsevere spasticity or severe osteoporosis, bringing the sling straps between the legs may produceexcessive stress to the legs and hips.
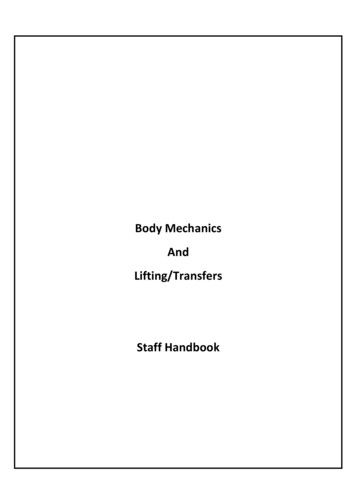
Before transporting an individual in a mechanical lift, ensure the base is open to increase the base ofsupport.a. Closed Positionb. Open Positiona.b.Basics for Using Mechanical Lifts Position the wheelchair as close as possible to where the individual is being transferred. For maximum safety, two staff persons must always be used when transferring an individual viamechanical lift. The second staff person should help control the individual’s position by usingthe handles on the sling and checking the sling placement and arm and leg position as the lift isbeing moved. If repositioning of the individual is needed for a secure lift, lower the individual to the surfaceand readjust sling as needed. Use caution to keep the lift boom away from the individual’s face throughout entire lift. Do not lock brakes or block wheels when lifting an individual. The wheels must be free to roll toallow the lifter to center itself beneath the person. When lifting, always keep the individual centered over the base. The individual should face thestaff that is operating the lift. For some individuals, the leg sections of the sling will be brought forward and up between thethighs. For others, the leg sections will be brought under both legs together and brought upalong the outer thighs. If the individual has a tube used for feeding, a third staff person must be present to attend tothe feeding equipmentTransfer from Wheelchair1. Lean the individual forward with arms forward. Place the sling behind the individual’s back andmove it down until it reaches the seat of the WC2. Pull the leg sections of the sling forward and under the individual’s thighs.3. Widen the base of the mechanical lift so that is can go around the wheelchair. To increasestability of the lift, the base of the lift must be spread to the widest possible position beforebeginning the lift.
4. Watch the lift boom so that it does not come too close to the individual’s face. Center the liftboom over the individual.5. Lower the lift boom so that the sling loops can be attached to the hooks on the top part of thelift. Keep the individual’s knees slightly higher than waist level and the back in an uprightposition if possible for secure positioning.6. After the sling is secured, raise the individual slowly. Check the position of the sling and ensurethat the sling is properly placed and that a secure sitting position has been attained. Removearms of wheelchair before performing.7. As the individual is raised, check position of arms and legs to ensure that they are not gettingcaught on the wheelchair or the lift. Raise the individual until there is sufficient clearance fromthe wheelchair.8. Ensure base of lift is locked into position before moving it9. Grasp the steering handles and move the lift away from the wheelchair. The lift must be movedand turned slowly to minimize the chance that the individual will swing and bump arms or legs.10. **Individuals should not be transported long distances while in the lift (no more than a fewfeet).11. After the individual is moved to the desired location, center him/her over the surface. Slowlylower the lift, checking for position of arms and legs to prevent injury.12. Hold onto the boom while unhooking the sling so that it does not swing and strike theindividual. Remove the legs straps of the lift first. Then, remove the sling from the individual’sback by leaning the trunk and arms forward if in a chair or rolling the individual if in a bed or ona wedge.Transfer from Supine Position1. Place sling along the side of the individual with the bottom of the sling even with the mid-thighregion of the individual.2. Roll the individual and pull the sling forward and under the individual’s thighs.3
Terminology Some of the terminology used in this handbook is listed below for reference: Body Mechanics – Maintaining a proper position during movement Contracture – Permanent shortening of muscle that limits motion at the joint involved Spasticity - Extreme or abnormal tension of the