Transcription
Introduction to GitDr. Chris Bourkecbourke@cse.unl.eduDepartment of Computer Science & EngineeringUniversity of Nebraska–LincolnLincoln, NE 68588, USAAugust 2015https://xkcd.com/1597/1
Contents1 Git1.11.21.3OverviewRegistering . . . . . . . . . . . . . . . . . . . . . . . . . . . . . . . . . .Installing Git on Your Machine . . . . . . . . . . . . . . . . . . . . . . .Creating a Repository on Github . . . . . . . . . . . . . . . . . . . . . .24452 Using Git via Git’s Clients2.1 Cloning an Existing Repository . . . . . . . . . . . . . . . . . . . . . . .2.2 Creating & Sharing Your Own Project . . . . . . . . . . . . . . . . . . .2.3 Making, Committing & Pushing Changes . . . . . . . . . . . . . . . . . .56793 Using Git via the Command Line3.1 Cloning an Existing Repository . . . . . . . . . . . . . . . . . . . . . . .3.2 Creating & Sharing Your Own Project . . . . . . . . . . . . . . . . . . .3.3 Making, Committing & Pushing Changes . . . . . . . . . . . . . . . . . .9910114 Using Git via the Eclipse124.1 Cloning an Existing Repository . . . . . . . . . . . . . . . . . . . . . . . 124.2 Creating & Sharing Your Own Project . . . . . . . . . . . . . . . . . . . 144.3 Making, Committing & Pushing Changes . . . . . . . . . . . . . . . . . . 185 Working With Others186 Resources187 Using UNL’s GitLab191 Git OverviewAs you develop software and make changes, add features, fix bugs, etc. it is often usefulto have a mechanism to keep track of changes and to ensure that your code base andartifacts are well-protected by being stored on a reliable server (or multiple servers).This allows you access to historic versions of your application’s code in case somethingbreaks or to “roll-back” to a previous version if a critical bug is found.The solution is to use a revision control system that allows you to “check-in” changes toa code base. It keeps track of all changes and allows you to “branch” a code base into aseparate copy so that you can develop features or enhancements in isolation of the maincode base (often called the “trunk” in keeping with the tree metaphor). Once a branchis completed (and well-tested and reviewed), it can then be merged back into the maintrunk and it becomes part of the project.You may already be familiar with similar online (or “cloud”) storage systems such as2
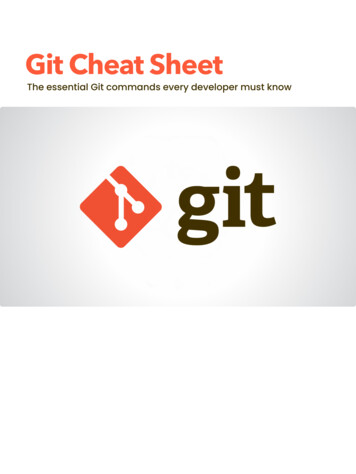
Google Drive or Dropbox that allow you to share and even collaborate on documentsand other files. However, a version control system is a lot more. It essentially keepstrack of all changes made to a project and allows users to work in large teams on verycomplex projects while minimizing the conflicts between changes. These systems arenot only used for organizational and backup purposes, but are absolutely essential whendeveloping software as part of a team. Each team member can have their own workingcopy of the project code without interfering with other developer’s copies or the maintrunk. Only when separate branches have to be merged into the trunk do conflictingchanges have to be addressed. Otherwise, such a system allows multiple developers towork on a very complex project in an organized manner.Figure 1: Trunk, branches, and merging visualization of the Drupal projectThere are several widely used revision control systems including CVS (Concurrent Versions System), SVN (Apache Subversion), and Git. CVS is mostly legacy and not aswidely used anymore. SVN is a centralized system: there is a single server that acts asthe main code repository. Individual developers can check out copies and branch copies(which are also stored in the main repository). They also check all changes into themain repository.Git, however, is a decentralized system; multiple servers can act as repositories, buteach copy on each developer’s own machine is also a complete revision copy. Codecommits are committed to the local repository. Merging a branch into another requiresa push/pull request. Decentralizing the system means that anyone’s machine can act asa code repository and can lead to wider collaboration and independence since differentparties are no longer dependent on one master repository.Git itself is a version control system that can be installed on any server (UNL has a Gitrepository setup at https://git.unl.edu). However, we’ll primarily focus on Github3
(https://github.com), the main website used by thousands of developers across theglobe.The rest of this tutorial will describe how to use Github for use in your courses and tomanage and share your code among your peers for group assignments and projects.1.1 RegisteringYou can register for a GitHub account at https://github.com/. However, it is stronglyrecommended that you get a free “student” account. A normal, free GitHub accountdoes not allow you to create “private” repositories. Any code you push to GitHub isautomatically public and accessible by anyone. This is okay in general, however manyof your courses will have Academic Integrity policies that will require you to not sharecode. A student account allows you up to 5 private repositories (normally 7/month asof this writing) so that you can comply with Academic Integrity policies.To get a student account first register at GitHub using an email account that ends in.edu (to “prove” you’re a student). Then go to https://education.github.com/packand register for a “student pack.” Sign up early as some have reported long wait timesto receive their student pack. The student pack contains a lot of other free and reducedcost software packages, tools and services that may be of interest.1.2 Installing Git on Your MachineIf you want to use Git on your own personal machine, then you may need to install aGit client. There are many options out there and you are encouraged to explore them,however the following suggestions are all free and open source. Git has released its own graphical user interface clients which are available for freefor both Windows and Mac:– Windows: https://windows.github.com/– Mac: https://mac.github.comSee section 2 for instructions on using the client. If you will be using the Eclipse IDE (http://www.eclipse.org/downloads/) fordevelopment, the most recent versions already come with a Git client. Eclipse willwork on any system. See Section 4 for using Git with Eclipse. If you use Windows and prefer to use a command line interface, you can downloadand install TortoiseGit (https://code.google.com/p/tortoisegit/) a WindowsShell Interface to Git. See Section 3 for using Git via the command line interface. If you use Mac and want the command line version of Git, you can download and4
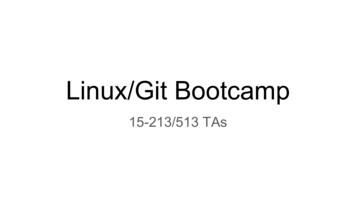
install here: http://www.git-scm.com/download/mac. Alternatively, you can install Git using a tool like ng-git-via-macports-on-mac-osx/.See Section 3 for using Git via the command line interface.1.3 Creating a Repository on GithubYou will eventually want to publish (“push”) your project code to Github. To do thisyou’ll first need to create a repository on Github’s site:1. Login to Github (https://github.com/) and click on the “repositories” tab.2. Create a new repository (see Figure 2) with the name that will match your projectfolder (the names do not have to match, but it keeps things organized). Provide ashort description and choose whether or not to make it public or private dependingon whether or not you are allowed to share your code with your peers.You may choose to include a README file and/or establish a license (whichcreates a LICENSE file). However, for this tutorial we will assume that you startwith an empty repo on Github. If you choose to create these files some extra stepsmay be necessary.Figure 2: Creating a New Repository on GitHub2 Using Git via Git’s ClientsIn this section we’ll explore the basic uses of Git by using Git’s client which provides a Graphical User Interface (GUI) to Git. A complete online help guide is available here: https://mac.github.com/help.html (Mac) and here: https://windows.github.com/help.html (Windows).Advantage: nice, clean, intuitive interface with GitHub-style diff markupDisadvantage: requires a separate client; some tasks are better done on GitHub.comor are difficult to do with the client alone.Though the clients should be almost identical for Mac and Windows, there may be someslight differences; this tutorial was written using the Mac version.5
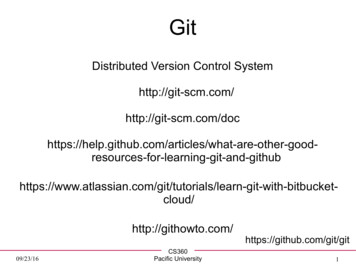
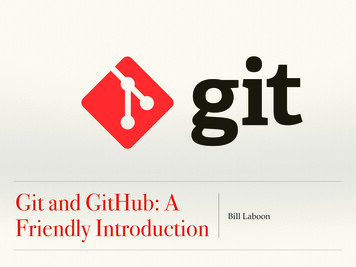
2.1 Cloning an Existing RepositoryTo clone an existing repository hosted on GitHub, point your browser to its URL. On itspage there will be several options to clone, fork or download the repository (see Figure3).Figure 3: Forking and/or Cloning on GitHub.comIf you click the “Clone in Desktop” option, you’ll be prompted to allow the GitHubclient to open and clone the repository to your local file system (you will be promptedto indicate where unless you’ve setup a permanent clone path/directory). You will beable to make changes to your local copy but you will not be able to push changes to theoriginal project unless you are a collaborator with write permission. However, you cancreate a new repository in your GitHub account and push the project back to your ownrepository.A “fork” essentially does this in reverse. If you choose this option, a new repository willbe created in your account and the project will be copied to this new repository. Then,in your Git client, you can clone it as a local copy to work on by clicking the “Add a6
repository” button in the Git client as depicted in Figure 4.Figure 4: Cloning in the GitHub Client2.2 Creating & Sharing Your Own ProjectTo share/publish a project to GitHub, you can start with an existing project or createa repository and then start working on your project.1. Open your Git hub client and click the “Add a repository” button as in Figure 4.2. Select the “Create” tab and select the directory of the project you wish to createa repository with as in Figure 5.Figure 5: Creating a Repository in the GitHub Client3. Upon success, the Git client should appear as in Figure 6; you can now makean initial commit by filling in the commit message and description and clicking“Commit to master”7
Figure 6: Committing in the GitHub Client4. You can now “publish” your repository to GitHub by clicking the “Publish” iconin the top right of the Git client5. This opens a new dialog where you can specify the name and description of theproject as it will appear on GitHub.To finish up, click the “Push Repository” button and observe your new project onGitHub8
2.3 Making, Committing & Pushing ChangesYou can make changes to your local project and the changes will automatically bedetected in the Git client. As in the previous step-by-step process, you can select asubset of changes to commit. Once committed, you can push the changes by clickingthe “Sync” icon at the top right:3 Using Git via the Command LineIn this section we’ll explore the basic uses of git by using the Command Line Interface(CLI) utilities. This section assumes basic familiarity with the unix command line.Advantage: quick, straightforward access to gitDisadvantage: requires good working knowledge of the command line; proficiency takeslonger3.1 Cloning an Existing RepositoryThe first thing you may want to do is to “clone” an existing project that has alreadybeen published on Github. You may do this if your instructor has provided some codefor assignments or labs.To start, you can verify that git has been properly installed on your machine by executingthe following:git --versionwhich may output something like:git version 1.9.5 (Apple Git-50.3)though your specific version may differ. However, if this command does not work, youwill need to troubleshoot your installation before continuing.1. Move to the directory where you want the project files to be placed. Usually thisis your “workspace” folder.2. Execute the following command:git clone https://github.com/project/url9
where the URL is replaced with the URL of the project that you want to clone. Forexample, if you wanted to clone Lab 01 for CSCE 155E/H, which has the url https://github.com/cbourke/CSCE155-C-Lab01, you would execute the command:git clone https://github.com/cbourke/CSCE155-C-Lab013. If successful, you should see a message like the following:Cloning into ’CSCE155-C-Lab01’.remote: Counting objects: 9, done.remote: Compressing objects: 100% (7/7), done.remote: Total 9 (delta 2), reused 9 (delta 2), pack-reused 0Unpacking objects: 100% (9/9), done.A new directory/file structure should now exist in your directory and you can startworking with/editing the files.If the owner of the repository that you just cloned ever makes changes, you can “pull”those changes from the repository by using git pull to pull all changes.3.2 Creating & Sharing Your Own Project1. Before continuing you will need to create a repository on Github. To do this, referto the steps in Section 1.3.2. Setup your local repository from the command line by going to your project directory and executing the following commands (approximate expected outputs havebeen included here: Initialize your directory using:git initwhich should have output similar to:Initialized empty Git repository in /your/directory/foo/.git/ Add all files, directories and subdirectories to your git index using:git add --all Commit your files using the following. The -m specifies that a commitmessage follows:git commit -m "Initial Commit"Output should resemble:10
[master (root-commit) 7a3fb99] Initial Commit2 files changed, 24 insertions( )create mode 100644 README.mdcreate mode 100755 hello.c Associate your repo with the repo on GitHub using the following command:git remote add origin https://github.com/login/PROJECT.gitwhere the URL is replaced with the URL for your project. Push your commit to the remote repository using the following command:git push -u origin masterOutput should resemble something like:Counting objects: 4, done.Delta compression using up to 8 threads.Compressing objects: 100% (4/4), done.Writing objects:
However, for this tutorial we will assume that you start with an empty repo on Github. If you choose to create these les some extra steps may be necessary. Figure 2:Creating a New Repository onGitHub 2 Using Git via Git’s Clients In this section we’ll explore the basic uses of Git by using Git’s client which pro-vides a Graphical User Interface (GUI) to Git. A complete online help guide .