Transcription
USER MANUAL
Special ThanksDIRECTIONNicolas DuboisSebastien ColinFrédéric BrunPROGRAMMINGDew ZhangSebastien ColinINDUSTRIALIZATIONNicolas DuboisMANUALRandy LeeSébastien RochardGermain MarzinMorgan PerrierSébastien RochardAxel HartmannPierre PfisterDESIGNGlen Darcey ARTURIA SA – 2020 – All rights reserved.26 avenue Jean Kuntzmann38330 ation contained in this manual is subject to change without notice and does notrepresent a commitment on the part of Arturia. The software described in this manual isprovided under the terms of a license agreement or non-disclosure agreement. The softwarelicense agreement specifies the terms and conditions for its lawful use. No part of thismanual may be reproduced or transmitted in any form or by any purpose other thanpurchaser’s personal use, without the express written permission of ARTURIA S.A.All other products, logos or company names quoted in this manual are trademarks orregistered trademarks of their respective owners.Product version: 1.1Revision date: 7 July 2020
Thank you for purchasing the Arturia MiniLab MkII!This manual covers the features and operation of Arturia’s MiniLab MkII, a full-featuredMIDI controller designed to work with any DAW software or plug-in you own. Note: While MiniLab MkII is part of a package which includes our Analog Lab Lite software, thismanual will focus only on the MiniLab MkII controller hardware. Please refer to the Analog Lab usermanual in order to learn about the features of the software.In this package you will find: One MiniLab MkII keyboard controller, with a serial number and unlock code onthe bottom. You will need this information in order to register your MiniLab MkII. One USB cable The Quick Start Guide for the MiniLab MkII. The serial number for your unit hasbeen placed on this sheet also. A card describing Analog Lab Lite and how to upgrade to the full version ofAnalog Lab 2. Also included on this card and with your purchase is a copy ofGrand Piano Model D by UVI, a beautifully realistic sampled grand piano. A card describing how to register for and download your copy of Ableton LiveLite.Be sure to register your MiniLab MkII as soon as possible! There is a sticker on the bottompanel that contains the serial number of your unit and an unlock code. These are requiredduring the online registration process. This information is also included on the Quick StartGuide.Registering your MiniLab MkII provides the following benefits: A product license key for your installation of Ableton Live Lite [see note below] The ability to download Analog Lab Lite and Grand Piano Model D by UVI Access to the MiniLab MkII user manual and the latest version of the MIDIControl Center software Special offers restricted to MiniLab MkII owners. The installation file for Ableton Live Lite is available here: ableton.com/live-lite.
Special Message SectionSpecifications Subject to Change:The information contained in this manual is believed to be correct at the time of release.However, Arturia reserves the right to change or modify any of the specifications withoutnotice or obligation to update the hardware that has been purchased.IMPORTANT:The product and its software, when used in combination with an amplifier, headphones orspeakers, may be able to produce sound levels that could cause permanent hearing loss.DO NOT operate for long periods of time at a high level or at a level that is uncomfortable. Ifyou encounter any hearing loss or ringing in the ears, you should consult an audiologist.NOTICE:Service charges incurred due to a lack of knowledge relating to how a function or featureworks (when the product is operating as designed) are not covered by the manufacturer’swarranty, and are therefore the owner's responsibility. Please study this manual carefullyand consult your dealer before requesting service.Precautions include, but are not limited to, the following:1.Read and understand all the instructions.2.Always follow the instructions on the instrument.3.Before cleaning the instrument, always remove the USB cable. When cleaning,use a soft and dry cloth. Do not use gasoline, alcohol, acetone, turpentine or anyother organic solutions; do not use a liquid cleaner, spray or cloth that's too wet.4.Do not use the instrument near water or moisture, such as a bathtub, sink,swimming pool or similar place.5.Do not place the instrument in an unstable position where it might accidentallyfall over.6.Do not place heavy objects on the instrument. Do not block openings or ventsof the instrument; these locations are used for air circulation to prevent theinstrument from overheating. Do not place the instrument near a heat vent at anylocation with poor air circulation.7.Do not open or insert anything into the instrument that may cause a fire orelectrical shock.8.Do not spill any kind of liquid onto the instrument.9.Always take the instrument to a qualified service center. You will invalidate yourwarranty if you open and remove the cover, and improper assembly may causeelectrical shock or other malfunctions.10.Do not use the instrument with thunder and lightning present; otherwise it maycause long distance electrical shock.11.Do not expose the instrument to hot sunlight.12.Do not use the instrument when there is a gas leak nearby.13.Arturia is not responsible for any damage or data loss caused by improperoperation of the instrument.
Table Of Contents1. Introduction. 32. Overview. 42.1. First step - Making the connections. 42.1.1. Front Panel. 42.1.2. Keyboard . 52.1.3. Pitch Modulation touch strips . 52.1.4. Shift Pad Bank buttons . 52.1.5. Octave buttons. 62.1.6. Encoders. 62.1.7. Pads. 72.2. Rear panel . 82.2.1. Footswitch jack . 82.2.2. USB jack . 82.2.3. Kensington lock port. 82.3. Factory Reset . 83. MiniLab MkII and Analog Lab Lite . 93.1. Audio and MIDI Setup. 93.1.1. Audio setup. 93.1.2. MIDI setup . 103.2. Preset Selection . 113.2.1. Preset #1 Analog Lab Lite. 113.2.2. Analog Lab Lite preset selection . 113.2.3. Presets 2-8 . 123.3. Using the Encoders . 133.4. Using the Pads . 143.4.1. Play a Note (Pads 1-8) . 143.4.2. Control Analog Lab Lite (Pads 9-16). 144. MIDI Control Center . 194.1. The Basics . 194.1.1. System requirements . 194.1.2. Installation and location . 194.1.3. Connection. 194.1.4. Where to find the manual . 204.1.5. Using MIDI Control Center. 204.1.6. MIDI Control Center features. 204.2. Device Memories . 214.3. Template Browser . 224.3.1. Drag and drop . 224.3.2. Revise a Template. 224.4. Store To/Recall From. 234.4.1. The ‘Store To’ button. 234.4.2. Recall a preset from MiniLab MkII. 244.4.3. Save, Delete, Import/Export, etc. 244.5. Import/Export Device Settings. 254.5.1. Export Device Settings. 254.5.2. Import Device Settings . 254.6. Editing basics . 264.6.1. Data entry. 264.6.2. Selecting the tabs. 264.6.3. Device Settings tab. 274.7. Working with Device Settings. 284.7.1. Keyboard Channel . 284.7.2. Knob acceleration . 284.7.3. Key Velocity Curve. 294.7.4. Pad Velocity Curve. 294.7.5. Octave Button Blink. 294.7.6. Pad off Backlight. 304.8. Editing Templates: Unique features. 304.8.1. MIDI Channel settings . 304.8.2. Control strips: Pitch Bend Hold . 31
4.8.3. Assignable pedal . 324.8.4. Mode Encoders . 335. Software License Agreement. 346. Declaration of Conformity . 37
1. INTRODUCTIONMiniLab MkII is Arturia’s most compact and feature-filled USB MIDI keyboard controller yet.It has a 25-key, velocity-sensitive, slim-key keyboard along with a control surface designedfor perfect integration with our software synthesizers. The attention to detail poured intoMiniLab MkII also makes it perfect for working with any other software plug-in or DAW youhave available.Beyond being a great MIDI controller, MiniLab MkII comes with our Analog Lab Litesoftware that includes an impressive array of classic synth and keyboard sounds. Theintegration of these two products results in a powerful hybrid synthesizer with excellentfunctionality and great sound.There’s also an affordable and simple way to upgrade Analog Lab Lite to the full version ofAnalog Lab, which provides access to many more thousands of the sounds you will hear inAnalog Lab Lite! To upgrade, go to www.arturia.com/analoglab-update.MiniLab MkII also features our innovative pitch and modulation touch strips: low-profilecontrollers which offer a different take on the traditional wheels while maintaining theirexpressiveness. The pitch strip offers an additional choice of ‘last position hold’ or ‘return tozero’ modes of operation.The 16 assignable encoders give you the control you need to exploit the full potential ofany USB audio product you encounter. There’s also an assignable pedal input jack for evengreater flexibility.Two banks of 8 backlit performance pads, for 16 total, can be assigned easily as pads, MIDICC buttons or Program change switches. They can also be assigned different colors forvisual feedback of their function, or just for fun! They’re pressure-sensitive too, which makesthem even more expressive.On top of that, the included MIDI Control Center software lets you map parameters to thecontrollers and pads in a simple and easy way directly from your computer and store theminto presets. Those presets are then stored in the MiniLab MkII hardware for instant recall.Made for the musician on the go or the performer with limited space, the MiniLab MkII givesyou a great depth of features in a portable package that is sturdy and looks great.Arturia - User Manual MiniLab MkII - Introduction3
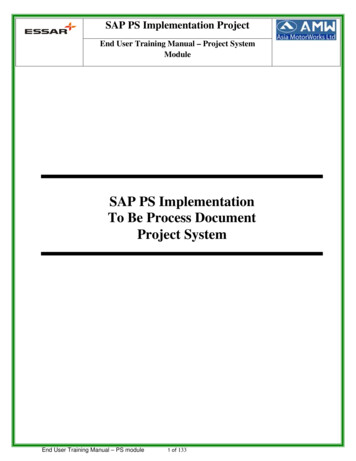
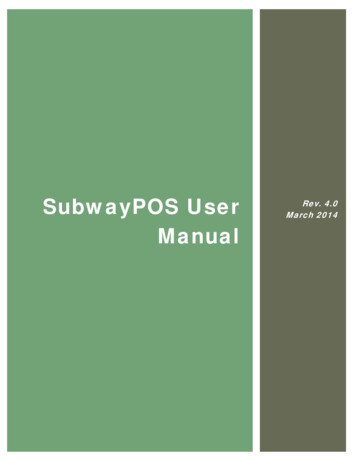
2. OVERVIEW2.1. First step - Making the connectionsSetting up the MiniLab MkII keyboard for use with Analog Lab Lite is fast and simple:1.First install the Analog Lab Lite program on your computer and be sure to registerand authorize it (see Chapters 2 and 3 of the Analog Lab user manual).2.Connect the MiniLab MkII keyboard to the computer. MiniLab MkII is poweredby its USB connection, so all you have to do is connect a USB cable from yourcomputer to the MiniLab MkII keyboard.3.MiniLab MkII is a class-compliant USB device, so its driver will be automaticallyinstalled when you connect MiniLab MkII to your computer.4.Fire up the Analog Lab Lite software and read on!2.1.1. Front PanelFront View1.4Shift button: Press Shift and one of the pads will light to show the currentMemory selection. Hold Shift and press a Pad to select a Memory. Hold Shift, press a key to select the MIDI Channel. Hold Shift, turn encoders 1 or 9 for alternate MIDI CC values. Hold Shift, press Oct and Oct- at the same time to send “All NotesOff” and “Reset all controllers” commands over MIDI.2.Pad 1-8 / 9-16 buttons: Use to access Pad banks 1-8 or 9-163.Octave - / buttons: Shift the keyboard range /- 4 octaves. Press both buttonsat once to reset the range to center.4.Pitch / Mod Touch: strips Pitch bend and modulation are activated by pressingthe touch strips. “Return to Zero” or “Hold” settings can be selected for the Pitchstrip using the MIDI Control Center software.5.Encoders 1 and 9: Analog Lab Lite: turn/click Encoder 1 to browse/select preset;turn/click encoder 9 to browse/select filters.6.Encoders 2-8 and 10-16: Analog Lab Lite: Memory #1 is pre-configured to controlAL Lite parameters with these encoders.7.Pads 1-8 / 9-16 Analog Lab Lite: Play notes from pads 1-8; control various featuresfrom pads 9-16.8.MIDI Channel selector keys: Press the Shift button and then one of the keys toselect the current MIDI channel for MiniLab MkII.Arturia - User Manual MiniLab MkII - Overview
NOTE: For other software programs use the MIDI Control Center software to alter their assignments.2.1.2. KeyboardMiniLab MkII has a 25-key, velocity-sensitive, slim-key keyboard with a control surfacedesigned for perfect integration with the Analog Lab Lite software interface.2.1.3. Pitch Modulation touch stripsIf you touch the Pitch bend strip at its center and move your finger forward or backwardit will alter the pitch of the played sound. The range of the pitch bend is determined by thepreset that has been selected.Similarly, moving your finger along the Modulation strip alters the modulation amount ofthe played sound. The level of modulation introduced by activating the modulation stripdepends on which preset is selected. CAUTION: The modulation strip may not be assigned to modulate a parameter in some Analog LabLite presets.2.1.4. Shift Pad Bank buttonsLet’s start on the right: The Pad 1-8 / 9-16 button toggles the MiniLab MkII pads between twodifferent sets of functions: playing notes or controlling Analog Lab Lite.The Shift button serves several purposes: recalling a preset from memory (Shift pad),selecting the master MIDI channel (Shift keyboard), and enabling encoders 1 and 9 to sendthe alternate MIDI CC numbers or NRPN/RPN commands that were defined using the MIDIControl Center.Arturia - User Manual MiniLab MkII - Overview5
2.1.5. Octave buttonsPushing one of the Oct - / buttons will transpose the keyboard by as much as four octavesup or down. The farther from center the keyboard has been transposed, the faster thebuttons will flash.To reset the keyboard octave range back to center, press both buttons at the same time. The button flashing can be desactivated by disablinging the "Octave Button Blink" in the "Devicesettings" using the Midi Control Center. See chapter 4.7. Working with Device Settings [p.28]2.1.6. EncodersThe sixteen encoders can be assigned to control any editable parameter on the selecteddevice. Encoders 1 and 9 are clickable, and can serve several functions within each presetmemory.The assignments within each Analog Lab Lite preset and within each synthesizer type mayvary according to the parameters that are available.6Arturia - User Manual MiniLab MkII - Overview
2.1.7. PadsThe eight pressure-sensitive pads on the front of the MiniLab MkII serve a dual purpose.Their function depends on whether you’re using the Shift button or the Pad 1-8 / 9-16 button.For example: The pads can be assigned to trigger up to sixteen particular MIDI notes (drums,stabs, bass notes, whatever). When the Pad 1-8 / 9-16 button is not lit, the first bank of padsare active (1-8). When the Pad 1-8 / 9-16 button is lit, the second bank of pads are active(9-16).There are two backlight modes for the pads: Pad off Backlight 'Off': The color of the pad is applied when the pad is activated.So the pads are unlit since it has been activated Pad off Backlight 'On': The pads are always lit with the preset defined color.Once activated, it's then lit in white. Note that, in this mode, if the pad color isconfigured as white, you will not be able to see if the pad is activated or not.When using MiniLab MkII with Analog Lab Lite, pads 1-8 play MIDI notes and pads 9-16control various features: clear search filters, select next / previous preset, and switch theencoders between Multi parts, for example.However, when you hold the Shift button and press one of the pads, this will recall one ofeight presets from the internal memory.Arturia - User Manual MiniLab MkII - Overview7
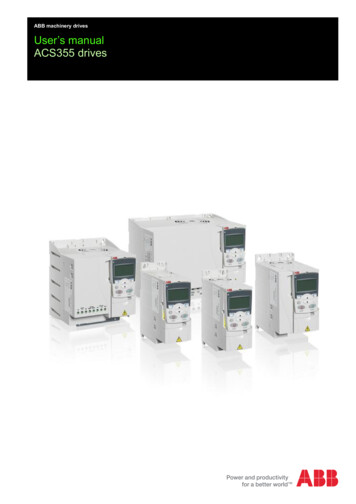
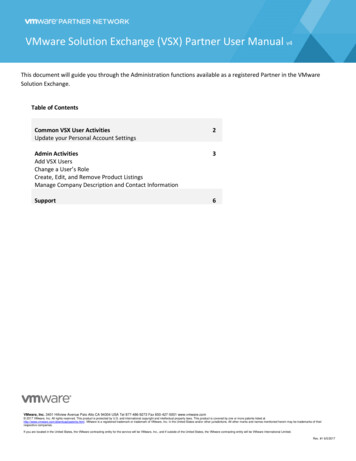
2.2. Rear panelRear ViewThe rear panel of the MiniLab MkII contains several important connectors: the footswitchjack, a USB Type B jack, and a Kensington lock port.2.2.1. Footswitch jackThe footswitch jack accepts a momentary footswitch (optional) and allows it to function aseither a momentary switch (such as sustain pedal) or a latching switch (first press/releasesends one event, second press/release sends the next event).It is best to connect the pedal before supplying power to the MiniLab MkII so it can sensethe pedal’s polarity. Be sure to keep your foot off the pedal when first making the connectionor it could work backward. If this happens, disconnect MiniLab MkII from the power sourceand start over.2.2.2. USB jackThe USB jack allows you to connect your MiniLab MkII to your computer for use with yourfavorite DAWs and plug-in instruments.2.2.3. Kensington lock portWe’ve added a Kensington security lock port to the left side of the rear panel as well. Thiswill help keep your MiniLab MkII right where you want it.2.3. Factory Reset This procedure will erase all presets and device settings and restore them to their defaults. Use theMIDI Control Center software to back up your changes first.To reset the MiniLab MkII to its original factory settings: Unplug the USB cable from the back of the keyboard Hold down the Oct - and Oct buttons Plug the USB cable back in, and continue to hold the buttons until the pads turnwhite.The pads will stay white for 2 seconds so you will know the reset process is underway. Afterthis the MiniLab MkII will go through its normal power-up lighting sequence.8Arturia - User Manual MiniLab MkII - Overview
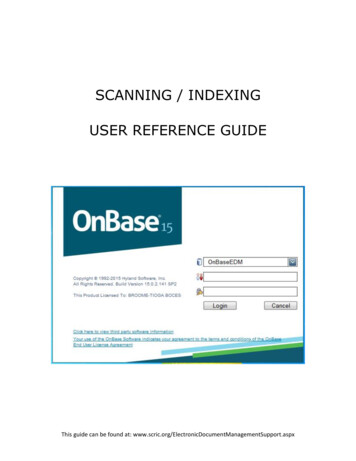
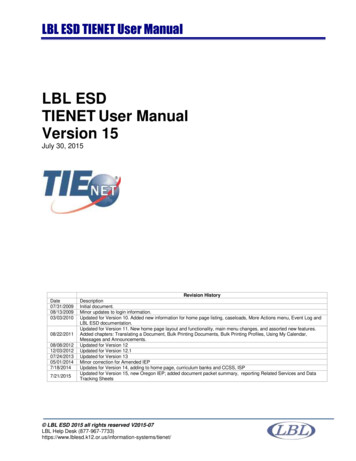
3. MINILAB MKII AND ANALOG LAB LITEThis chapter will focus mostly on the MiniLab MkII keyboard and how it interacts with theAnalog Lab Lite software. So you will find only basic coverage of the various Analog Lab Liteparameters that MiniLab MkII controls. For more details about Analog Lab Lite, please referto the Analog Lab user manual.3.1. Audio and MIDI SetupThe first thing to do after launching Analog Lab Lite is to make sure the software is set tooutput audio correctly and that it will receive MIDI from the MiniLab MkII keyboard.3.1.1. Audio setupIn order to check the audio driver settings for Analog Lab Lite, open the Preferences windowby pressing [Command] [,] or by selecting it from the Analog Lab Lite drop-down menu.This will open the Audio & MIDI Settings window, which is where the preferred audio outputdevice will be selected. Now click the Test button: If you hear a short sine wave, then youraudio is set up correctly. If not, make sure the correct audio driver is selected and that yourheadphones or speakers are properly connected and turned on.WindowsMac OSXArturia - User Manual MiniLab MkII - MiniLab MkII and Analog Lab Lite9
3.1.2. MIDI setupConnecting a USB MIDI keyboard controller to Analog Lab Lite is very simple. As shownabove, navigate to the Audio MIDI Settings window by pressing [Command] [,] or byselecting it from the Analog Lab Lite drop-down menu as shown in the Audio Setup section[p.9].The Audio MIDI Settings window has a section labeled “MIDI Devices”. Click the box labeled“Arturia MiniLab MkII” to select it as a controller for Analog Lab Lite.10Arturia - User Manual MiniLab MkII - MiniLab MkII and Analog Lab Lite
3.2. Preset Selection3.2.1. Preset #1 Analog Lab LiteWhen MiniLab MkII is first powered up it loads preset
A card describing how to register for and download your copy of Ableton Live Lite. Be sure to register your MiniLab MkII as soon as possible! There is a sticker on the bottom panel that contains the serial number of your unit and an unlock code. T