Transcription
Tutorials for Pro/Engineer Wildfire 2.0Last Update: January 15, 2006Dr. Zuomin DongDepartment of Mechanical EngineeringUniversity of VictoriaContents12345About the Pro/Engineer Wildfire 2.0 Tutorial. 41.1What is Pro/ENGINEER ?. 41.2Conventions Used in this Tutorial . 41.3About this Tutorial. 5Introduction to Pro/E WILDFIRE . 62.1Starting Pro/E. 62.2Mouse Functions. 82.3Begin to work in Pro/E . 10Modeling a Complete Part. 173.1Complete the Housing top . 183.2Build another extrusion: cylinder bracket. 183.3Build another extrusion: caliper bracket . 203.4Create a cylinder . 213.5Create the hole . 223.6Create the two chamfers. 223.7Create the rounds . 223.8Create the two slides . 233.9Clean your directory . 24Creating a 2-D Engineering Drawing. 254.1Insert views . 264.2Add dimensions . 284.3Other Useful Features . 30Creating the Disk-Brake Assembly . 33
67895.1Six Common Assembly Constraints . 335.2Build the disc-brake assembly . 355.3Add Color and Create an Exploded View. 385.4Create a Cutout View. 39Animation in Pro/ENGINEER Wildfire 2.0. 416.1Background . 416.2Creating Assembly. 416.3Creating the Motion Sequence. 426.4Playing the Motion. 43Pro/Mechanica for Structural Analysis, Sensitivity Analysis, and Design Optimization . 447.1Prepare the Model . 457.2Start Pro/MECHANICA . 467.3Define the FEA model . 467.4Run a static analysis. 477.5Design parameter sensitivity study . 517.6Design optimization . 53Pro/Mechanica – Standard Static Analysis. 588.1Objectives . 588.2Procedures. 58Automated CNC Tool Path and G-Code Generation for Volume Milling. 729.1Objectives . 729.2Procedures. 729.3Advanced Features. 8710 Definition and Machining of Free-form Surfaces in Pro/ENGINEER. 8810.1 Introduction. 8810.2 Variable Sweep Creation of Free Form Surface . 8810.3 More Complex Surface and Part Model . 8910.4 Automated Generation of CNC Tool Paths Using Pro/Manufacturing . 9010.5 Automated Generation of CNC Machining Program (G-Code) . 9111 Programming in Pro/ENGINEER . 9211.1 Introduction. 9211.2 Programming Details . 94
11.3 An Example Part and the PROGRAM Window. 97References . 100Appendix: Format of Reports. 101A1. Format of the Laboratory Report . 101A2. Format of the Project Report. 101
1 About the Pro/Engineer Wildfire 2.0 Tutorial1.1 What is Pro/ENGINEER ?Pro/ENGINEER is a feature-based, parametric solid modeling system with many extended designand manufacturing applications. As a comprehensive CAD/CAE/CAM system, covering manyaspects of mechanical design, analysis and manufacturing, Pro/ENGINEER represents theleading edge of CAD/CAE/CAM technology.1.2 Conventions Used in this TutorialExampleUPPERCASE The name of a menu, window or dialogue boxBoldface type An item to be selected from a WINDOW or a MENU[bracketed] text information entered from the keyboard Text between Name of a keyboard keythese symbols ItalicsA naming Convention For a series of actions / commands performed inMENUS. The process of steps is linearly downwardswith each new set starting on a new line/For a series of actions / commands performed inMENUS, a back slash is used when the actions areperformed within the same MENU box keystroke mouseSimultaneously press and hold a specified key whileselecting with a specified mouse button (default left)FILE, FEAT, MODELTREEopen, save[500] shift , Enter , Space partname.prt indicatesthe name of a specificpart will be substitutedwhere partname.prtoccursFILE NewProtrusion / done / oneside / done shift clickThe following terms are used frequently in this tutorial:Choose Click the {left} mouse button on a MENU option, a pull down MENU, or aDIALOGUE BOX.Click the {left} mouse button on geometry in a model or drawing, or on an object inSelecta database.Click the {left} mouse button on a specific point or location.PickSingle click the {left} mouse button on an icon, button, box, or hyperlink.ClickObject An assembly, part, drawing, or set of metadata within a database.Model An assembly or part in a Pro/ENGINEER environment, or a graphical representationof a computer program.A group of closely related functions in a Pro/ENGINEER environment.Mode
1.3 About this TutorialThis tutorial is introduced based on the collective efforts of many people over a number of yearsduring the teaching and learning of CAD. Part of it came from previous versions of Pro/ETutorials at UVic. Prof. Gary Wang of Department of Mechanical and ManufacturingEngineering, the University Manitoba rewrote many sections. Mr. Minh Ly also contributed to anumber of sections. Their efforts are gratefully acknowledged.Rather than competing with other comprehensive Pro/E tutorials available on the internet, weintend to provide a number of short tutorials that go over the basic functions of several basicPro/E modes to allow a user to have a quick start. Pro/E on-line manual, other on-line tutorials,and reference books, listed at our website, provide more detailed explanations and practices onvarious Pro/E function modules.
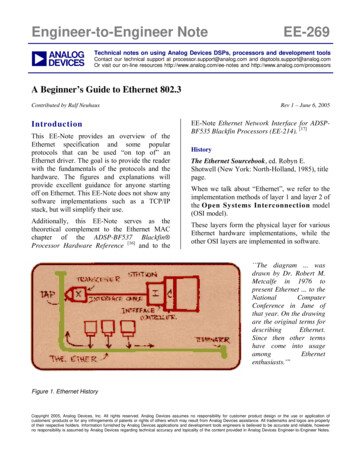
2 Introduction to Pro/E WILDFIREThis section is intended to briefly explain the Pro/E User Interface and get you started with asimple modeling task. The steps needed to start Pro/E and to generate a part model is discussedin the following tutorials.2.1 Starting Pro/ETo start Pro/E on a Windows machine, there may be an icon on your desktop or you may have tolook in the Start menu at the bottom left of the screen on the Windows taskbar. The programtakes a while to load, so be patient. The start-up is complete when your screen looks like thefollowing figure, which is a default Pro/E screen.Figure 1 The default Pro/E Wildfire screen.
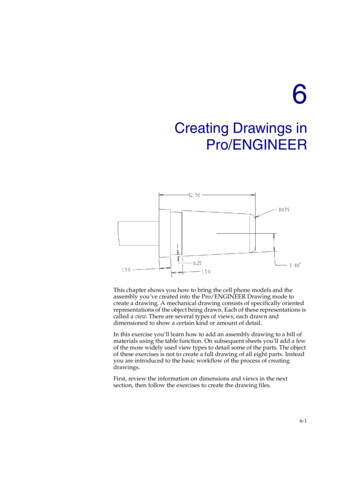
Now, look for the iconunder your menu to start a new application. Press the icon; or youmay use the menu FILE New. Either way, you should be able to launch the following window.Figure 2 The pop-up window to start a new application.You may type the name [housing] to replace the default name “prt0001”. In this section, we aregoing to create the first feature of a part called “housing”, which is one of the components of adisc brake assembly that we are going to create in the lab. The focus of this section, however, ison the introduction of Pro/E environment rather than the modeling techniques. More modelingtechniques will be described in later sections.After clicking the OK button, you should see the window shown inFigure 3, which is pretty much self-explanatory. You are encouraged to move your mouse cursoron top of each shortcut button and read the description from the command description window.The filter setting selection is for the convenience of picking a feature on the main graphicsscreen. The default (or the lazy way) is to leave it as Smart.HINT: DO NOT resize or move the main or menu window. If you start messing with the windowsize and placement, sooner or later you will bury a command menu behind other windows, thensuddenly the computer seems frozen and you are stuck there! So before becoming an expert,you’d better let Pro/E do its own window management. This also tells you that if the computerseems frozen, try to move the windows around to see if some menus are hidden waiting for yourmouse click.
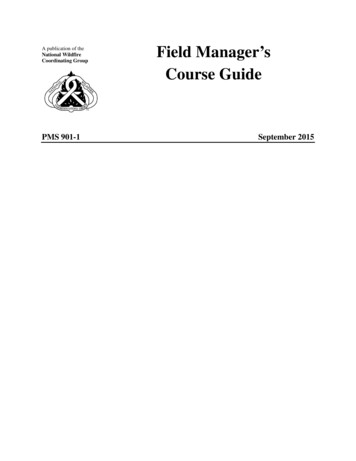
Top toolchest(shortcutbuttons)Pull downmenusNavigatorControls(Currentlyshows themodel tree)WindowsizecontrolMain Graphics AreaRight toolchest(Shortcutbuttons)Prompt/Message windowCommanddescriptioFilter settingfor featureFigure 3 A description of the Pro/E screen.2.2 Mouse FunctionsBefore we start with the hard job (modeling), you should know about some tricks of the mouse.Wildfire is meant to be used with a 3-button mouse. If it has a middle scroll, it is actually betterand you are lucky. If your mouse is a 2-button one, try to use the shift key plus the left mousebutton (LMB) simultaneously as an equivalent to the middle mouse button (MMB). If it doesn’twork, talk to your system administrator.Most selections of menu commands, shortcut buttons, and so on are performed by clicking theleft mouse button (LMB). In this tutorial, whenever you “select”, “click”, or “pick” a commandor entity, this is done with the LMB unless otherwise directed.
The functions controlling the view of the object in the graphics window are all associated withthe MMB. These are the important Spin, Pan, and Zoom functions. The following tablesummarizes different uses of mouse buttons that can make your job easier and more fun. Note: ifyou know previous versions of Pro/E, you will find the mouse functions are quite different! Learnthe ne
15.01.2006 · Engineering, the University Manitoba rewrote many sections. Mr. Minh Ly also contributed to a number of sections. Their efforts are gratefully acknowledged. Rather than competing with other comprehensive Pro/E tutorials available on the internet, we intend to provide a number of short tutorials that go over the basic functions of several basic Pro/E modes to allow a user to have a quick start .