Transcription
Standard Operating Procedure for theDiscovery Hybrid Rheometer HR-3
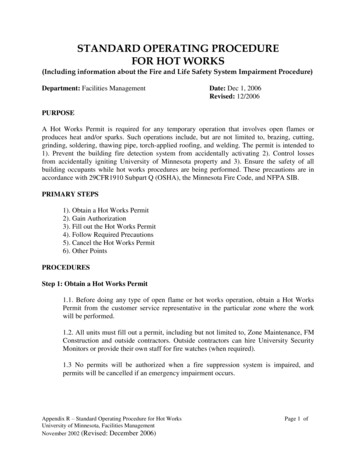
Page 1 of 5Edited on 01/02/2019Coral Reservations-The Discovery Hybrid Rheometer is on the CCMR Coral Equipment Reservation and EnablingSystem. To use the Discovery Hybrid Rheometer you must reserve and enable it through yourCCMR user account.More Information about Coral can be found mlAbout the RheometerThe Discovery Hybrid Rheometer is a stress controlled shear rheometer with a range of measurementoptions. It measures various properties including: viscosity, shear stress, storage and loss modulus,strain, and phase angle. A number of geometries are available including: various diameter parallel plateand cone plate; cup and rotor with options of a vaned or conical rotor; and a number of tribologicalaccessories.HeadDraw RodMotor and BearingColumnCoolant ConnectionsSmart Swap power/signalconnectionBaseSmart Swap accessoryconnectorFront PanelFigure 1: DHR-3 RheometerGetting Started--Log into your Coral account on the main computer. Enable the RheometerLog on to computer using User Account. The Password is RheometerDouble click the TRIOS icon
Edited on 01/02/2019Page 2 of 5-Choose the Geometry and update software:-Select the geometry that is correct for your experiment.-Select the appropriate geometry in the software by selecting the GeometryLocate the geometry serial number either on the case or printed directly on thegeometry near the top.buttonand choosing the geometry with the correct serial number from thedropdown menu. If you don’t see the appropriate geometry in the dropdown,click the last entry labelled “geometries ” to open an expanded menu ofoptions.Installing Geometry---Check and make sure the air pressure gage for the bearing is at 30 lbs. If not contact the facilitymanagerCarefully install the top Geometry- Make sure the head is fully raised so there is enough space to attach the accessory- With one hand, raise the Draw Rod up to relieve any air pressure created wheninstalling the geometry- With the other hand, carefully place the Geometry on the motor shaft- Lower the draw rod and screw the draw rod intothe accessory. Tighten to 7in-lb of torque. Tightbut not too tight.Other Equipment- If using any of the Peltier geometries you mustturn on the chiller- The chiller is located under the desk flipthe switch on the left side of the chiller- If using the environmental test chamber you mustturn on the air- The flow meter is located on the wall tothe left of the rheometer Turn the knobuntil it is at 10 l/mZero the rheometer by clicking the zero gap button in thetrios software.NOTE: Make sure that there is nothing located on thelower plate and that the environmental test chamberdoors are completely open or the Rheometer head will notoperate properly.
Edited on 01/02/2019Page 3 of 5Sample loading-Raise the upper geometry to the loading gap either manually or through the software.Place your sample on the bottom plate or in the cup.- For the parallel plate or cone: put enough of your sample on the plate that when itlowers the sample squishes out from all sides.-Press the trim gap button in the softwareFor the parallel plate or cone plate, trim yoursample so that it is even with the edges of theupper plate, ideally leaving a perfect cylinder ofmaterial.-Go the the geometry gapClose the environmental test chamber doors if applicableFigure 4: Loading SampleExperimental setup-Click experiment in the bottom left corner- In the central window of Trios you will see three sections: Sample, Geometry, andProcedure.-Sample: allows the userto name their data file,add notes and changedirectory. All datashould be saved in theuser’s folder or subdirectory.-Geometry: Changes inthis section should bemade with care. Thereare many constants forparticular geometriesthat should never needto be changed. Unlessyou have specificpermission form thefacility manager, the only value that can be changed in this section is the measurementgap and this in general can only be Adjusted in the range of 500 and 2000µm-Under procedure you can choose what type of test you are running and otherparameters-The parameter options vary per testThere are some values that are limited-torque should not go above200 mN*m
Edited on 01/02/2019Page 4 of 5-Normal Force should not go above 50 NResults---The results screen should come up when you have started the experimentIf it doesn’t click Results on the bottom leftThere are three options for viewing the results can be found as tabs on the bottom ofthe page.-Experimental parametersSpreadsheetGraphSpreadsheet-You can edit the variables displayed in your spreadsheet by choosing SelectVariables on the top left-You can add equations to your spreadsheet by choosing Add User Column onthe top left and entering your equation , All possible variables and functions aregivenGraph--You can also adjust the variables shown on your graph-Choose select on the top left and choose your variables-For more variable options check Show extended list or Show uservariables on the lower leftAll of the Y values can have more than 1 variable associated with itAll of Y1 and Y3 are shown on the left and Y2 and Y4 are shown on therightTo overlay two graphs right click on the graph and click New Overlay Document-You then can drag the graphs you wish to overlay from the File Manageron the left to the overlay graphFinishing up--Make sure to clean the sample off the accessoriesTo uninstall the top accessory- Holding the accessory unscrew the draw rod, lift the draw rod and remove theaccessory.Make sure the accessories are thoroughly cleaned before putting them awayPlease be sure to set the temperature system idle when you done!!Make sure to save your resultsPlease log off the computer when finished
and cone plate; cup and rotor with options of a vaned or conical rotor; and a number of tribological accessories. Getting Started - . - Zero the rheometer by clicking the zero gap button in the trios software. NOTE: Make sure that there is nothing located on the lower plate and that the environmental test chamber doors are completely open or the Rheometer head will not operate properly. Page .